background image


To avoid falling off, you must slide the panel left and right to make sure the two hooks have 
been completely put into the rear of the two long frames! 


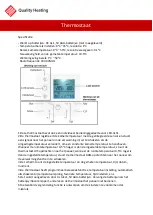
Thermostat


Specification


Battery-powered: DC 4x 1.5V AAA batteries (not included)


Set temperature range: 0

~ 45

, resolution: 1


Room temperature range: 0

~ 50

, display resolution: 0.1


Accuracy of the measured temperature: 

±

0.5


Working environment range 1

~ 50


Radio frequency 433.92MHz


1.


This thermostat also includes individual operation part for LED light.


2.


The thermostat acquires the room temperature with its integrated sensor and transmit signal to 
the  panel  to  turn  on/off  heating  as  the  ambient  temperature  changing,  in  order  to  maintain  a 
constant  room  temperature.  When  the  ROOM  temperature  is  0.5

  higher  than  the  SET 

temperature, thermostat will send OFF commands to panel; When the ROOM temperature is 0.5


lower than the SET temperature, thermostat will send ON commands to panel to turn on heating 
function.


9


Содержание QH-HH-L

Страница 1: ...QH HH L infrarood paneel ...

Страница 2: ...araat geeft aan dat het verboden is om verboden is om voorwerpen zoals handdoeken kleding enz boven of direct voor het apparaat te plaatsen Om oververhitting en brandgevaar te voorkomen mag het apparaat niet worden afgedekt Dit symbool op het apparaat duidt op gevaren voor het leven en de gezondheid van personen door een heet oppervlak Dit symbool op het apparaat geeft aan dat het verboden is om h...

Страница 3: ...ARSCHUWING EN VOORZORGSMAATREGELEN 2 FUNCTIES 3 TECHNISCHE INFORMATIE 4 LEVERINGSOMVANG 5 OPBOUW 6 INSTALLATIE 7 THERMOSTAAT 8 PROBLEMEN OPLOSSEN 9 ONDERHOUD EN SERVICE 10 OPSLAG 11 TECHNISCHE BIJLAGE 12 AFVOEREN ...

Страница 4: ... manier te gebruiken en de gevaren begrijpen Kinderen mogen niet met het apparaat spelen Reiniging en onderhoud door de gebruiker mogen niet zonder toezicht door kinderen worden uitgevoerd Kinderen jonger dan 3 jaar moeten uit de buurt worden gehouden tenzij ze onder voortdurend toezicht staan Kinderen van 3 jaar tot 8 jaar mogen het apparaat alleen aan en uitzetten als het in de beoogde normale g...

Страница 5: ...dens gebruik niet onbeheerd achter Zorg ervoor dat alle elektrische kabels buiten het apparaat beschermd zijn tegen beschadiging bijvoorbeeld door dieren Gebruik het apparaat nooit als de elektrische kabels of de stroomaansluiting beschadigd zijn De elektrische aansluiting moet overeenkomen met de specificaties in het hoofdstuk Technische gegevens Gebruik het apparaat niet als het stopcontact of d...

Страница 6: ...r Maat mm Stroom W Voltage Frequentie Nominaal Stroom HH0606L 655 630 35 400W 230V 50Hz 1 7A HH1006L 1080 630 35 700W 3A HH1206L 1280 630 35 840W 3 6A Leveringsomvang A 1 x verwarmingsapparaat B 4 x schroeven C 4 x pluggen D 2 x hangelementen 1 x thermostaat 1 x handleiding Verwarmingselement Carbon Verwarming Ver infrarood verwarming Ingangsspanning 220 240V 50Hz Oppervlaktetemperatuur 130 150 C ...

Страница 7: ...enoeg is Verwijder de beschermfolie aan de voorkant voor gebruik Het netsnoer moet goed geaard zijn 1 Boor vier gaten in het plafond met de juiste afstand A en afstand B Gebruik een 8 mm draaibit om te voorkomen dat het paneel valt Paneelgrootte mm Gatenafstanden van schroeven mm 655 630 of vergelijkbaar A495 B100mm 1080 630 of vergelijkbaar A495 B300mm 1280 630 of vergelijkbaar A495 B300mm ...

Страница 8: ...achterkant van het rechter lange frame in de andere haak te maken Opmerking 1 Haken zijn alleen voor de twee lange frames niet voor de twee korte 2 Zorg ervoor dat de haken tussen de twee limietschroeven zitten Om te voorkomen dat het paneel valt moet je het paneel naar links en naar rechts schuiven om er zeker van te zijn dat de twee haken volledig in de achterkant van de twee lange frames zitten...

Страница 9: ...n Wanneer de ruimtetemperatuur 0 5 hoger is dan de ingestelde temperatuur stuurt de thermostaat UIT opdrachten naar het paneel wanneer de ruimtetemperatuur 0 5 lager is dan de ingestelde temperatuur stuurt de thermostaat AAN opdrachten naar het paneel om de verwarmingsfunctie in te schakelen 3 Het scherm toont de ingestelde temperatuur en de gemeten temperatuur tijd datum modi enz 4 De thermostaat...

Страница 10: ...naar 5 4 Druk op de knop ON Off voor de thermostaat om het verwarmingsvermogen in of uit te schakelen 5Druk 3 seconden lang op LOCK om de knoppen te vergrendelen ontgrendelen 6 Druk op de knop om de meeteenheid van het temperatuurdisplay om te zetten 7 Druk lang op TIME 3 seconden om jaar maand datum en tijd in te stellen met de UP en DOWN knoppen 8 Druk op UP en DOWN om de gewenste temperatuur in...

Страница 11: ...fde manier instellen Stap 6 Nadat u klaar bent met het instellen van Programma drukt u op de SET knop om het volgende op te roepen Herhaal stap 2 5 om Programma van de weekenden in te stellen 2 1 7 programmeermodus Je kunt de thermostaat elke dag programmeren met het instellen van 2 groepen tijd interval per dag instellen In de modus 1 7 houdt u de knop SET 3 5 seconden ingedrukt totdat het pictog...

Страница 12: ... tijdens het inschakelen Opmerkingen 1 Alle instellingen moeten opnieuw worden ingesteld nadat de batterij is vervangen 2 Alkalinebatterij wordt aanbevolen Als ALLE knoppen op de thermostaat niet werken probeer dan de batterijen te vervangen 3 Vervang de batterijen door nieuwe zodra het batterijsymbool op het scherm symbool gaat knipperen anders kan dit ertoe leiden dat de thermostaat stopt stopt ...

Страница 13: ...er zonder stekker wordt geleverd moet u het circuit uitschakelen voordat u het aansluit Raak de stekker of het netsnoer niet aan met natte of vochtige handen Houd de stekker vast terwijl u het netsnoer uit het stopcontact trekt Laat het apparaat volledig afkoelen Tasks which require the housing to be opened must only be carried out by authorized specialist companies Dompel het apparaat nooit onder...

Страница 14: ...timer no electronic room temperature control plus week timer yes Other control options multiple selections possible room temperature control with presence detection no room temperature control with open window detection no with distance control option no with adaptive start control yes with working time limitation no with black bulb sensor no Afvoeren Het pictogram met de doorgekruiste afvalbak op...

Страница 15: ...QH HH L infrared panel ...

Страница 16: ...n the device indicates that it is prohibited to place objects such as towels clothes etc above or directly in front of the device In order to avoid overheating and fire hazards the device must not be covered This symbol located on the device indicates dangers to the life and health of persons due to hot surface This symbol located on the device indicates that it is prohibited to spray the device T...

Страница 17: ...nt 1 WARNING PRECAUTION 2 FEATURES 3 TECHNICAL INFORMATION 4 SCOPE OF SUPPLY 5 DEVICE STRUCTURE 6 INSTALLATION 7 THERMOSTAT 8 TROUBLESHOOTING 9 MAINTENANCE SERVICING 10 STORAGE 11 TECHNICAL ANNEX 12 DISPOSAL ...

Страница 18: ... involved Children shall not play with the appliance Cleaning and user maintenance shall not be made by children without supervision Children of less than 3 years should be kept away unless continuously supervised Children aged from 3 years and less than 8 years shall only switch on off the appliance provided that it has been placed or installed in its intended normal operating position and they h...

Страница 19: ...very use of the device Do not use any defective devices or device parts Ensure that all electric cables outside of the device are protected from damage e g caused by animals Never use the device if electric cables or the power connection are damaged The electrical connection must correspond to the specifications in chapter Technical data Do not use the device when the socket or wire overloaded Obs...

Страница 20: ...thy heating system for any domestic users These devices can reduce air circulation and help to maintain a clean silent dust free environment A wide range of devices available in a huge choice of colors sizes and styles Technical information Heating element Carbon Heating way Far infrared heating Input Voltage 220 240V 50Hz Surface temperature Main 130 150 C Frame Aluminum Over heating protection Y...

Страница 21: ... Installation Warning Mounting work must be carried out by professional electrician Do not suspend panels by heating power cord No any sticking ways are allowed to be used for hanging or suspending support Make sure the ceiling is stable enough Do remove the front protective film before using Power cord must be well grounded ...

Страница 22: ...495 B300mm 1280 630 or similar A495 B300mm 2 2 Mount the two hanging units onto ceiling with screws and turn the screws to the end tightly this is very important 3 Push the rear of the left long frame into the hook and then push back to make the rear of the right long frame into the other hook Note 1 Hooks are for the two long frames only not the two short ones 2 Make sure the hooks are between th...

Страница 23: ...ronment range 1 50 Radio frequency 433 92MHz 1 This thermostat also includes individual operation part for LED light 2 The thermostat acquires the room temperature with its integrated sensor and transmit signal to the panel to turn on off heating as the ambient temperature changing in order to maintain a constant room temperature When the ROOM temperature is 0 5 higher than the SET temperature the...

Страница 24: ...ch you don t want to pair 2 Press ON Off button for LED light to turn on off the led light surrounding the panel and long press to switch light color for some models only 3 Press to adjust the brightness short press can adjust brightness to 100 75 50 and 25 long press can adjust from 100 to 5 4 Press ON Off button for thermostat to turn on off the heating power 5 Long press LOCK 3 seconds to lock ...

Страница 25: ...ner Step 6 After finishing setting Program press the SET button to bring up SAT and SUN setting repeat step 2 5 to set Program of weekends 2 1 7 Programming Mode You can program the thermostat everyday with setting 2 groups of time interval per day Once in 1 7 Mode Press and hold the SET button for 3 5 seconds until Program icon and MON is displayed with ON and Time icon flashing on screen users c...

Страница 26: ...ress any button in the state of power on Notes 1 All settings need to be re set after battery replacement 2 Alkaline battery is recommended If ALL buttons on the thermostat are not working try replacing the batteries 3 Please do change the batteries with new ones once the screen battery symbol gets flashing or else it may result in halted stuck not working 4 Check if set temperature is higher enou...

Страница 27: ...wer cord comes without plug disconnect the circuit before connecting it Do not touch the mains plug or power cord connection with wet or damp hands Hold onto the mains plug while pulling the power cable out of the mains socket Allow the device to cool down completely Warning of electrical voltage Tasks which require the housing to be opened must only be carried out by authorized specialist compani...

Страница 28: ...ve effects for the environment and human health caused by the disposal of hazardous substances potentially contained in the equipment Item Unit Type of heat input for electric storage local space heaters only select one manual heat charge control with integrated thermostat N A manual heat charge control with room and or outdoor temperature feedback N A electronic heat charge control with room and ...

Страница 29: ...QH HH L infrarot panel ...

Страница 30: ...Gerät weist darauf hin dass es verboten ist Gegenstände wie Handtücher Kleidung usw über oder direkt vor dem Gerät abzulegen Um Überhitzung und Brandgefahr zu vermeiden darf das Gerät nicht abgedeckt werden Dieses Symbol auf dem Gerät weist auf Gefahren für das Leben und die Gesundheit von Personen hin die von einer heißen Oberfläche ausgehen Dieses Symbol auf dem Gerät weist darauf hin dass das B...

Страница 31: ... WARNUNG UND VORSICHTSMASSNAHMEN 2 FUNKTIONEN 3 TECHNISCHE INFORMATIONEN 4 LIEFERUMFANG 5 BAUWEISE 6 INSTALLATION 7 THERMOSTAT 8 FEHLERBEHEBUNG 9 WARTUNG UND SERVICE 10 OPSLAG 11 TECHNISCHER ANHANG 12 DISPOSAL ...

Страница 32: ...t Kinder im Alter von 3 bis 8 Jahren dürfen das Gerät nur dann ein und ausschalten wenn es in der für den normalen Gebrauch vorgesehenen Position aufgestellt oder installiert ist und sie beaufsichtigt werden oder Anweisungen zum sicheren Gebrauch des Geräts erhalten haben und die Gefahren verstehen Kinder ab 3 Jahren und unter 8 Jahren dürfen das Gerät nicht anschließen regulieren reinigen oder Wa...

Страница 33: ...ät niemals wenn die elektrischen Kabel oder der Stromanschluss beschädigt sind Der elektrische Anschluss muss den Angaben im Abschnitt Technische Daten entsprechen Benutzen Sie das Gerät nicht wenn die Steckdose oder das Kabel überlastet ist Achten Sie bei der Auswahl der Verlängerungskabel auf die Leistungsaufnahme des Gerätes die Kabellänge und den Verwendungszweck Wickeln Sie Verlängerungskabel...

Страница 34: ...atie Modellnum mer Größe mm Aktuell W Spannung Frequenz Nennwert Strom HH0606L 655 630 35 400W 230V 50Hz 1 7A HH1006L 1080 630 35 700W 3A HH1206L 1280 630 35 840W 3 6A Umfang der Lieferung A 1 x Heizgerät B 4 x Schrauben C 4 x Dübel D 2 x Oberschränke 1 x Thermostat 1 x Gebrauchsanweisung Heizelement Carbon Heizung Fern Infrarot Heizung Eingangsspannung 220 240V 50Hz Oberflächentemperatur 130 150 ...

Страница 35: ... die Schutzfolie auf der Vorderseite vor dem Gebrauch Das Netzkabel muss ordnungsgemäß geerdet sein 1 Bohren Sie vier Löcher mit dem richtigen Abstand A und Abstand B in die Decke Verwenden Sie einen 8 mm Drehmeißel damit die Platte nicht herunterfällt Plattengröße mm Lochabstände der Schrauben mm 655 630 oder ähnlich A495 B100mm 1080 630 oder ähnlich A495 B300mm 1280 630 oder ähnlich A495 B300mm ...

Страница 36: ...eite des rechten langen Rahmens in den anderen Haken zu machen Hinweis 1 die Haken sind nur für die beiden langen Rahmen nicht für die beiden kurzen 2 stellen Sie sicher dass sich die Haken zwischen den beiden Begrenzungsschrauben befinden Um ein Herunterfallen der Platte zu verhindern schieben Sie die Platte nach links und rechts um sicherzustellen dass die beiden Haken vollständig in die Rücksei...

Страница 37: ...ie Raumtemperatur 0 5 niedriger als die eingestellte Temperatur ist sendet der Thermostat EIN Befehle an das Bedienfeld um die Heizfunktion einzuschalten 3 das Display zeigt die eingestellte Temperatur und die gemessene Temperatur die Zeit das Datum die Modi etc 4 der Thermostat verfügt über programmierbare Wochenfunktionen Temperatureinstellung automatische Abschaltung bei Temperatursprung bevorz...

Страница 38: ...ücken um Jahr Monat Datum und Uhrzeit mit den Tasten UP und DOWN einzustellen 8 drücken Sie UP und DOWN um die gewünschte Temperatur einzustellen Auch während der Einschaltzeit des Wochentimers kann der Benutzer mit UP und DOWN eine temporäre Temperatur einstellen die beim nächsten TIMER ON in die Zieltemperatur der Woche umgewandelt wird 9 3 Sekunden lang auf FAV drücken bis das Symbol für die ei...

Страница 39: ...e können den Thermostat jeden Tag programmieren indem Sie 2 Zeitgruppen einstellen Einstellungsintervall pro Tag Halten Sie im 1 7 Modus die SET Taste 3 5 Sekunden lang gedrückt bis das Programm und das MON Symbol angezeigt werden und das ON Symbol und das Zeitsymbol auf dem Bildschirm blinken Die Benutzer können die obigen Schritte 2 4 befolgen um die Ein Aus Zeit und die gewünschte Temperatur de...

Страница 40: ...1 Alle Einstellungen müssen nach dem Batteriewechsel zurückgesetzt werden 2 eine Alkalibatterie wird empfohlen Wenn ALLE Tasten des Thermostats nicht funktionieren versuchen Sie die Batterien auszutauschen 3 ersetzen Sie die Batterien durch neue sobald das Batteriesymbol auf dem Display Andernfalls kann dies dazu führen dass der Thermostat anhält ausfällt nicht funktioniert 4 Überprüfen Sie zunäch...

Страница 41: ...ohne Stecker geliefert wird unterbrechen Sie den Stromkreis bevor Sie es anschließen Berühren Sie den Stecker oder das Netzkabel nicht mit nassen oder feuchten Händen Halten Sie den Stecker fest während Sie das Netzkabel abziehen Lassen Sie das Gerät vollständig abkühlen Arbeiten die das Öffnen des Gehäuses erfordern dürfen nur von autorisierten Fachbetrieben durchgeführt werden Tauchen Sie das Ge...

Страница 42: ...re feedback N A electronic heat charge control with room and or outdoor temperature feedback N A fan assisted heat output N A Type of heat output room temperature control select one single stage heat output and no room temperature control no Two or more manual stages no room temperature control no with mechanic thermostat room temperature control no with electronic room temperature control no elec...

Страница 43: ...ose Rückgabe von Elektro und Elektronik Altgeräten Die Adressen erhalten Sie bei Ihrer Stadt oder Gemeindeverwaltung Die getrennte Sammlung von Elektro und Elektronik Altgeräten soll die Wiederverwendung das Recycling und andere Formen der Verwertung von Altgeräten ermöglichen und negative Auswirkungen auf die Umwelt und die menschliche Gesundheit durch die Entsorgung von gefährlichen Stoffen die ...

Отзывы: