background image

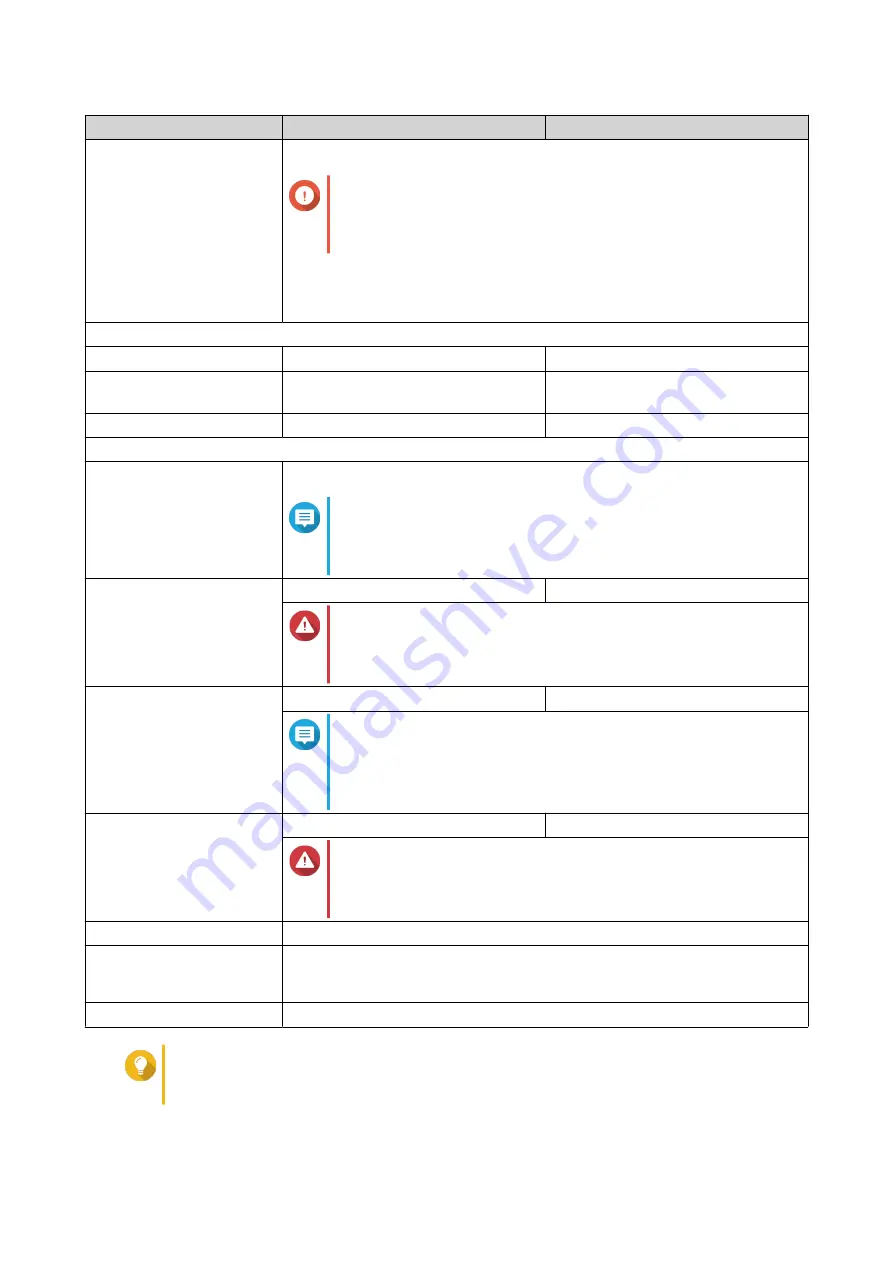
Component

TL-R400S

TL-R1200S-RP

Switches

• Power

Important

QNAP recommends waiting at least two seconds after
powering off the JBOD enclosure before powering it on
again.

• Fan speed

• Audio alert

Dimensions
Form factor

1U Rackmount

2U Rackmount

Dimensions (H x W x D)

4.39 x 43.89 x 29.11 mm
(1.73 x 17.28 x 11.46 in)

89 x 482 x 534 mm
(3.50 x 18.98 x 21.02 in)

Net weight

3.66 kg (8.06 lbs)

6.17 kg (13.6 lbs)

Other
Rail compatibility

Rail-B02

Note

Rail kits are not included with the NAS and must be
purchased separately. For details, contact an authorized
reseller or go to 

http://shop.qnap.com

.

Power supply unit

100W, 100-240V AC, 50/60 Hz

250W, 100-240V AC, 50/60 Hz

Warning

To reduce the risk of fire or electric shock, ensure that you
only connect the power cord to a properly grounded
electrical outlet.

Sound level

22.1 db(A)

33.7 db(A)

Note

The sound level was tested at a bystander position, which is
within one meter of the JBOD enclosure. The test device
operated at low speed with the maximum number of drives
installed.

Fans

System: 2 x 4 cm, 12V DC smart fan

System: 2 x 7 cm, 12V DC smart fan

Warning

To avoid potential injury or damage to the components, do
not touch the fans while the device is connected to a power
source.

Operating temperature

0˚C to 40˚C (32˚F to 104˚F)

Relative humidity

• Non-condensing relative humidity: 5% to 95%

• Wet-bulb temperature: 27˚C (80.6˚F)

Security slot

Kensington security slot

Tip

Model specifications are subject to change without prior notice. To see the latest
specifications, go to 

https://www.qnap.com

.

QNAP JBOD Enclosure - TL-R400S/TL-R1200S-RP User Guide

Product Overview   

5

Содержание TL-R400S

Страница 1: ...JBOD Enclosure TL R400S TL R1200S RP User Guide Document Version 2 20 02 2020...

Страница 2: ...ves on 3 5 inch Trays 16 Installing Handles 18 Connecting the JBOD Enclosure to a NAS 19 Connecting the JBOD Enclosure to a Server 21 Hot Swapping Redundant Power Supply Units 22 Rail Kits 24 4 Basic...

Страница 3: ...SJ T 11364 2006 39 2...

Страница 4: ...hat the user has a basic understanding of storage and backup concepts Document Conventions Symbol Description Notes provide default configuration settings and other supplementary information Important...

Страница 5: ...tenance procedures on the product by you or an unauthorized third party invalidates the warranty QNAP is not responsible for any damage or data loss caused by unauthorized modifications and installati...

Страница 6: ...ic shock ensure that you only connect the power cord to a properly grounded electrical outlet Sound level 22 1 db A 33 7 db A Note The sound level was tested at a bystander position which is within on...

Страница 7: ...bus adapter TL R400S QXP 400eS A1164 TL R1200S RP QXP 1600eS Screws for 2 5 inch drives TL R400S 12 TL R1200S RP 36 Screws for 3 5 inch drives TL R400S 16 TL R1200S RP 48 Quick Installation Guide QIG...

Страница 8: ...LEDs 3 Link LED 2 Status LED 4 Fan error LED Rear Panel TL R400S No Component No Component 1 Audio alert switch 4 Power switch 2 Fan speed switch 5 Kensington security slot QNAP JBOD Enclosure TL R40...

Страница 9: ...Component No Component 1 Fan speed switch 5 Audio alert switch 2 SFF 8088 port drive bays 1 4 6 Power switch 3 SFF 8088 port drive bays 5 8 7 Power supply unit 1 4 SFF 8088 port drive bays 9 12 8 Powe...

Страница 10: ...Drive Numbering TL R400S TL R1200S RP QNAP JBOD Enclosure TL R400S TL R1200S RP User Guide Product Overview 9...

Страница 11: ...s to the device Hardware and peripherals NAS or computer Storage drives Tip For the list of compatible drive models go to https www qnap com compatibility One or more SF 8088 connector cables Host bus...

Страница 12: ...s Installing Solid State Drives on 3 5 inch Trays 4 Connect the power cord 5 Connect the JBOD enclosure to your NAS or server For details see the following topics Connecting the JBOD Enclosure to a NA...

Страница 13: ...h Drives on 3 5 inch Trays Warning Observe electrostatic discharge ESD procedures to avoid damage to components 1 Power off the JBOD enclosure 2 Remove a drive tray a Pull the handle to release the tr...

Страница 14: ...4 Load the tray into the drive bay a Insert the tray into the bay b Push the handle 5 Power on the JBOD enclosure QNAP JBOD Enclosure TL R400S TL R1200S RP User Guide Hardware Installation 13...

Страница 15: ...mage to components 1 Power off the JBOD enclosure 2 Remove a drive tray a Pull the handle to release the tray b Pull the tray out 3 Install a drive on the tray a Place the drive on the tray so that th...

Страница 16: ...4 Load the tray into the drive bay a Insert the tray into the bay b Push the handle 5 Power on the JBOD enclosure QNAP JBOD Enclosure TL R400S TL R1200S RP User Guide Hardware Installation 15...

Страница 17: ...amage to components 1 Power off the JBOD enclosure 2 Remove a drive tray a Pull the handle to release the tray b Pull the tray out 3 Install a drive on the tray a Place the drive on the tray so that t...

Страница 18: ...4 Load the tray into the drive bay a Insert the tray into the bay b Push the handle 5 Power on the JBOD enclosure QNAP JBOD Enclosure TL R400S TL R1200S RP User Guide Hardware Installation 17...

Страница 19: ...acket a Align the openings on the handle with the two round screw holes on the angle bracket b Attach the screws to lock the handle to the angle bracket 3 Install the angle bracket on the JBOD enclosu...

Страница 20: ...one or more SFF 8088 connector cables to the SFF 8088 or SFF 8644 ports on the host bus adapter installed in the NAS Note Refer to the hardware installation section of the NAS user guide for instructi...

Страница 21: ...S 6 Verify that the JBOD enclosures are recognized by the NAS a Log on to QTS as administrator b Go to Main Menu Storage Snapshots Overview Storage c Verify that the JBOD enclosures are listed QNAP JB...

Страница 22: ...SFF 8088 connector cables to the SFF 8088 or SFF 8644 ports on the host bus adapter installed in the NAS Note Refer to the hardware installation section of the NAS user guide for instructions on inst...

Страница 23: ...download QNAP JBOD Manager go to https download qnap com b Verify that the JBOD enclosure is listed Hot Swapping Redundant Power Supply Units Warning The NAS may have one or more power supply unit PSU...

Страница 24: ...the PSU out 4 Insert the new PSU 5 Connect the power cord to the PSU and the electrical outlet 6 Power on the NAS 7 Enable alerts for PSU failures a Log on to QTS as administrator b Go to Control Pane...

Страница 25: ...L B02 Rail kits are not included with the JBOD enclosure and must be purchased separately For details contact an authorized reseller or go to http shop qnap com You can find installation information i...

Страница 26: ...BOD enclosure is connected to a host device Off The JBOD enclosure is not connected to a host device Fan Red The system fan is not functioning Drive Green The JBOD enclosure is powered on The drive ca...

Страница 27: ...and 69 C using QNAP JBOD Manager The temperature critical threshold is 70 C Fan Speed Switch The rear panel of the JBOD enclosure includes a fan speed switch for manually configuring the speed of the...

Страница 28: ...the following situations RAID 1 One member drive fails RAID 5 One member drive fails RAID 10 One member drive fails Two member drives fail RAID 50 One member drive per disk subgroup fails RAID 60 Two...

Страница 29: ...ins the new drive and then verify that the status is Rebuilding Support and Other Resources QNAP provides the following resources Resource URL Documentation https docs qnap com Service Portal https se...

Страница 30: ...ility for Windows Linux and macOS that allows you to view and configure QNAP JBOD enclosures Storage Snapshots QTS utility that allows you to view and configure QNAP JBOD enclosures connected to a QNA...

Страница 31: ...rranty or representation expressed implied or statutory with respect to its products or the contents or use of this documentation and all accompanying software and specifically disclaims its quality p...

Страница 32: ...he GPL to prohibit the practice for those products If such problems arise substantially in other domains we stand ready to extend this provision to those domains in future versions of the GPL as neede...

Страница 33: ...esponding Source need not include anything that users can regenerate automatically from other parts of the Corresponding Source The Corresponding Source for a work in source code form is that same wor...

Страница 34: ...h it such as to form a larger program in or on a volume of a storage or distribution medium is called an aggregate if the compilation and its resulting copyright are not used to limit the access or le...

Страница 35: ...transaction in which the right of possession and use of the User Product is transferred to the recipient in perpetuity or for a fixed term regardless of how the transaction is characterized the Corre...

Страница 36: ...pt as expressly provided under this License Any attempt otherwise to propagate or modify it is void and will automatically terminate your rights under this License including any patent licenses grante...

Страница 37: ...or commitment not to enforce a patent against the party If you convey a covered work knowingly relying on a patent license and the Corresponding Source of the work is not available for anyone to copy...

Страница 38: ...Free Software Foundation If the Program specifies that a proxy can decide which future versions of the GNU General Public License can be used that proxy s public statement of acceptance of a version p...

Страница 39: ...provide reasonable protection against harmful interference when the equipment is operated in a commercial environment This equipment generates uses and can radiate radio frequency energy and if not i...

Страница 40: ...RoHS RoHS Pb Hg Cd CR VI PBB PBDE 0 0 0 0 0 0 0 0 0 0 0 0 0 0 0 0 0 0 0 0 0 0 0 0 0 0 0 0 0 0 0 0 0 0 0 0 0 0 0 0 0 0 0 0 0 0 0 0 O SJ T11363 2006 X SJ T11363 2006 QNAP JBOD Enclosure TL R400S TL R120...

Отзывы: