background image

Optional Feeder

4-11

Printer Options

3

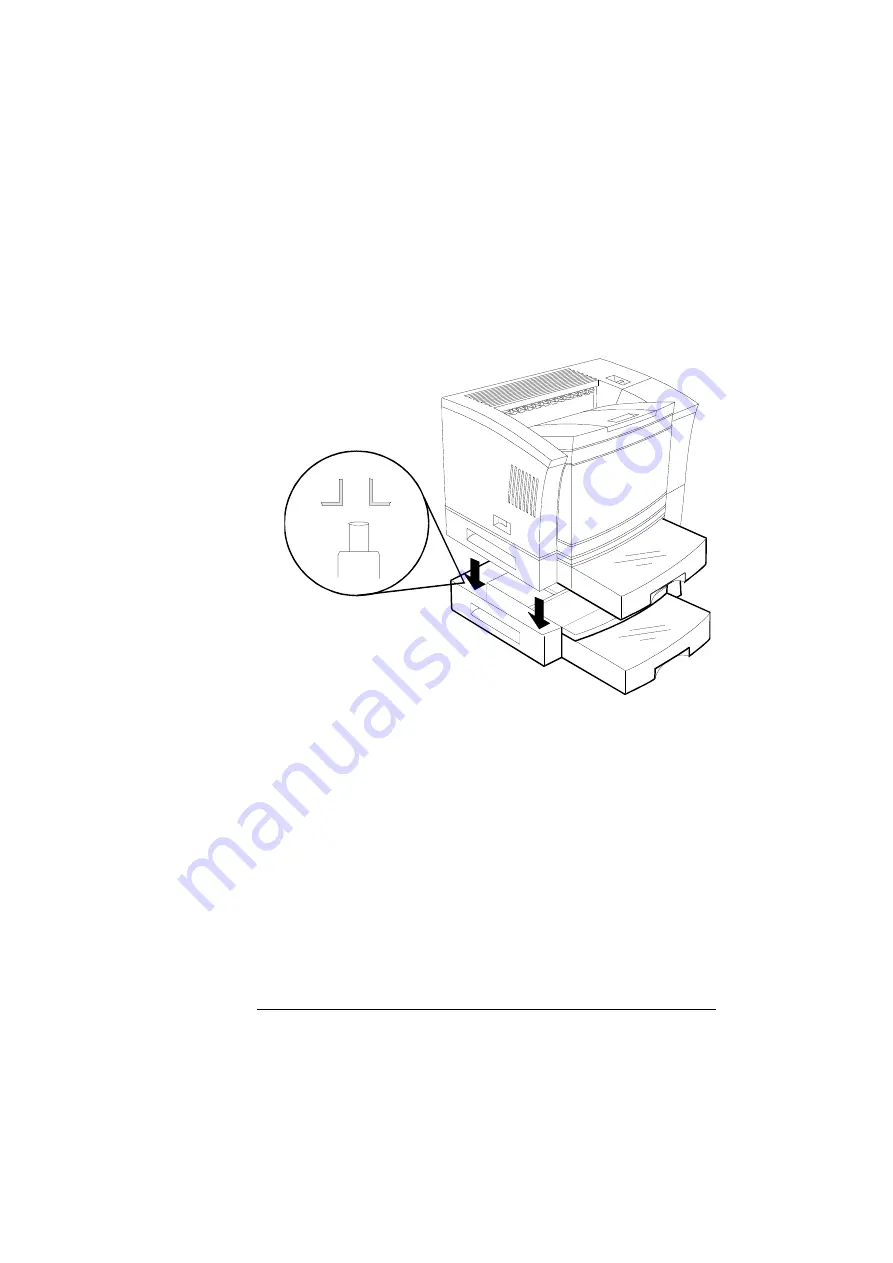
Using the carrying grips located on the sides of the standard 
feeder, set the printer and standard feeder on the optional 
feeder, using the coupling pins as guides.

»

Note: Align the printer over the pins on the optional feeder, and 
set the printer down on the optional feeder so that the three 
positioning posts on the optional feeder fit into the holes on the 
printer’s bottom. Ensure that the printer and the optional feeder 
are securely seated. 

4

Reconnect the interface cables, plug in the power cord, and 
turn the printer back on.

If you experience problems, check the order of the paper feeders 
in the stack, making sure that the optional paper feeder’s connec-
tor is correctly aligned with the pins on top of the standard paper 
feeder. 

5

Load the optional cassette, using the directions in “Refilling 
the Media Cassette” on page 2-45.

»

Note: In the printer driver this cassette is called the lower tray.

Содержание 2060 WX

Страница 1: ...1800457 001 QMS 2060 WX Print System User s Guide...

Страница 2: ...ithout the express written permission of QMS Inc Copyright Notice This manual is Copyrighted 1997 by QMS Inc One Magnum Pass Mobile AL 36618 All Rights Reserved This manual may not be copied in whole...

Страница 3: ...bout This Manual 1 2 Typographic Conventions 1 4 2 Printing Introduction 2 2 Configuring the Windows 95 Printer Driver 2 2 Setting the Printer Driver Defaults 2 2 Configuring the Printer Driver for th...

Страница 4: ...2 38 Sharing Someone Else s Printer 2 40 Using a Network Print Monitor 2 40 About the QMS Network Print Monitor 2 40 Components 2 41 Using the Network Print Monitor 2 42 Refilling the Media Cassette 2...

Страница 5: ...e Configuration Menu 3 8 Selecting Configuration Menu Options 3 8 Setting the Message Window Language 3 9 Setting Energy Conservation 3 10 Setting the Internet Address 3 10 Setting the Subnet Mask 3 1...

Страница 6: ...ndows 95 Printer Driver 4 20 Windows NT Printer Driver 4 21 5 Maintenance Introduction 5 2 Handling the Printer 5 2 About Toner Cartridges 5 4 Toner Cartridge Life 5 4 Ordering Toner Cartridges 5 4 Ha...

Страница 7: ...oubleshooting Quick Check 7 11 Performing a Board Test 7 13 Accessing Page Count 7 14 Media Jams 7 15 Locating Print Media Jams 7 15 Clearing a Media Jam Inside the Printer 7 16 Clearing Cassette Area...

Страница 8: ...for Windows 95 7 34 Placing a Service Call 7 35 A QMS Customer Support Sources of Support A 2 Your QMS Vendor A 2 Your Application Vendor A 2 Q FAX A 2 The QMS Corporate Bulletin Board System A 3 Comp...

Страница 9: ...gulatory B 10 FCC Compliance Statement B 10 Canadian Users Notice B 11 Laser Safety B 12 Power Cord B 12 Warranty Considerations B 12 Consumables and Your Warranty B 12 Electrostatic Discharge and You...

Страница 10: ......

Страница 11: ...1 Introduction In This Chapter n About the Documentation on page 1 2 n About This Manual on page 1 2 n Typographic Conventions on page 1 4...

Страница 12: ...ect it to a PC via the parallel or Ethernet interface and install the Windows 95 or Windows NT printer drivers QMS 2060 WX Print System User s Guide You re looking at this document right now The follo...

Страница 13: ...ng Interprets printer and QMS Network Print Monitor status messages explains how to remove a media jam discusses various output problems and describes how to install the printer driver manually A QMS...

Страница 14: ...ormed exactly as described in the manual ACHTUNG Bitte halten Sie sich exakt an die im Handbuch beschriebene Vorgehensweise da sonst Verletzungsgefahr bestehen k nnte v Mixed Case Courier Text you typ...

Страница 15: ...n page 2 12 n Sharing a printer on page 2 36 n Using the QMS Network Print Monitor on page 2 40 n Refilling the media cassette on page 2 45 n Printing on different types of media page 2 57 n Imageable...

Страница 16: ...omplete information Setting the Printer Driver Defaults Note Changes you make here apply to all documents However any changes you make through your application override these settings 1 Open the print...

Страница 17: ...made through the Printers window 1 From the application s File menu choose Print or in some cases Print Setup or Page Setup 2 In the Print Print Setup or Page Setup dialog box select the QMS 2060 WX...

Страница 18: ...2060 WX Print System User s Guide 2 4 Configuring Paper Options The Paper tab allows you to provide information about the type and location of the media you want to print on Each option and button is...

Страница 19: ...0 A4 LEF 11 69 x 8 27 297 0 x 210 0 A5 5 85 x 8 27 148 5 x 210 0 B4 JIS 10 12 x 14 33 257 0 x 364 0 B5 JIS 7 17 x 10 12 182 0 x 257 0 C5 6 38 x 9 02 162 0 x 229 0 Envelope 6 93 x 9 76 176 0 x 248 0 En...

Страница 20: ...nting direction of the print media Choices Portrait Printing along the short edge of the page Landscape Printing along the long edge of the page Default Portrait Notes Portrait Letter A4 LEF is the sa...

Страница 21: ...ws you to save your changes and exit from the Properties window Cancel Button The Cancel button allows you to cancel your changes and exit from the Properties window Purpose Sets the type of media to...

Страница 22: ...nting Choices None Simplex printing Flip on Long Edge Duplex printing with the pages flipped along the long edge Flip on Short Edge Duplex printing with the pages flipped along the short edge Default...

Страница 23: ...ts button allows you to reset all of the selections on the Paper tab to their default settings OK Button The OK button allows you to save your changes and exit from the Paper More Options window Cance...

Страница 24: ...QMS 2060 WX Print System User s Guide 2 10 Configuring Graphics Options The Graphics tab allows you to provide information on how the text and images in your job will be printed Each option and butto...

Страница 25: ...rpest possi ble text and line art Dithering Dithering a technique for placing dots allows the printer to create halftones in which areas of print appear to contain many different val ues and densities...

Страница 26: ...Button The Cancel button allows you to cancel your changes and exit from the Properties window Configuring the Windows NT 4 0 Printer Driver This section explains how to configure the QMS 2060 WX Prin...

Страница 27: ...in the QMS 2060 WX Properties window General Ports Scheduling Sharing Security and Device Settings For information on all the tabs except Device Settings refer to your Windows NT 4 0 documentation Fo...

Страница 28: ...s Note Any changes you make here apply only to the current document These changes override any settings you made through the Default Document Properties window 1 From the application s File menu choos...

Страница 29: ...S 2060 WX Properties dia log box The QMS 2060 WX Device Settings tree has two branches n Form To Tray Assignment Upper Paper tray Manual Paper feed Lower Paper tray and Printer Default n Halftone Setu...

Страница 30: ...as Microsoft Word that display media icons in the Page Setup dialog box Choosing the page size first will yield unexpected results Purpose Assigns a specific form media size to a tray Choices See the...

Страница 31: ...ters 12x19 12 00 x 19 50 304 8 x 495 3 A3 11 69 x 16 53 297 0 x 420 0 A4 8 27 x 11 69 210 0 x 297 0 A4 LEF 11 69 x 8 27 297 0 x 210 0 A5 5 85 x 8 27 148 5 x 210 0 B4 JIS 10 12 x 14 33 257 0 x 364 0 B5...

Страница 32: ...box QMS has carefully set the default values of the parameters in the Device Color Halftone Properties dialog box to provide optimum performance with the QMS 2060 WX Unless you re an expert at handli...

Страница 33: ...greater range of grays or colors to be printed Enhanced cell patterns are optimized to produce greater resolution If your graphic prints with an unwanted pattern of lines or an unwanted moir pattern t...

Страница 34: ...el size based on the print resolution 1 52 1 900 Inch mode You adjust the pixel diameter based on the real pixel size For example 1 100 equals 0 01 Default DEVICE Notes The mode value or name appears...

Страница 35: ...Revert Button The Revert button allows you to reset all of the selections in the Device Color Halftone Properties window to the values in use when the window was opened OK Button The OK button allows...

Страница 36: ...r size paper source copy count and orientation of the media you want to print on Each option and button is explained in this section Note The Page Setup and Advanced tabs display in both the QMS 2060...

Страница 37: ...x 297 0 A4 LEF 11 69 x 8 27 297 0 x 210 0 A5 5 85 x 8 27 148 5 x 210 0 B4 JIS 10 12 x 14 33 257 0 x 364 0 B5 JIS 7 17 x 10 12 182 0 x 257 0 C5 6 38 x 9 02 162 0 x 229 0 Envelope 6 93 x 9 76 176 0 x 2...

Страница 38: ...oices Automatically Select Any cassette or tray that contains the requested media size Default Automatically Select Purpose Sets the number of copies to be printed Choices 1 999 Default 1 Copy Printer...

Страница 39: ...xit from the Document Properties window Cancel Button The Cancel button allows you to cancel your changes and exit from the Document Properties window Purpose Sets the orientation printing direction o...

Страница 40: ...tree form on three branches n Paper Output branch Paper Size Orientation Paper Source and Copy Count n Graphic branch Resolution n Document Options branch Media and Metafile Spooling Beside each opti...

Страница 41: ...ng Note The Page Setup and Advanced tabs display in both the QMS 2060 WX Default Document Properties and the QMS 2060 WX Document Properties dialog boxes Since the tabs are the same in both dialog box...

Страница 42: ...16 53 297 0 x 420 0 A4 8 27 x 11 69 210 0 x 297 0 A4 LEF 11 69 x 8 27 297 0 x 210 0 A5 5 85 x 8 27 148 5 x 210 0 B4 JIS 10 12 x 14 33 257 0 x 364 0 C5 6 38 x 9 02 162 0 x 229 0 Envelope 6 93 x 9 76 1...

Страница 43: ...per Output Purpose Sets the orientation printing direction of the print media Choices Portrait Printing along the short edge of the page Landscape Printing along the long edge of the page Default Port...

Страница 44: ...iver defaults If you re configuring the printer for the current print job set the number of copies in the Print dialog box Branch Graphic Purpose Sets the printing resolution Choices 600 dots per inch...

Страница 45: ...ment Options Purpose Sets the format in which printing information is stored while a print job is waiting Choices Off Turns off metafile spooling On Turns on metafile spooling Default On Notes General...

Страница 46: ...ment is located under the Document Options branch When Halftone Color Adjustment is selected the Halftone Color Adjustment window displays Each option and button on this window is explained in detail...

Страница 47: ...the intensity of the light in your picture Range 100 darkest to 100 lightest Default 0 Purpose Adjusts images that are too dark Choices Unchecked Does not adjust image Checked Lightens the colors in...

Страница 48: ...ference point and decreasing the value of the white reference point increases the contrast but narrows the range of midtones Purpose Corrects for unbalanced brightness of the input image by adjusting...

Страница 49: ...the graphic that is being used as a test picture Purpose Set various attributes of the test picture Choices View When selected checked displays a test picture Maximize When checked maximizes the test...

Страница 50: ...file so that you can see how your changes affect color A standard Windows NT File Open dialog with a Select a Test Picture prompt will display Save As Button The Save As button saves the graphic file...

Страница 51: ...Network Service window select Microsoft and then select the File and Print sharing entry that matches your network g Choose the OK button and follow the instructions h Restart your computer for the c...

Страница 52: ...icon 3 From the File menu choose Properties 4 From the Properties dialog box choose the Sharing tab 5 After the Sharing tab displays select Shared 6 In the Share Name edit box type the name of the pri...

Страница 53: ...C Windows 95 QMS 2060 WX The QMS 2060 WX printer driver must be installed on the server Client PCs supported are Windows 95 and Windows NT 4 0 configured Client PC The QMS 2060 WX printer requesting c...

Страница 54: ...95 and Windows NT 4 0 control the printing environment for both local and remote print jobs submitted through shared resources The manual on each software disk contains complete information on using...

Страница 55: ...printer such as print job go nogo and error or warning conditions Status APPLICATION PRINT QUEUE PRINT QUEUE PRINT QUEUE PRINT QUEUE WINDOWS 95 NT PRINT SPOOLER PRINT MONITOR DATA DATA LPRMON QMSMON L...

Страница 56: ...Monitor it utilizes all allocated Windows 95 operating system resources to transport the job If a connection is broken while a job is being transported the monitor discards the remain ing data and gi...

Страница 57: ...its status is reported in a status window The following table explains the status window menus and field names Menu or Field Name Explanation Printer Allows you to select Pause Printing Purge Print J...

Страница 58: ...sent to that port its status is reported in a status window Status Displays the current state of the print job in process A print job either proceeds in a normal error free state or it is in an error...

Страница 59: ...ess A print job either proceeds in a normal error free state or it is in an error state Error states can be nonvolatile like PAPER OUT or PAPER JAM or volatile like the inability to connect to a targe...

Страница 60: ...pull the stack out Note Paper is packed in reams of 500 sheets Do not unpack the paper above the printer as this might cause particles to fall into the printer components Note the arrows on the wrapp...

Страница 61: ...Refilling the Media Cassette 2 47 Printing Loading the Paper 250 sheet Universal Cassette Note Reload the media cassette only when it s empty 1 Pull out and remove the cassette 2 Open the paper cover...

Страница 62: ...the cassette The cassette has a spring in the bottom that provides some resistance when print media is placed on it Lay the cassette flat on a hard surface and using your left hand push down on the pl...

Страница 63: ...r LEF or A4 LEF as the media size in the printer driver See the sections on configuring the printer driver at the beginning of this chapter for more information 6 Ensure that the media stack lies flat...

Страница 64: ...060 WX Print System User s Guide 2 50 7 Adjust the media stop to fit the media size Your output is delivered print side down to the output tray at the top of the printer The media stop keeps the sheet...

Страница 65: ...when it s empty 1 Pull out and remove the cassette 2 Position the cassette The cassette has a spring in the bottom that provides some resistance when print media is placed on it Lay the cassette flat...

Страница 66: ...and the media stack is properly leveled out Load the media so the front end of the stack comes against the front of the cassette in three steps as follows a Up to the bottom limit mark b Halfway to t...

Страница 67: ...ll out the media stop and slide it to the correct media size Note When printing different sized media in the face down tray set the print tray to the largest paper size If the print tray is set to a s...

Страница 68: ...60 This section explains how to load print media in the multipurpose tray For tips on how to get the best possible printing results see Printing on Different Types of Media on page 2 57 Note A Printin...

Страница 69: ...it as far as it will go in the printer Note To optimise print speed on letter A4 size media you must load the media for long edge feed LEF and select Letter LEF or A4 LEF as the media size in the prin...

Страница 70: ...r plain or recycled 5 transparencies 10 enve lopes 10 labels or 10 sheets of letterhead or thick paper 7 Check the media guides to make sure that they touch the sides of the print media 8 For smaller...

Страница 71: ...f transparencies at a time may cause static buildup n Keep the paper path clean Transparencies are especially sensi tive to a dirty paper path If there are shadows on either the top or the bottom of t...

Страница 72: ...cover the entire carrier sheet and no adhesive should come through on the surface The adhesive and carrier sheet must withstand the fusing temperature 200 C 392 F n The face sheet printing surface mu...

Страница 73: ...d or optional cassette Special Considerations n Letterhead and preprinted paper must adhere to the paper speci fications listed in appendix B Technical Specifications n Adjust the multipurpose tray me...

Страница 74: ...of the envelope media jams or misfeeds may occur if they are too loose or too tight n We recommend that you use common office envelopes with diag onal joints ordinary gummed flaps and sharp folds and...

Страница 75: ...flap toward the rear of the printer when loaded n Print on the front side only n Try to print only in one layer parts of the envelope Some parts of the envelope consist of three layers of paper the fr...

Страница 76: ...ing envelopes with emulsion based glue avoids this problem Postcards and Thick Stock Your printer supports printing postcards and thick stock only from the multipurpose tray up to 10 sheets Special Co...

Страница 77: ...lect Thick Stock printing and any other printing options you want 4 Send the print job Odd size Paper Odd size paper is printed from the multipurpose tray Special Considerations n Use only 16 to 42 lb...

Страница 78: ...size Since the media cassette sends a media size signal to the printer controller using a wrong size media could cause a media jam incorrect positioning of the image or a clipped image About Imageable...

Страница 79: ...2 182 0x257 0 7 84x9 80 173 74x248 92 S M U C5 6 38x9 02 162 0x229 0 6 06x8 69 153 92x220 73 S M Envelope 6 93x9 76 176 0x248 0 6 61x9 44 167 87x239 85 S M Envelope 10 4 125x9 50 104 8x241 3 3 81x9 18...

Страница 80: ...n print quality and printer operation Improperly stored media increases the chance of jams during printing and can drastically affect the appearance of your work Keep media in good condition by storin...

Страница 81: ...10 sheets of letterhead or thick paper or 10 labels The 250 sheet cassette holds up to 250 sheets of paper The 500 sheet cassette holds up to 500 sheets of paper n If you have problems with double fee...

Страница 82: ...ess the Cancel key on the printer control panel To cancel all pages of the print job not yet received by the printer can cel the job at your PC Note Since all pages of a multi page print job may not h...

Страница 83: ...3 Control Panel In This Chapter n Message window on page 3 3 n Control panel indicators on page 3 4 n Function keys on page 3 5 n Printer configuration on page 3 6...

Страница 84: ...e printer has two func tions n It alerts you to the printer s current status including any error needing your attention n It allows you to configure several printer features The control panel consists...

Страница 85: ...isplayed in three ways in the message window n Continuous display A short status message such as Idle displays continuously until the status changes n Scrolling display A longer status message such as...

Страница 86: ...s Although jobs continue to compile and print using the data already received a job may be interrupted causing it to wait for more incoming data before printing resumes Press the Online Offline key on...

Страница 87: ...lowing configuration option Press this key to take the printer off line to use the configuration menu or to put the printer on line and available for printing Press the Previous key to move to the pre...

Страница 88: ...indows NT printer driver Most of the configuration is done in this way See chapter 2 Printing n Through the printer control panel Several options are availa ble The rest of this section explains how t...

Страница 89: ...rman French Italian Spanish Dutch Page count xxxx 000 000 000 000 000 000 000 000 000 000 000 000 000 000 000 000 Parallel port Ethernet HW 080086 xxxxxx Perform test Language Internet address Subnet...

Страница 90: ...off line and idle before you can access the configuration menu Selecting Configuration Menu Options Once you access the configuration menu you use the control panel keys to move through the menu Use t...

Страница 91: ...ge window again reads Energy saver Press this key to The message window reads Online Offline Turn off the Online indicator and ready the printer for configuration Idle Menu Access the Energy saver men...

Страница 92: ...s The address is in the format xxx xxx xxx xxx Menu Energy saver Choices Off 15 min 30 min 45 min 1 hr 2 hr Default 1 hr Menu Internet address Choices Each xxx xxx xxx xxx triplet can have a value of...

Страница 93: ...ck with your network administrator This allows the interface to provide automatic sensing of gateways If you identify a subnet mask this automatic sens ing is disabled n Once you save your changes to...

Страница 94: ...teways are not used with your network the router 1 and router 2 addresses should remain 000 000 000 000 Check with your network admin istrator n Once you save your changes to this menu the printer aut...

Страница 95: ...as two printed faces For complete information see Accessing Page Count in chapter 7 Troubleshooting Menu Communications Choices Parallel port Ethernet Default Parallel port Notes Once you save your ch...

Страница 96: ...guration QMS 2060 WX Print System User s Guide 3 14 Using the Board Test Menu The Board Test menu allows you to test the printer For complete information see Performing a Board Test in chapter 7 Troub...

Страница 97: ...nd accessories on page 4 2 n Duplexer on page 4 3 n Additional media cassettes on page 4 8 n Optional feeder on page 4 9 n Single In line memory modules SIMMs on page 4 12 n Updating system software o...

Страница 98: ...external hard disks and an optional CrownCopy scanner Contact your QMS vendor for specifications Duplexer Unit providing two sided printing on executive to 11x17 A3 paper sizes MediaCassettes and Opt...

Страница 99: ...0 WX Print System standard comes with 8 MB of memory This allows you to simplex print on all media sizes and duplex print on A5 and Statement media sizes Duplex printing on other media sizes however r...

Страница 100: ...stalling the Duplexer 1 Remove the duplexer from its box and then remove all the packing materials 2 Turn off the printer and remove the power cord and all inter face cable s 3 Remove the panel for th...

Страница 101: ...5 Printer Options 4 Attach the two duplex brackets J hooks included with the duplexer to the back of the printer in the holes provided Note Press down until you hear a click 5 Hook the duplexer onto t...

Страница 102: ...Duplexer QMS 2060 WX Print System User s Guide 4 6 6 Position the duplexer in place over the panel and the bracket 7 Secure the duplexer in place with the two screws...

Страница 103: ...er cord and turn on the printer 9 Check the message window to make sure the printer is ready to print 10 Configure the printer for duplex printing through the printer driver See chapter 2 Printing for...

Страница 104: ...a multipurpose tray and a 250 sheet cassette for a total capacity of 400 sheets Additional media cassettes provide two main benefits n Expanded flexibility to switch media size color and type without...

Страница 105: ...ses your printer s media feed capacity to a total of 900 or 1150 sheets depending on whether you install an optional 250 sheet or 500 sheet cassette n It allows you to load different sizes or colors o...

Страница 106: ...HTUNG Bitte beachten Sie da die Papierzuf hrungen unterhalb des Druckers nicht fest mit dem Drucker verbunden sind Wenn Sie das gasamte Ger t hochheben wollen greifen Sie deshalb in die Griffmulden de...

Страница 107: ...der fit into the holes on the printer s bottom Ensure that the printer and the optional feeder are securely seated 4 Reconnect the interface cables plug in the power cord and turn the printer back on...

Страница 108: ...MS FAQs through the Internet at http www qms com www faq or through Q FAX see appendix A QMS Customer Support to find out how to access Q FAX documents You may need additional memory SIMMs for the fol...

Страница 109: ...piece of equipment with an electrical current present Turn off all power switches first Plastic rubber wood painted metal surfaces and telephones are not acceptable grounding points The printer isn t...

Страница 110: ...ard Using both hands grab the two screws on the metal mounting bracket cover slide the controller board out of the printer and set it aside on a flat surface 4 Position the controller board on a flat...

Страница 111: ...e In Line Memory Modules SIMMs 4 15 Printer Options b Remove the SIMM Tilt the SIMM backwards to a 45 angle away from the SIMM connector and then lift it out 6 Remove the new SIMM from the anti static...

Страница 112: ...ew SIMM into the SIMM connector Hold the SIMM at a 45 angle to the controller board with the notch on the right side and the bottom edge is in the connector Note You can insert a SIMM in either SIMM c...

Страница 113: ...til you feel it snap into place When seated the SIMM stands upright firmly in place If you cannot snap the SIMM into place do not force it Reposition it making sure that the bottom of the SIMM is seat...

Страница 114: ...controller board in until it s firmly seated in the printer 12 Tighten the two screws you loosened earlier Push in each screw and then tighten 13 Reconnect the interface cable s and the power cord and...

Страница 115: ...appropriate command n Windows 95 x updt_lpy n Windows NT 4 0 x firmware updt_lpy Replace x with the letter of the disk drive in which you inserted the system software disk and replace y with the numb...

Страница 116: ...lel connection continue with the next section Parallel Connections If you re using an Ethernet network connection skip to Ethernet Connections on page 4 21 Parallel Connections Windows 95 and the para...

Страница 117: ...Plug and Play technology you must install the printer driver manually as follows 1 From the Windows 95 Start menu choose Settings 2 From the Settings menu choose Printers 3 Insert the QMS 2060 WX pri...

Страница 118: ...Windows NT 4 0 Start menu choose Settings 2 From the Settings menu choose Printers 3 Select the QMS 2060 WX printer driver in the Printers window 4 From the File menu choose Delete Select Yes when you...

Страница 119: ...indows NT 4 0 printer driver perform this step otherwise skip to step 10 a When prompted choose Replace Existing Driver and then choose Next b When prompted for a printer name either accept the displa...

Страница 120: ...60 WX printer driver for Windows 95 you ll be prompted to install it Insert the QMS 2060 WX printer driver disk and choose OK The required files are copied to the appropriate directory Note When the Q...

Страница 121: ...5 Maintenance In This Chapter n Handling the printer on page 5 2 n About toner cartridges on page 5 4 n Replacing toner cartridges on page 5 6 n Cleaning the printer on page 5 10...

Страница 122: ...multipurpose tray except the media being used for printing n Avoid spraying cleaning solution directly on the printer s surface the spray could penetrate through the air vents of the printer and damag...

Страница 123: ...e cassette below before moving it to the side ACHTUNG Bitte beachten Sie da die Papierzuf hrungen unterhalb des Druckers nicht fest mit dem Drucker verbunden sind Wenn Sie das gasamte Ger t hochheben...

Страница 124: ...message Toner low displays in the message window Usually parts of the page print lighter It is your option whether or not to continue printing when the engine senses it is out of toner Extending Tone...

Страница 125: ...storing toner cartridges n Toner cartridges are sensitive to bright light Keep them in their protective bags until you re ready to install them Don t store them in direct sunlight or room light more t...

Страница 126: ...empty toner cartridge While grasping the grip area of the empty toner cartridge remove the cartridge by pulling up it and then toward you 3 Dispose of the old toner cartridge Note Put the old toner ca...

Страница 127: ...not subject to extreme heat or humidity salty air or corrosive gases such as aerosols Keep the toner cartridge away from your computer The magnets in the cartridge can damage data particularly on you...

Страница 128: ...er handle faces away from you b Holding the cartridge in place with your left hand use your right hand to grasp the tab on the side of the toner cartridge c Pull the plastic strip straight out If the...

Страница 129: ...the toner cartridge with your right hand so the arrow on the toner cartridge is facing away from you angle the cartridge down into the printer b Place the cartridge on the rails inside the upper unit...

Страница 130: ...nterface cables before cleaning ACHTUNG Ziehen Sie den Netzstecker aus der Steckdose bevor Sie den Drucker reinigen In addition to unplugging the printer follow these guidelines when cleaning the prin...

Страница 131: ...RNING Do not spill water or detergent into the printer otherwise the printer will be damaged and an electric shock may occur ACHTUNG Versch tten Sie kein Wasser oder andere Fl ssigkeiten auf dem Druck...

Страница 132: ...ean the paper pick up rollers beneath the toner cartridge and in the media cassettes and the win dow glass of the print head unit n Every time the toner cartridge is changed n Whenever print quality b...

Страница 133: ...the window glass of the print head using a soft cloth Note You can see the window glass if you face the printer from its rear If the glass is especially dirty use a cloth dampened with ethyl alcohol...

Страница 134: ...MS Service provider or QMS Sup plier after every 120 000 page faces printed to order a maintenance kit A page face is one side of a sheet of media Therefore a simplex page has one printed face while a...

Страница 135: ...6 Repacking the Printer In This Chapter n Repacking the printer for relocation or shipment on page 6 2...

Страница 136: ...tional Service at 1 334 633 4300 x 2530 If you need to return the printer for service in the US call QMS Customer Service at 1 334 633 1072 for an RMA Return Merchandise Authorization number before sh...

Страница 137: ...Printer Remove the Toner Cartridge 1 Press the upper unit lock release button and open the top cover 2 Remove the toner cartridge While grasping the handle of the empty toner cartridge remove the car...

Страница 138: ...service you don t need to return the toner paper cassette s sheet feeder power cable or interface cables v 3 Repack the toner cartridge to its original protective alumi num bag and shipping carton Not...

Страница 139: ...n Testing the printer board on page 7 13 n Accessing the page count on page 7 14 n Media jams on page 7 15 n Control panel problems on page 7 24 n Output problems on page 7 24 n Print quality problems...

Страница 140: ...cessary Printer Status Messages Status messages in the control panel message window provide infor mation about the printer and help you locate many problems When the condition associated with a displa...

Страница 141: ...op cover on the printer is open Download error press Cancel An error has occurred in the system software download procedure Press the Cancel key on the printer control panel and restart the download p...

Страница 142: ...uldn t program logical address 124 snetopen err 125 netxopn err 126 makeport full 241 shift err 242 fifo count error Ethernet port The printer has identified an Ethernet port connection during startup...

Страница 143: ...a cassette Remove the jam see Media Jams on page 7 15 Need more memory Paper mismatch More memory is needed to print the job and the media in the default media cassette is different from that chosen i...

Страница 144: ...rinting but it needs more memory to print the file It will print as much of the page as it can currently fit in memory Note Due to the lack of sufficient memory parts of the image may be clipped off P...

Страница 145: ...toner cartridge is low See chapter 5 Maintenance for information on replacing the toner cartridge Warming up The printer is warming up the fuser is at a low temperature Wait until the printer has warm...

Страница 146: ...n application either on a local or remote workstation Note Windows NT only Remote Downlevel Document displays in the Document Name column of the status window when the client workstation spooling jobs...

Страница 147: ...either delete or retry the job displays n If the print job is spooled on a remote workstation then the job is retried until it is either deleted or the printer becomes unavailable n For print jobs sp...

Страница 148: ...ess then it is terminated removed from the queue reported to the Network Spooler and if you re using Windows NT listed in the Application Event Log if enabled n If the print job is spooled by a local...

Страница 149: ...essages such as the following IDLE TONER OUT ADJUST UPPER BIN PAPER JAM The printer has encountered a problem n If the print job is spooled on a local workstation a dialog box prompts you either to de...

Страница 150: ...ose Settings and then Printers b Select the printer and from the File menu choose Properties c On the General tab choose the Print Test Page button If the Ready indicator starts blinking the printer i...

Страница 151: ...menu 3 Press the Select key to display the Perform test option 4 Press the Select key to display the message Online full test and begin the test The printer displays the following messages several ti...

Страница 152: ...the Status Page key on the control panel The message Page count xxx scrolls in the control panel message window c Press the Online Offline key to return the message window to Idle d Press the Online...

Страница 153: ...ent jams in any area indicate that area should be checked repaired or cleaned Frequent jams may also happen if you are using the wrong weight print media See the Print Media section of appen dix B Tec...

Страница 154: ...nd print delivery guide become extremely hot when the printer is used Personal injury could result if you touch those areas ACHTUNG Die Fixiereinheit und die Papierf hrung werden sehr hei wenn der Dru...

Страница 155: ...t guide and pull the jammed media upward and then out Front Transport Guide 4 If the edge of the media has been fed into the fusing unit pull the jammed paper forward and out Note Toner may get on you...

Страница 156: ...Media Jams QMS 2060 WX Print System User s Guide 7 18 Clearing Cassette Area Jams 5 Reinstall the toner cartridge 6 Close the upper unit 1 Open the upper unit...

Страница 157: ...leshooting 2 Remove the toner cartridge 3 Determine which media cassette is currently being used and remove it 4 Check the cassette pick up roller area and remove any jammed print media that remains o...

Страница 158: ...g print media in the multipurpose tray can cause the print media position to shift during removal of the jam This may result in a media feed failure and another jam when printing is restarted 5 Reinst...

Страница 159: ...Media Jams 7 21 Troubleshooting 2 Remove the toner cartridge 3 Open the multipurpose tray and pull out the jammed media...

Страница 160: ...Media Jams QMS 2060 WX Print System User s Guide 7 22 4 Reinstall the toner cartridge 5 Close the upper unit...

Страница 161: ...ubleshooting Clearing a Duplexer Media Jam 1 Open the duplex cover and pull out the jammed paper 2 Open the maintenance cover and remove the jammed paper 3 Close the maintenance cover and the duplexer...

Страница 162: ...ore information Output Problems Only Partial Pages Print n Check the imageable areas for the size media you re using see chapter 2 Printing Are you trying to print outside of the image able area of th...

Страница 163: ...in the printer 4 If these solutions do not work contact your QMS vendor to purchase another toner cartridge Not All Pages Print If the printer stops printing in the middle of your file try the followi...

Страница 164: ...g inside the printer by checking the locations in Media Jams on page 7 15 Printer Will Not Duplex n If the error message Duplexer absent appears in the mes sage window make sure you have the optional...

Страница 165: ...not improve replace the toner cartridge n Remove the toner cartridge and rock it several times from side to side The toner can settle and this procedure redistributes the toner Reinsert the cartridge...

Страница 166: ...edistributed Remove the toner cartridge and rock it as you would when installing a new cartridge This redistributes toner inside the cartridge Then reinstall the cartridge n The toner cartridge may be...

Страница 167: ...Make sure the toner cartridge is not defective 3 If steps 1 and 2 above do not solve the problem install a new toner cartridge n If toner smudges are both on the front and the back of the page the im...

Страница 168: ...a new cartridge and then reinstall it 2 If step 1 doesn t solve the problem install a new toner cartridge n The paper being used may have absorbed moisture perhaps due to high humidity or having water...

Страница 169: ...Black Bands n The window glass of the Print Head may be dirty Clean the glass as described in chapter 4 Printer Care n The toner cartridge may be defective Install a new toner cartridge if needed n T...

Страница 170: ...ialog box choose Add Remove Pro grams 4 On the Install Uninstall tab select QMS Print Monitor 5 Choose Add Remove 6 In the Welcome window choose OK n The photoconductive drum inside the toner cartridg...

Страница 171: ...nt Monitor window from the Printer menu choose Properties 12 In the QMS Properties window choose the Details tab scroll down in the Print to the following port listing and select a port not associated...

Страница 172: ...tional contacts are listed in appendix A QMS Customer Support Before calling be sure you have the answers to these questions handy to help our technicians serve you more quickly 1 What is your printer...

Страница 173: ...A QMS Customer Support In This Appendix n Sources of customer support on page A 2 n QMS world wide offices on page A 3...

Страница 174: ...the printer In this case the application manufacturer is the best source of help CompuServe Through CompuServe you ask general non technical questions share information with other users and access pr...

Страница 175: ...ance Pricing 1 800 762 8894 On Site Service and Depot Repair Information 1 800 858 1597 7 00 am 7 00 pm Central Time Spare Parts Ordering and Information 1 334 633 4300 x2530 8 00 am 5 00 pm Central T...

Страница 176: ...QMS Benelux Belgium Nether lands and all unlisted countries Planetenbaan 60 Corner Plaza 3606 AK Maarssen The Netherlands 31 346 551333 Fax 31 346 550170 Internet http www qms nl QMS France V lizy Plu...

Страница 177: ...Sweden 46 8 600 01 30 Fax 46 8 600 01 33 QMS South Africa Saskay House Unit 24 Sunninghill Business Park Peltier Road Sunninghill Johannesburg Republic of South Africa 27 11 807 6957 Fax 27 11 807 696...

Страница 178: ...QMS World wide Offices QMS 2060 WX Print System User s Guide A 6...

Страница 179: ...n page B 2 n Controller specifications on page B 3 n Environmental requirements on page B 3 n Print media on page B 4 n Cable pinouts on page B 6 n Printer options on page B 8 n Consumables on page B...

Страница 180: ...20 240 V 50 Hz 3 Hz about 200 260 VAC Energy Star compliant Engine Minolta SP A310 Noise Level Idle Maximum 38 dB A Printing Maximum 53 dB A Print Method Laser beam scanning and dry electrophotographi...

Страница 181: ...TrueType fonts Interfaces Centronics IEEE 1284 bidirectional parallel Ethernet TCP IP ftp and telnet Memory FLASH EPROM system code 8 MB RAM standard upgradable to 32 MB through two SIMM connectors No...

Страница 182: ...ies About 5 sheets Loading Automatic from paper cassette or multipurpose tray Manual from multipurpose tray Output Location and Capacity Face down output tray Up to 500 sheets of 20 lb 75 g m2 paper S...

Страница 183: ...296 93x210 06 L M U L A5 5 85x8 27 148 5x210 0 5 52x7 95 140 21x201 93 S M U B4 10 12x14 33 257 0x364 0 9 80x14 01 248 92x355 85 S M U B5 7 17x10 12 182 0x257 0 7 84x9 80 173 74x248 92 S M U C5 6 38x...

Страница 184: ...279 4x431 8 11 00x17 00 279 40x431 80 S M U Universal 13 00x19 00 330 2x482 6 13 00x19 00 330 20x482 60 S M Input Source L Letter A4 cassette M Multipurpose tray U Universal cassette Feed Edge L Long...

Страница 185: ...the chassis of the system unit and printer respectively n All interface conditions are based on Transistor Transistor Logic TTL level Both the rise and fall times of each signal must be less than 0 2...

Страница 186: ...Ethernet EtherTalk LAN Manager Lan Server NetWare TCP IP interface n Optional interface supporting a DECnet LocalTalk CrownNet Token Ring serial or another CrownNet Ethernet interface n SCSI interface...

Страница 187: ...4 Laser Hammermill Laser Print Envelopes Common office envelopes with diagonal joints and ordinary gummed flaps They must not contain any fasteners clasps or peel off strips for sealing The material m...

Страница 188: ...Fast transcients Electromagnetic Compatibility EMC International EU IEC 801 2 IEC 801 3 IEC 801 4 ESD Radiated susceptibility Electromagnetic Emissions EMI DOC Canada Canadian CRC c1374 EU Internatio...

Страница 189: ...ulations of the Canadian Department of Communications Le pr sent appareil num rique n met pas de bruits radio lectriques d passant les limites applicables aux appareils num riques de la classe A presc...

Страница 190: ...t for the 220V QMS 2060 WX Print System Note The male plug is certified in the country in which the equipment is to be installed and the female plug is an IEC 320 connector Warranty Considerations Var...

Страница 191: ...ter option kit attach one end of it to your wrist and the other end to any convenient electrical ground The bare metal chassis of equipment such as on the back of a computer is suitable if it is plugg...

Страница 192: ......

Страница 193: ...C TCP IP Concepts In This Appendix n Terminology on page C 2 n Subnetting on page C 4 n Internet routing on page C 5...

Страница 194: ...cable or twisted pair wiring Based on the IEEE 802 3 standard Ethernet operates at 10 megabits 10 million bits per second Ethernet Address An Ethernet address is a unique address assigned to each dev...

Страница 195: ...atagram as the unit of information passed across the Internet and provides the basis for connectionless best effort packet delivery service The Internet protocol suite is often referred to as TCP IP b...

Страница 196: ...hysical networks is through subnetting which divides the host part of an Internet address into a physical network part and a host part In other words it creates a hierarchical address which identifies...

Страница 197: ...ss If information is sent between two devices on a single physical net work or subnet no gateways are involved The sending device encapsulates the datagram in a physical frame binds the destination in...

Страница 198: ...address and the last 24 bits form the host address The high order bits also constitute the network mask for the Class A address The following table identifies the differences between Class A B and C a...

Страница 199: ...EC BAT file 7 25 B Black Ref and White Ref Windows NT printer driver 2 34 Board test 7 13 Board Test menu 3 14 Booting message 7 3 Brightness Windows NT printer driver 2 33 Buffers Enlarging 4 12 Bull...

Страница 200: ...mmunications 3 13 Energy Saver 3 10 Eth HW Address 3 13 Internet Address 3 10 Language 3 9 Options selecting 3 8 Router 1 3 12 Router 2 3 12 Subnet Mask 3 11 Consumables Envelopes B 9 Labels B 9 Paper...

Страница 201: ...gy Saver 3 10 Engine Specifications B 2 Envelopes Brands recommended B 9 Size choosing 2 4 2 23 2 28 Environmental requirements B 3 Erasing flash message 7 3 Error diffusion 2 11 Error indicator 3 4 E...

Страница 202: ...3 4 Data 3 4 Disk 3 4 Error 3 4 Ready 3 4 Inner jam message 7 5 7 15 7 24 Input RGB Gamma 2 34 Installation Printer driver manual installation 7 32 Intensity Choosing 2 12 Setting 2 34 Internet C 2 Ad...

Страница 203: ...illing 2 45 Media source Choosing 2 16 Meg ver x x message 7 5 Memory RAM SIMMs 4 12 Specifications B 3 Menu Configuration 3 7 Menu key 3 5 Menus Board Test 3 14 Board test 7 13 Service 3 13 7 14 Mess...

Страница 204: ...ser tray message 7 6 Paper out upper tray message 7 6 Paper source 2 25 Choosing 2 16 Parallel interface IEEE 1284 cable pinouts B 6 Parallel port message 7 6 PC System software updating 4 19 Photogra...

Страница 205: ...21 2 25 2 31 2 35 Open button 2 36 Restore Defaults button 2 7 2 9 2 12 Revert button 2 21 2 36 Save As button 2 36 See Windows 95 printer driver or Windows NT printer driver 2 2 Printer drivers Upda...

Страница 206: ...l B 2 Optional accessories B 8 Print engine B 2 Print media B 4 Print method B 2 Print speed B 2 Regulatory B 10 Resolution B 2 Toner B 2 Toner cartridge B 3 Warm up time B 3 Speed printer B 2 Status...

Страница 207: ...Brands recommended B 9 Choosing 2 7 2 25 2 30 2 31 Print 2 57 Vendor B 9 vendor B 9 Troubleshooting Black bands 7 31 Black image entire page 7 27 Black stripes 7 31 Blank pages 7 25 Blurred background...

Страница 208: ...printer driver 2 20 2 34 Black Ref and White Ref 2 34 Brightness 2 33 Configuration 2 12 Contrast 2 32 Copy Count choosing 2 24 Dark Picture 2 33 Device Alignment White Luminance CIE Y choosing 2 20...

Отзывы: