


Part number, Rev 2.x
Page 6
2.0
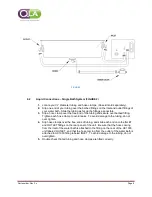
Unpacking
The HC1000 Heater / Circulator has been packaged to protect the unit from shipping and
handling. Please complete the following steps to unpack your HC1000 Heater / Circulator:
1.
Carefully remove all items from shipping container.
2.
Check all items for damage that may have occurred during shipping. If any damage
to the unit is evident, please contact both your shipping provider and Quality Lab
Accessories.
3.
Check the shipping container for any loose parts before discarding.
4.
Place the unit on a clean, dry, and level surface as close to your dissolution bath as
necessary. It is recommended to leave approximately 6 inches of open area behind
the unit to allow for access to the rear power control and hose hookups.
This unit includes electrical components. Please ensure a dry area around the unit
before plugging in the main power supply.
3.0
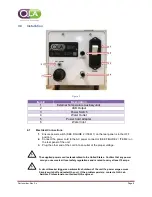
HC1000 Heater / Circulator Overview
The HC1000 Heater / Circulator was designed to function with any dissolution machine, and
provide precise temperature control of your dissolution bath water, within a range of ambient
temperature to 45°C. Operating functions can be monitored on a front panel display. Set and
current temperature are also displayed on the front panel display. A single button/dial makes
operation of the unit quick and easy.
An optional external temperature probe can also be used for increased accuracy and assurance
of bath temperature. Without the external probe, an internal probe measures temperature with
accuracy of ±.1°C.


