QLA HC1000 Скачать руководство пользователя страница 11


Part number, Rev 2.x 

Page 11 


5.0 

Operation 


5.1 

Priming The System 

 
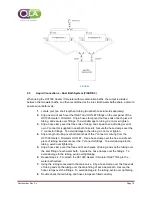
Priming the HC1000 Heater / Circulator is an essential part of setting up the unit to run as 
efficiently as possible.  Please follow the steps below to prime your HC1000 Heater / 
Circulator. 
 

1. 

Fill the water bath to a level approximately 2 

– 3 inches above the bath outlet fitting. 

2. 

Turn on the HC1000 Heater / Circulator. 

3. 

Using the control dial, highlight and select 

CONFIGURE.


4. 

Once in the Configure Menu, highlight and select 

BATH OPTIONS. 

5. 

In the Options Menu highlight and select PUMP PRIME IS OFF.  

PUMP PRIME IS 

ON

 is now displayed.  


6. 

Your unit is now priming.  Allow up to 5 minutes for the unit to prime.  For faster 
priming results, tilt the rear of the unit up to allow air inside the unit to flow out 
naturally.  You should see and hear air being expelled through the outlet tubing.


7. 

The 

FLOW

 light will illuminate green when the unit is primed.


8. 

Highlight and select 

ESC 

to return to the main menu. 


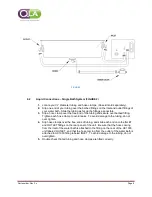
   If an excessive distance of tubing is needed between the water bath and Heater / Circulator, more 

water may be necessary to prime the unit.  The water level should stay above the outlet fitting on the bath as 
the unit is priming.  Add water as needed. 

    It is suggested that you use deionized water when possible to minimize scale and mineral buildup.  

The use of algaecide can help inhibit mold and bacteria growth.  Check the label before use to ensure the 
formulation is safe to use with the plastic materials used in the water bath.   


After priming, the flow sensor will trigger an automatic shutdown of the system if the flow rate 

drops below .5 G per minute.  Simply switch off and restart the unit.  If the problem persists, contact a QLA 
Lab Services Professional or authorized QLA engineer.


5.2 

Setting Temperature 

Setting, changing, and checking the temperature on the HC1000 Heater / Circulator is a quick 
and easy process.  Please follow the steps below to set the temperature on your HC1000 Heater 
/ Circulator. 

1. 

On the main screen highlight and select 

SET TEMP. 

2.  NEW TEMP

 is now displayed. Turn the control dial clockwise to increase 

temperature, and counter clockwise to decrease temperature. 


Содержание HC1000

Страница 1: ...Operating Instructions HC1000 Heater Circulator P N HC1000 Revision 2 x 07 03 17 Prepared by Quality Lab Accessories LLC 100 Emlen Way Suite 108 Telford PA 18969...

Страница 2: ...verview 6 3 1 Front Panel 7 4 0 Installation 8 4 1 Electrical Connections 8 4 2 Liquid Connections Single Bath System 9 4 3 Liquid Connections Dual Bath System 10 5 0 Operations 11 5 1 Priming the Sys...

Страница 3: ...Part number Rev 2 x Page 3 Revision History Rev Description Revised By Revised On Approved By Approved On A INITIAL RELEASE JUSTIN M 07 11 17...

Страница 4: ...during the operation of this unit 1 2 1 General Safety Operation of the HC1000 Heater Circulator involves aqueous liquids in conjunction with a heating element and electrical components Improper or c...

Страница 5: ...icates potential electrical hazard Failure to observe this symbol or notes in connection to this warning could result in death or injury Warning Indicates the potential for personnel or equipment dama...

Страница 6: ...s of open area behind the unit to allow for access to the rear power control and hose hookups This unit includes electrical components Please ensure a dry area around the unit before plugging in the m...

Страница 7: ...Heater LED 6 Flow LED 7 Status LED Note that when a feature on the LCD screen is highlighted it is surrounded by two arrows Select a highlighted feature by depressing the control dial Covers retained...

Страница 8: ...e AC power connector SEE FIGURE 2 ITEM 2 on the rear panel of the unit 3 Plug the other end of the cord into an outlet of the proper voltage The supplied power cord is standardized to the United State...

Страница 9: ...bed fitting Tighten each hose clamp to avoid leaks To avoid damage to the tubing do not over tighten 4 Slip hose clamps over the free ends of tubing and slide each end onto the INLET and OUTLET fittin...

Страница 10: ...the Y connector fittings To avoid damage to the tubing do not over tighten 4 Slip a length of tubing over both branches of the Y connector coming from the HC1000 Heater Circulator OUTLET Slip a hose...

Страница 11: ...essive distance of tubing is needed between the water bath and Heater Circulator more water may be necessary to prime the unit The water level should stay above the outlet fitting on the bath as the u...

Страница 12: ...ack on the rear panel of the unit and highlight and select OK 6 Once the unit is done calculating you will be prompted to insert the 40 C calibration standard into the RC jack 7 Once the 40 C calibrat...

Страница 13: ...d method by the customer To update the firmware follow the procedure below 1 Insert USB thumb drive with file named image hex into USB port on back of unit 2 With the unit OFF hold down the control di...

Страница 14: ...purchase as shown on the purchase order receipt The obligation of QLA under this warranty shall be limited to repair or replacement at our option during the warranty period provided the product is ret...

Отзывы: