background image

Sportrex 2019 Update


Subject to change. 08|2019 – 

19 

f

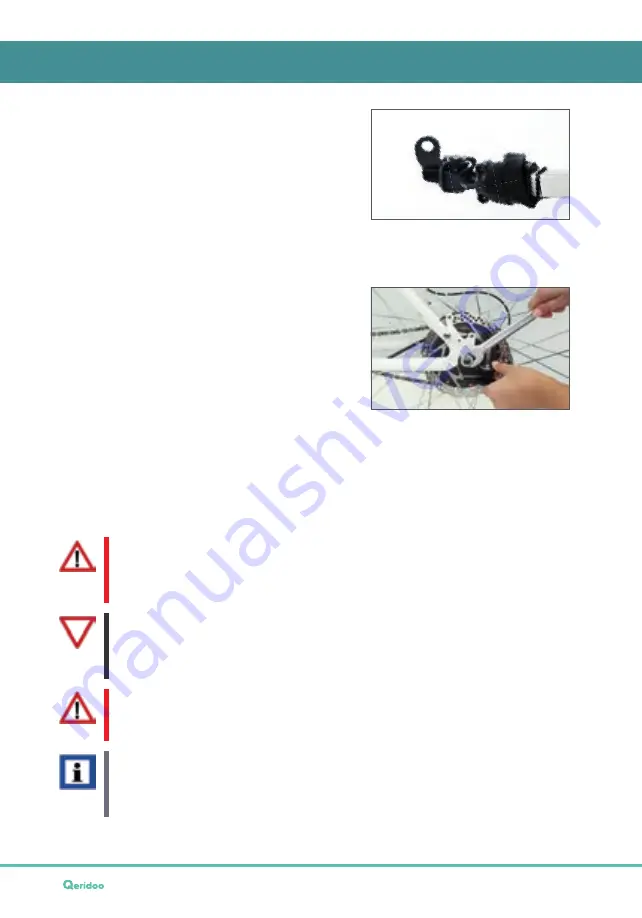
Undo the cotter pin fastening and remove the coupler.

f

Then insert the retaining cotter pin onto the tow bar 

coupler pocket.

f

Prepare the bicycle for mounting the coupler by undoing 

the screw connection of the rear wheel axle: 

Quick-release axle: Open the bracket of the quick-release axle and unscrew the cap nut on the 

other side of the rear wheel axle. 

Full axle: Unscrew the nut on the left side of the rear wheel axle.

f

Mount the coupler on the rear wheel axle:

Place the large hole of the coupler onto the left side 

of the rear wheel axle so that the coupler is facing 

outwards.

Screw on the dedicated nut and tighten it slightly.

Align the rear wheel so that it can turn freely.

Align the coupler so that it faces horizontally to the rear.

f

Tighten the connection firmly in order to secure the rear wheel:

Quick-release axle: Use the supplied M5 quick release adapter. Tighten the cap nut until you can 

close the clamp with a certain amount of pressure. 

Full axle: Tighten the nut with a spanner. Always pay attention to the bicycle manufacturer’s 

notes about the tightening torque.

Danger!

The axle nut must be tightened in order to assure sufficient clamping force. Therefore, 

observe the assembly instructions for the hub and the manufacturer’s torque specifications 

when tightening the axle nut.

Caution!

Due to the construction of the coupler, slight wear and tear in the form of scratches can 

occur at the connection between bicycle frame and coupler. This is not a reason for a com-

plaint. 

Danger!

Do not use a washer or similar at the connection between the bicycle frame and coupler 

because this could negatively affect the stability of the connection.

Tip!

The provided universal coupler is suitable for mounting on the most rear-wheel models. If it 

does not fit your bicycle, find a suitable adapter and special couplers in our manuals on the 

following website: 

www.qeridoo.de/kupplungsleitfaden

 Assembly

Содержание Sportrex1 2019

Страница 1: ... A Q6 19 DA Q6 19 DW V I D E O T UTORIAL GERMAN ENGINEERING AND DESIGN USER MANUAL This product fulfils all safety requirements of the European standard for bicycles and bicycle trailers DIN EN 15918 Sportrex1 2019 Sportrex2 2019 EN ...

Страница 2: ...ements in this documentation are not to be interpreted as an assurance of particular product properties Despite the greatest care being taken to avoid technical inaccuracies or omissions the possibility of these arising cannot be entirely excluded When necessary individual items of information can be changed quickly and without special notification This documentation can be ordered from Qeridoo Gm...

Страница 3: ...buggy wheel 18 Mounting the tow bar 18 Mounting the coupler onto a bicycle 18 Installing the rear light 20 Utilisation 21 Operating the parking brake 21 Adjusting the push handle 21 Setting the mode 22 Adjusting the buggy wheel 22 Insert tow bar 23 Using the pennant 23 Attaching the hand strap 23 Putting on the 5 point safety harness 23 Securing the load 23 Loading the baggage 23 Embarking the chi...

Страница 4: ...Trailer mode a rear light must be installed in accordance with the Road Traf fic Licensing Regulations and to be in use in darkness or in conditions of poor visibility Before using the Sportrex check which local regulations apply and how the product may be used It must not be used on unsurfaced ground to transport baggage in the passenger compartment to carry animals or for commercial use It is es...

Страница 5: ... users f Always keep the user manual close to the Sportrex The following typographical elements are employed in the user manual to indicate the possible danger sources or special information Danger Identifies notices pertaining to the Danger risk level Indicates possible dangers that can result in injury if the instructions are not followed Caution Identifies notices pertaining to the Caution risk...

Страница 6: ... commercial or competitive purposes Check the screw connections for tight fit before the first use In particular the tow bar holder the spokes and the thru axles of the wheels must be checked before use Before every journey check that the Sportrex is in a proper and technically faultless condition Perform a visual inspection and in particular pay attention to the instructions and checklists in the...

Страница 7: ...ngine Please note that bicycle trailers towed by electrically power assisted cycles EPAC may be restricted by law The bicycle or the pedelec motorised for speeds up to 25 km h must be technically sound and suitable for towing loads in accordance with the permissible total weight The maximum permissible total weight can be found in chapter Performance limits on page 4 For details read the towing ve...

Страница 8: ...nd bear in mind the additional lane required for the inner wheel of the Sportrex Additional weight When fully loaded the Sportrex1 weighs up to 50 kg and the Sportrex2 weighs up to 60 kg that the bicycle must pull brake and keep on track in addition to its own weight and that of the rider Jerky pulling and braking puts high loads on the coupler and tow bar and thereby increases wear All stopping d...

Страница 9: ... is damaged see Support information on page 36 1 Pennant with 2 part pennant staff and centre piece 2 Tow bar with coupler and retaining strap 3 Push handle with hand strap and hand park ing brake with side mounted parking brake module and brake cable 4 Cabin with seats and 5 point safety harnesses 5 Wheel guard 2x 6 Head protectors 2x 7 2 wheels 8 Multiwheel buggy wheel 9 Leaf suspension cover 10...

Страница 10: ...nesses 6 Leaf suspension 7 Reflector strip 8 20 wheel with push in axle 9 Air valve Schrader valve 10 Removeable wheel guard for rejection from obstacles 11 Tow bar for trailer mode with cotter pin fas tening and retaining strap for securing bicy cle frame 12 Tow bar holder 13 Locking button 14 Buggy wheel for three wheel use in Buggy or Walker mode 15 Wheel mount on the cabin frame Operating mode...

Страница 11: ...p for fastening the pennant 5 Rear light position 6 Reflective seams in the fabric cover 7 Coupler pocket with cotter pin fastening and retaining strap for securing the tow bar on the bicycle frame 8 Rubber cap for push in axle release when mounting the wheels 9 Hand parking brake 10 Star grip screw with tube clamp for securing the push handle 11 Ventilation window with integrated pouch for small ...

Страница 12: ...rapped Before using the appliance for the first time check all screwed and splint connections carefully Unpack contents f Remove the packaging material and all protective caps and dispose of them in accordance with the environmental guidelines that apply in your region f Read the chapter Assembly on page 12 before you assemble parts Unfolding the cabin f Place the collapsed cabin in the assembly a...

Страница 13: ... in axle as far as it will go into the axle retainer Release the rubber cap to secure the push in axle f Pull on the wheel to check that the wheel is locked in the axle retainer f Insert the second wheel in the same way Danger After mounting the wheels secure the Sportrex whenever you park it so as to prevent it from rolling away see Operating the parking brake on page 21 f Check whether there is ...

Страница 14: ...euvring your Sportrex f Prepare the push handle by fully unfolding it To do this keep the light grey pushbuttons pressed on both sides see Adjusting the push handle on page 21 f Position yourself behind the upright cabin f Loosen the two star grip screws at the bottom end of the push handle to enable the tube clamps to be easily pushed onto the tubes of the cabin frame f Insert the pipe clamps thr...

Страница 15: ...o that it is easily visible before every journey including in Buggy or Walker mode f Using the connecting piece insert the pennant staff into the extension rod f Insert the extended pennant pole through the loop on the left head protector and secure the position by inserting the pennant pole into the recess on the left leaf suspen sion cover f Unroll the pennant so that it can fly clearly visible ...

Страница 16: ...in the cabin floor and the long end through the right opening in the cabin floor f Put the cabin on the roof f Pull out the ends of the brake cable a little Fasten the side mounted parking brake module f Check whether the sliding block with the spring attached is in the socket of the parking brake module f Align the parking brake module so that the pin of the sliding block points in the direction ...

Страница 17: ...king brake module f Use the supplied cable ties to fix the brake cable to the axle Optional assembly steps Installing the buggy wheel You need the buggy wheel for Buggy and Walker mode The buggy wheel is connected directly with the wheel suspension attached to the frame and is mounted so that it can rotate through 360 f Lift the cabin at the front f Place the buggy wheel into the wheel mount as fa...

Страница 18: ...at the locking bolt unlocks f Keep on pushing down the button and push the tow bar forwards until the mark in the tow bar mount is reached f Release the button so that the locking bolt secures the tow bar in the tow bar mount f Release the locking knob so that it jumps back into the closed position and additionally secures the tow bar Tip You do not have to remove the tow bar completely Simply pla...

Страница 19: ...le Use the supplied M5 quick release adapter Tighten the cap nut until you can close the clamp with a certain amount of pressure Full axle Tighten the nut with a spanner Always pay attention to the bicycle manufacturer s notes about the tightening torque Danger The axle nut must be tightened in order to assure sufficient clamping force Therefore observe the assembly instructions for the hub and th...

Страница 20: ...could lead to contact corrosion Installing the rear light In trailer mode a certified rear light must be used during poor visibility or darkness in accordance with the Road Traffic Licensing Requirements f Move the push handle to the lowest position f Mount the rear light below the left joint of the push handle Tip Follow the attached manufacturer s information for the work of the rear light ...

Страница 21: ...of the parking brake f If necessary press the brake lever slightly further downwards f Push down the red button on the brake lever to release the brake Tip Use the supplied velcro straps to hold the brake cable in position within the storage space Adjusting the push handle Use the two light grey pushbuttons to alter the height of the push handle These are identified by the word PUSH The push handl...

Страница 22: ...Hand strap on the push handle wrapped around a wrist wrapped around a wrist 5 point safety harness must be fastened must be fastened must be fastened Rear light must work in poor visibility or darkness follow the Road Traffic Licensing Requirements recommended in poor visibility or darkness recommended in poor visibility or darkness Bicycle the correct coupler must be installed Danger Before every...

Страница 23: ...the attachment position or carried along backwards in the standby position Pay attention also to the instructions in the chapter Mounting the tow bar on page 18 Danger Wrap the retaining strap of the tow bar around the tow bar several times to ensure it does not hang down in the standby position Otherwise it could become trapped on obstacles Using the pennant The pennant must be attached in Traile...

Страница 24: ...vent it from rolling away f Loosen both belt locks of the cover and unfold them completely f Adjust the safety harnesses to the number of children see Mid sitting position Sportrex2 on page 26 f Open the safety harnesses required Release the harness catch by pressing the pushbutton Pull the two tabs out of the belt buckle Loosen the small locks which fix the belt cushions in place Placing the chil...

Страница 25: ...il they click audibly f Check that all parts of the 5 point safety harness fit prop erly and comfortably f Close the small locks to fix the belt pads if the belt pads of the 5 point safety belts are too loose However always make sure that there is enough distance between the locks and the child s neck see the photo above An additional fixation of the belt pads is not recommended for taller childre...

Страница 26: ...en the Velcro fastener on the narrow straps of the belt pad fixation f Insert the straps together with the Velcro strap through the slots in the backrest to the front f Select a different position and pass the narrow strap of the belt pad fixation through the opening first and then the wider strap of the seat belt f Close the Velcro strap between the two narrow straps of the belt pad fixation f Th...

Страница 27: ... The load s centre of gravity should always lie in the centre of the wheel axle The tow bar load with which the tow bar lies on the coupler must be neither too great nor too low in Trailer mode Tow bar load too great 8 kg Too much load on the coupler Tow bar load too low 3 kg The trailer could reduce the traction of the rear wheel through lifting and thereby cause critical situations in curves Cen...

Страница 28: ...ollowing conditions have been fulfilled The trailer is fully loaded The children wear a bicycle helmet or use a head rest and are properly belted The buggy wheel has been removed The tow bar load has been checked and is within the permissible range 3 8 kg f Remove the retaining cotter pin from the tow bar coupler pocket f Push the tow bar onto the coupler of the bicycle so that the cotter pin hole...

Страница 29: ...into the coupling head and lock it in place f Stow the tow bar in the ready position as described in the chapter Mounting the tow bar on page 18 Using the comfort functions Using the climate functions Adjusting the 3 in 1 canopy The 3 in 1 canopy is comprised of an insect net an adjustable sun visor and a weather canopy The inner part of the 3 in 1 canopy must be closed during every journey becaus...

Страница 30: ...red length and lock it with the side Velcro fasteners f If necessary you can also roll up the sun visor completely and close the splash water window again Using the ventilation windows The purpose of the ventilation windows of the Sportrex is to improve air circulation in the cabin Lateral ventilation windows f To open release the Velcro fastener of the window film in the cabin and fold it down f ...

Страница 31: ...kwards for two children and a lot of luggage harder suspension f Tighten the knurled screw firmly and put the same value on the other leaf spring Storage For storage simply fold the Sportrex together and store it in a protected and dry place without direct sunlight Please also consider the information in the chapter Care on page 33 Danger Hands or fingers can become trapped on moving parts while s...

Страница 32: ...proof material the corrosion cannot be completely eliminated De icing salts such as magnesium chloride can lead to stress corrosion cracking on the components In winter or in case of rain it is also recommended to clean the trailer after each ride with a dry cloth In addition a treatment with cleansers and preservatives such as wax or spray oil every two weeks is recommended Utilisation ...

Страница 33: ...page 37 If necessary contact our service department or your local specialist dealer see Support information on page 36 Care Caution For cleaning use only water and domestic care agents such as detergents and textile care products soft cloths or impregnation and silicone spray Do not use any sharp edged tools or cleaning agents with a scouring effect Cleaning agents containing acids and solvents ar...

Страница 34: ...rements described in the chapter Connecting the trailer to a bicycle on page 28 have been fulfilled Buggy mode Make sure that the buggy wheel can rotate freely Put the hand strap of the push handle around your wrist in order to prevent accidental rolling away Walker mode Make sure that the buggy wheel is secured facing straight ahead Put the hand strap of the push handle around your wrist in order...

Страница 35: ...h seats 54 cm 64 cm Seat height max height between seat and cabin roof 70 cm 70 cm Legroom max length between backrest and foot rest 53 cm 53 cm Storage space back approx 35 l approx 43 l Weights Sportrex1 Sportrex2 Weight trailer mode cabin wheels push handle tow bar 18 3 kg 19 8 kg Wheels Sportrex1 and Sportrex2 Wheel Type 20 spoked wheel push in axle Tyres 20 x 1 75 47 406 Hose size 20 20 50 mm...

Страница 36: ...t The data will only be used for the purpose of checking and processing a warranty claim Qeridoo reserves the right to verify the cause of the defect within the framework of the legal regulations In addition the registration serves as proof of ownership in the event of theft The warranty service is provided by Qeridoo or an authorized dealer after release by Qeridoo At Qeridoo s option the defect ...

Страница 37: ... middle part 2019 BRAM 19 SET BRAM 19 SET 6 Frame bar top Sportrex 2019 Y RSOSR 19 Y RSOSR 19 7 Head protector set 2019 KP 19 SET KP 19 SET 8 Handlebar set from 2019 HGSR1 19 SET HGSR2 19 SET 9 Connector folding mechanism frame top 2019 Y AKMRO 19 Y AKMRO 19 10 Axle for Sportrex 2019 ASR1 19 SET ASR2 19 SET 11 Leaf suspension cover set 2019 BFA 19 SET BFA 19 SET 12 Rubber cap 20 Wheel from 2018 Y ...

Страница 38: ...portrex2 Comfort seating system 2019 Art No KSS 1 19 Sportrex1 Art No KSS 2 19 Sportrex2 Toggle fastener with strap Art no KÖRD 55 Harness buckle Art no GRT 899 Belt pad set 2019 Art No GP 19 SET Belt pad left 2019 Art No Z GPL 19 Belt pad right 2019 Art No Z GPR 19 Crotch pad 2017 Art No Z SCHPO 17 Head rest 2019 Art No Y KS 19 Harness catch Art no GUR 69 Reflector white 2019 Art No Y RSW K 19 Re...

Страница 39: ...8 Art No Y SCHA 18 Safety strap tow bar 2019 Art No Z SBD 19 Buggywheel adapter 2017 Art No Z LRAM 17 Buggy Multiwheel 8 5 2017 Art No Z LRMW 8 5 17 Hub axle for Multiwheel Art No Z SA MW 17 Mode switch 2017 Art No KN 5321 Push button Multiwheel 2019 Art No Y DKMW 19 Hand strap for handlebar 2019 Art No Z HSHG 19 Head protector left 2019 Art No Z KPL 19 Head protector right 2019 Art No Z KPR 19 Ap...

Страница 40: ...Rev 230819 1208 Sportrex 2019 Update Qeridoo GmbH Industriepark Nord 100 53567 Buchholz Germany www qeridoo de info qeridoo de ...

Отзывы: