background image

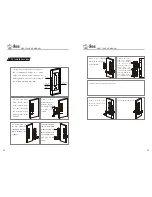
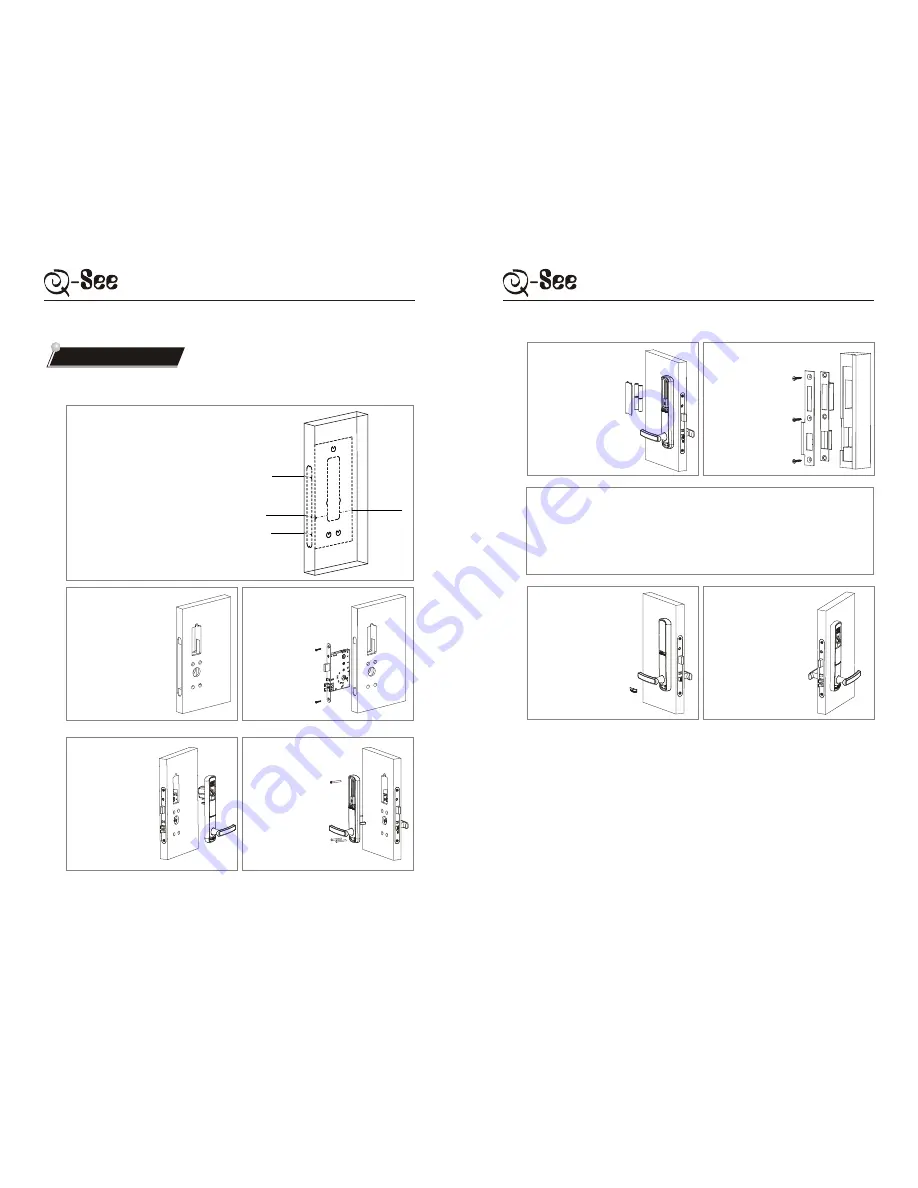
3.4 Installation steps

23

22

QSE7F4 USER MANUAL

QSE7F4 USER MANUAL

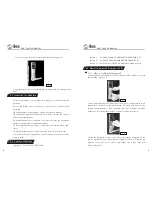
Mortise 

Line

1.Draw lever centerline as your request, 

the recommended height is 1 meter 

above the ground. Mark the door for 

drilling holes with a pencil according to 

installation template provided.

2 . D r i l l   t h e   d o o r 

f r o m   b o t h   s i d e s 

with electric drill. 

Cut out the cavity 

for mortise as per 

drilling view in the 

manual.

3.P u t   t h e  

mortise into the 

mortise cavity, 

fix it with 2 pcs 

o f   M 4 * 2 5  

screws.

4.Fix front plate on 

the door, make the 

spindle on the front 

plate through the 

cylinder. 

5.Connect the data 

cable in front plate 

with back plate, fix 

the back plate with 

2 pcs of M5 screws 

and 1pc of M6 

screw. 

6.Put 4 AA alkaline 

batteries in battery box 

as instructed.

7 .M a r k   t h e   d o o r 
frame for drilling 
holes as per drilling 
view. Cut out the 
cavity for strike and 
s t r i k e   p l a t e .   P u t 
strike into the cavity, 
covered with strike 
plate, fix them on the 
door frame with 3 
pcs of M4*25 screws.

8.Test the lock as per operation instructions.

9.Cover the back screw 

hole with plastic screw 

cover provided. 

10.Installation completed.

Mortise 

Line

Square spindle

centerline 

Square spindle

centerline 

Содержание Fingerprint Plus QSE7F4

Страница 1: ...no representa tions or warranties with respectto the contents hereof and specifically disclaims any impliedwarranties of selling or functionality for anyparticular purpose Digital Peripheral Solutions...

Страница 2: ...echnical Parameters 1 3 2 Operating Environment 1 4 Components 1 5 Structure View 2 Operation Instruction 2 1 Left handedand Right handed 2 2 Status ofthe lock 2 3 Instruction forindicators 2 4 Functi...

Страница 3: ...utside inside lever 2 6 2 How to erase group member fingerprint 2 7 Unlocking 2 7 1 Unlock with Emergency PIN 2 7 2 Unlock with group member fingerprint 2 7 3 Unlock with mechanical key 2 8 How to set...

Страница 4: ...ds later the lock will alarm automatically While alarming the door can t be opened with fingerprint or Emergency PIN but can be opened with mechanical key after 1 minute s alarming the alarm stops the...

Страница 5: ...e fingerprint template All enrolled fingerprint template will be saved while replacing the batteries 120 max Sunlight resistable Remain good condition after being jabbed with a 4H pencil at a 20cm s d...

Страница 6: ...if the hinge is on the right it is right handed lock 2 1 2 1 Left handed and Right handed 2 2 Status of the lock 1 Operation Instruction 1 Lock status locked with latches not by deadbolt Figure 2 1 Le...

Страница 7: ...Activate the lock in the manual it means to make the buttons or sensor begin to work Button 0 TO ACTIVATETHE LOCK QSE7F4 USER MANUAL QSE7F4 USER MANUAL 2 5 1 How to set Master fingerprint 2 3 2 4 2 5...

Страница 8: ...linput for Emergency PIN NOTE After entering the first digit all red indicators change to green indicator lights 4 Repeat entering the same 8 digit PIN green indicator goes out followed by a QSE7F4 US...

Страница 9: ...Group B 1000 ID For deleting Group C 2000 ID For deleting Group D 3000 QSE7F4 USER MANUAL QSE7F4 USER MANUAL 2 6 1 Enroll group member s fingerprint s 2 6 Referring to thelist let s takethe member inG...

Страница 10: ...n each lock B Master fingerprintand the groupmember fingerprint cannotbe the same C Afingerprint number willonly allow toenroll one fingerprint D Group memberfingerprint can openthe lock QSE7F4 USER M...

Страница 11: ...1 minute automatically 2 Blue background and green indicator light up a long beep is heard the inside motor is activated 3 Rotate the outside lever to unlock Figure2 9 QSE7F4 USER MANUAL QSE7F4 USER...

Страница 12: ...SE7F4 USER MANUAL 2 13 2 9 Change batteries flashes once for a second which indicates the lock is set into Normally open status successfully 3 Unlock with Emergency PIN or group member fingerprint aga...

Страница 13: ...ng tools not provided aresuitable for installingthis lock 21 20 1pc Electric drill Socket 1pc Drill bit 1pc File 1pc Square ruler 1pc Knife 1pc Hammer 1pc Drill 1pc Chisel 1pc Screwdriver 1pc Pencil 1...

Страница 14: ...plate on the door make the spindle on the front plate through the cylinder 5 Connect the data cable in front plate with back plate fix the back plate with 2 pcs of M5 screws and 1pc of M6 screw 6 Put...

Страница 15: ...ws two short beeps door can t be opened 1 Invalid fingerprint key 2 Your fingerprint has already been deleted 1 Your fingerprint position is quite different from where you first enrolled 2 Bad quality...

Страница 16: ...021 3022 3023 3030 3031 3032 3033 3100 3101 3102 3103 3110 3111 3112 3113 3120 3121 3122 3123 3130 3131 3132 1001 1002 1003 1010 1011 1012 1013 1020 1021 1022 1023 1030 1031 1032 1033 1100 1101 1102 1...

Отзывы: