


www.PyleUSA.com
8
5.
Ground Connection
Connect the ground input cable of the crossover to the vehicle chassis.
For better conductivity. If necessary, scrape paint off the chassis to reveal
bare metal at the contact point.
6.
Connect the Remote Input Terminal of the crossover to the Source Unit
Connect the remote input cable of the crossover to the remote output
terminal of the source unit to establish crossover remote power on/off via
the source unit. If the source unit does not provide a remote output, connect
to its power antenna terminal or other switched 12-volt source, e.g. Ignition
switch.
7.
Reconnect the Battery Ground to the Vehicle Chassis
Double check all the previous installation steps with the following table.
If everything is in order, complete the installation by reconnecting the
battery ground to the vehicle chassis.
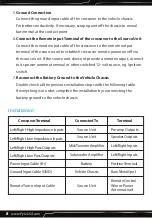
Installation
Crossover Terminal
Connected To
Terminal
Left/Right High Impedance Inputs
Left/Right Low Impedance Inputs
Left/Right High Pass Outputs
Left/Right Low Pass Outputs
Power Input Cable (B+)
Ground Input Cable (GND)
Remote Turn-on Input Cable
Source Unit
Source Unit
Mid/Tweeter Amplifier
Subwoofer Amplifier
Battery
Vehicle Chassis
Source Unit
Pre-amp Outputs
Speaker Outputs
Left/Right Inputs
Left/Right Inputs
Positive Terminal
Bare Metal Spot
Remote Control
Wire or Power
Antenna Lead
Содержание PLXR2B
Страница 1: ...2 Way Electronic Crossover Network Independent High Pass Low Pass Output Level Controls ...
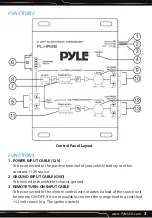
Страница 5: ...www PyleUSA com 5 SYSTEM DIAGRAM Remote Turn On Lead from Head Unit Battery Positive B A B ...
Страница 13: ...www PyleUSA com 13 ...
Страница 14: ...Questions Issues We are here to help Phone 1 718 535 1800 Email support pyleusa com ...


