background image

3

User Guide

About unit

!!

Notice

A. This unit is used at the 13.8V DC ground. In the condition of the negative 
     ground connect with the metal body of car, so it is safe to operate.
B. Fix the unit in the steady parts. If you parked your car to direct the sunlight wait 
     until the temperature in the car becomes normal before operating the unit.
C. If this unit is out of order. Please shut off the power sources immediately and 
     contact with authorized repairman in time. Do not disassemble it by yourself.
D. Please forgive us that we are irresponsible for the damages by your own defect.
 

Protect LCD monitor

When this unit does not use in long time. Do not expose the LCD monitor to direct 
sunlight. Otherwise, it will cause the function out of gear.When use the mobile 
phone, please keep away from the monitor, so that video signal was interrupted 
decause of spot, color stripe, etc.

!!

Notice

A. When your hands have sweat, water.
B. When your hands have dirt.
Do not touch the monitor to avoid it was damaged and cause the operating can t 
control.   

'

RESET MPU

Press  RESET   button to reset MPU to 
default MPU must reset as following 
situation:
    When finished the installation before 
    use this unit first.
    If this unit can t operate normally.
    When the monitor appears 
    exceptionally or the error message.

'

'

'

1. Turn off the Ignition switch.
2. Use the pen point or other edgily tools to press.

Car back video input function

This unit includes car back video input function. (When car back camera connects 
this player), during the operation of car backing, this player changes from play 
mode to car back video input mode automatically.
Then the  screen shows you back view, it protects you more safely.    

40

CAUTION:

2. The location of the player must not obstruct the driver . 

4. Follow the player connecting diagram, using the appendixes provided with 

     the unit.

1. Always use an experienced installation technician. 

3. Do  not  install  the  player in excessive dusty, shakable, high-temperature 

    or humid condition.

    Note : these conditions will adversely affect the player  s operation.

,

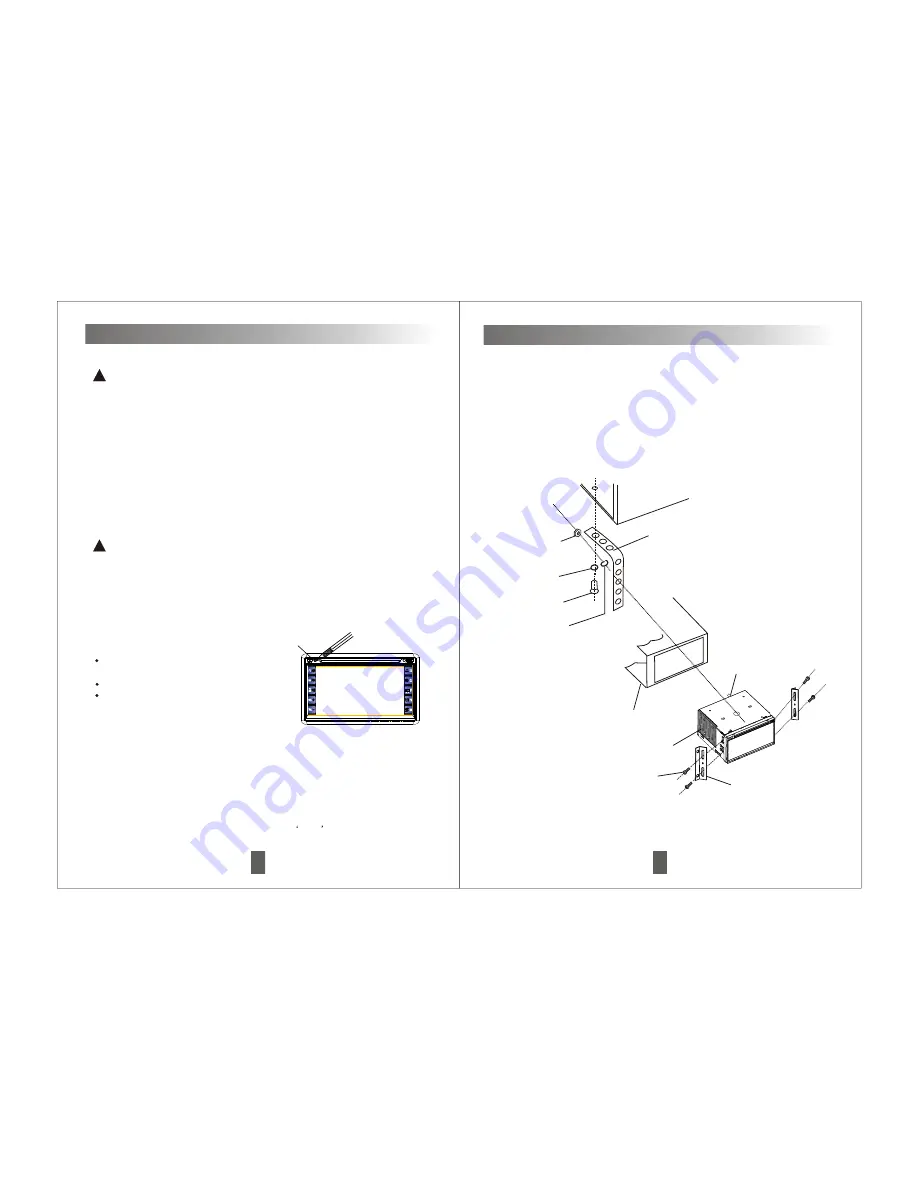
Installation

Hex. Bolt

Body

Flexible washer

Car panel

Screw

Flat washer 

Mounting metal bar

Hex. nut

Unit 

Install the screw

Install the bracket

Note:Maybe some camera lens can t match with this monitor,so it will appear
         horizontal line on picture.Only need press 9P/N

button over 2 seconds on 

         remote control  to set system match in 3 seconds,then solve this question.

'

Press  RESET

Содержание PLTSD62

Страница 1: ...ecifications 41 M P3 Functions 29 p Front Panel s Diagram 7 Remote Control s Diagram 8 Function Instructions 9 12 Troubleshooting 38 39 The Remote Control uses and maintains 4 Table of Contents 1 Touch screen function introduction 30 37 Disc Handling And Maintenance 5 Disc Handling And Maintenance 5 ...

Страница 2: ...p and the vehicle is driving 10 Do not turn up the volume too high You can t hear the outer activity CAUTION Do not install the vehicles which have no ACC function CAUTION Don t try installing or repairing your monitor If you have no training about electronic setup and car fittings and who have no relational experiences You will be injured by electric shock or other danger CAUTION In order to avoi...

Страница 3: ...ollowing situation When finished the installation before use this unit first If this unit can t operate normally When the monitor appears exceptionally or the error message 1 Turn off the Ignition switch 2 Use the pen point or other edgily tools to press Car back video input function This unit includes car back video input function When car back camera connects this player during the operation of ...

Страница 4: ...ure Fails to dialogue language and subtitle language The playing DVD has not multi lingual record content If the disc does not record muti lingual you will not switch it You have to switch in the item of the disc menu If the disc has not record subtitle The subtitle can t display Do not display the subtitle The playing DVD has no subtitle If the disc has not record subtitle The subtitle can t disp...

Страница 5: ...e fuse For god s sake to install the right same tating fuse Press RESET button The noise and other factor caused the Built in MPU fails to work normally No sound The wire has discconnected Connect the wire correctly The unit enforcing the play with repose slow motion or per frame to play Enforce the repose slow motion or per frame to play has no sound No picture The grip brake wire has disconnecte...

Страница 6: ...n some kinds of discs can not play in this unit This player cannot playback diameter 8cm disc To avoid damage of it please do not insert and play the above mentioned disc in this player PAY ATTENTION MP4 Audio Video compressed format 12cm 37 Touch screen function introduction 1 2 3 4 Note The product does not correct any more after leaving factory because of all of products were corrected in produ...

Страница 7: ...ter grounding 2 RGB setup Setup BACK R BACK G BACK B to adjust the grounding of monitor from default blue to adjust to red yellow etc If want to memory you setting color after selecting you want it Touch QUIT for exit turn off POWER and turn on it you selected color will memory in the unit for long time Touch screen correcting setup To set up this button when touch screen working has warp in order...

Страница 8: ...8 9 10 11 12 13 14 15 16 17 18 19 20 21 22 Note The function with only is valid in GPS mode 35 Picture setup 1 Personel picture effect setup Touch one of 1 5 on screen and adjust SATURATION HUE CONTRAST BRIGHT then the setup parameter will automatically to one of 1 5 which selected Touch screen function introduction AUDIO VIDEO OSD SYS 1 2 3 4 5 HUE BRIGHT CONTRAST 30 17 20 SATURATION 30 QUIT 1 2 ...

Страница 9: ...ch 10 three times then touch 5 VCD DVD only 13 QUIT For page quit button touch it to quit the current page to return to last page Touch screen function introduction E Multi functional setup interface operation After entering this interface AUDIO for audio setup interface see picture 9 1 VIDEO for picture setup interface see picture 9 2 OSD for screen display accord interface see picture 9 3 SYS fo...

Страница 10: ...ch can store 6 stations at most 18 stations AM includes AM1 A 2 AM3 each can store 6 stations at most 18 stations Auto memory scan storage button AMS LCD Display all selected functions USB function selection Insert USB to USB port of this player it will automatically playback the M 33 1 Touch this button to choose track up press it over 2 sec means fast backward function 2 Touch this button means ...

Страница 11: ...so be called PBC contents of USB 1 During USB playback mode press button for selection of next track press button for selection of last track Press 2RPT on panel or press 7RPT on remote control over 2 seconds to select the content of USB for repeat playback function Press 3RDM on panel or press 8RDM on remote control over 2 seconds to select the content of USB for random playback function Press di...

Страница 12: ... of the outer input video system must be same as this unit s then switch MODE button it will not has horizontal line twinkling If need to use this correct system for long time press POWER to turn off the unit to turn on it again the correct system will memory in the unit for long time OSD CLEAR This information only can be watching but can t be adjusted Note 1 In disc playing mode Press OSD on rem...

Страница 13: ...ring of disc 2 Press direction buttons to highlight selected Title Menu entry 3 Press ENTER or BAND on remote control to select the highlighted entry If the highlighted entry indicates a title that title will play from Chapter 1 4 Press MENU to invoke the menu screen included on many DVDs DVD only 5 Press direction buttons to highlight a selected menu entry It must open PBC in VCD format or it wil...

Страница 14: ...t Off Mode Normal Music Playing 29 MP3 Functions MP3 adopts to a standard which is the newest compressed technique of video digital playing one disc can store more than 600 types of music or more than 160 songs and have the same quality as CD Use the digital button to select the song playing directly 1 According to the basic operating process insert the disc correctly the player will start to sear...

Страница 15: ...program list C In program mode move the yellow cursor to Clear press Enter to clear the last chapter track in the program list then move the yellow cursor to Clear all press Enter to clear all of chapters tracks in the program list next to press PRG AMS over 2 seconds to continue playback the current disc Program Track 1 Track 2 Track 3 Track 4 Track 5 Track 6 1 2 3 4 5 6 7 8 9 10 11 12 13 14 15 1...

Страница 16: ...cture folder and move cursor to select picture files then press Enter have picture output 27 Basic Operations Press direction button to select 1 Kid Safe 2 G 3 PG 4 PG 13 5 PG R 6 R 7 NC 17 8 Adult Then press Enter to cycle through the available option Kid Safe Only title a parental control setting of 1 are allowed to play G Only title a parental control setting of 2 or less are allowed to play PG...

Страница 17: ...ying 00 00 23 Track01 Track02 Track03 Track04 Track05 Track06 Track07 Track08 07 16 Track06 CDA Contents Ripping SD card USB Ripping To insert CD format disc playback while SD card USB in the unit as below This operation is valid only CD format disc 1 press direction button to move the cursor to right side then press direction button to move the cursor to Ripping press Enter on remote control to c...

Страница 18: ...les have marks If will select all to press direction button to move the cursor to Select all then press Enter to confirm If will unselect all to press direction button to move the cursor to Unselect all then press Enter to confirm 25 Basic Operations Press direction button to select Standard Bright Soft Dynamic option press Enter to cycle through the available option Language Video Audio Rating Mi...

Страница 19: ...y press Enter to select the rip quality Medium High Best Low No Basic Operations Language Video Audio Rating Misc Aspect Ratio 4 3 View Mode TV System Smart Picture Fill Original Auto Fit Pan Scan 3 Press direction button move cursor to Video mode option press Enter to appear 4 kinds of video mode for selection as bellow Press direction button to select Fill Original Auto Fit Pan Scan option press...

Страница 20: ...btitle DIVX Subtitle Audio DVD menu Basic Operations Basic Operations 23 Press direction button to select different subtitle language English French Spanish Italian Portuguese Thal Chinese Turkish Russian Then press Enter to cycle through the available option Notes 1 The above language output depends on disc 2 The factory default language preference is English Language Video Audio Rating Misc Aspe...

Страница 21: ...Audio DVD menu Language Video Audio Rating Misc Basic Operations 22 Press direction button to select Unicode Western European Turkish Central European Cyrillic Thai Chinese ISO8859 Thai option Then press Enter to cycle through the available option 5 Press direction button to move cursor to Audio option press Enter to appear 9 kinds of audio language for selection as bellow Press direction button t...

Отзывы: