background image

2

IMPORTANT INSTRUCTIONS

4. Heat

The product should be placed away from other
products (including amplifiers) that produce heat.

5. Water and Moisture

Do not allow the product to come in contact with
water at anytime.

6. Cleaning

Disconnect power from this product before
cleaning. Do not use liquid cleaners or aerosol
cleaners. Use a dry cloth for cleaning .

7. Foreign objects

Never push objects of any kind into this
product through openings as they may touch
dangerous voltage points or short-out parts
that could result in a fire or electric shock.
Never spill liquid of any kind on the product.

8. Attachments

Do not use attachments not recommended
by the product manufacturer as they may
cause damage.

Please use care when installing the unit,
the unit may fall, causing serious
to the product.

9.

damage

Do not use a cracked, deformed, or repaired
disc. These discs are easily broken and may
cause serious personal injury and product
malfunction.

10.

12. Damage Requiring Service

Unplug the unit and
qualified service personnel

conditions:

a) If liquid has been spilled, or objects have

fallen into the product.

b) If the product has been exposed to rain

or water.

refer servicing to

under the

following

11. Accessories

Any mounting of the product should follow the

manufacture's instructions, and should use
a mounting accessories recommended by the
manufacturer. Make sure the player is
securely mounted. Quick stops, excessive
force, or improper installation may cause
damage to the product.

3.Ventilation

This product requires proper ventilation as per the
manufacturers's instructions in order to ensure
proper operation.

c) If the product does not operate normally

by following the operating instructions.

Adjust only those controls that are covered

by the operating instructions as an improper
adjustment of other controls may result in
damage and will often require extensive
work by a qualified technician to restore the
product to its normal operation.

d) If the product has been dropped or damaged

in any way.

e) When the product exhibits a distinct change

in performance - this indicates a need for
service.

13.Servicing

Do not attempt to service this product
yourself. Refer all servicing to qualified
service personnel.

14. Replacement parts

When replacement parts are required, be
sure the service technician has used
replacement parts specified by the
manufacturer or have the same
characteristics as the original part.
Unauthorized substitutions may result in
hazards.

1. Owner's manual

After unpacking this product, read the owner's

manual carefully, heed all warnings and instruc-
tions given in this manual and those marked on the
unit ,and follow all the operating and other instruc-
tions. Keep this booklet for future reference.

2. Power sources

When the product operates from the battery,
please refer to the operating instructions on
proper connections.

Содержание PLDVD170

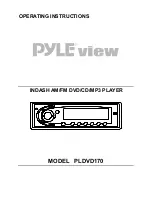
Страница 1: ...OPERATING INSTRUCTIONS MODEL PLDVD170 INDASH AM FM DVD CD MP3 PLAYER...

Страница 2: ...lowing discs DVD CD VCD DVCD MP3 CD R CD RW POWER SYSTEM FUNCTIONS ADDITIONAL VIDEO FEATURES COMPATIBILITY AUDIO SYSTEM FM 15 preset stations receiving frequency range 87 5 108 MHz MW 5 preset station...

Страница 3: ...ck audio setting Selecting the camera angle Selecting subtitles P Locat Playing repeatedly Selecting sound effect 1 7 8 10 11 13 14 20 21 23 27 32 24 2 3 4 6 8 11 12 14 16 15 18 17 19 20 21 22 23 27 2...

Страница 4: ...VD VIDEO PLAYER IS HARMFUL TO THE EYES DO NOT ATTEMPT TO DISASSEMBLE THE CABINET REFER SERVICING TO QUALIFIED PERSONNEL ONLY Dew may form on the pickup lens in the following conditions Immediately aft...

Страница 5: ...mmended by the manufacturer Make sure the player is securely mounted Quick stops excessive force or improper installation may cause damage to the product 3 Ventilation This product requires proper ven...

Страница 6: ...nit from an air conditioned area When you use the DVD player in a humid place If you use the DVD player in such a situation it may damage discs and internal parts Remove the disc turn on the DVD playe...

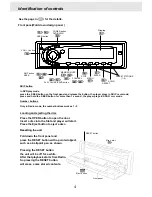
Страница 7: ...layer plays in SCAN mode 9 7 8 Identification of controls Eject OPEN button 11 12 MEMORY MUTE 11 12 17 VOL button 18 POWER button DVD RADIO 12 Display 5 PLAY PAUSE BAND button 12 SKIP button SEEK 15 2...

Страница 8: ...you play Other indicators DVD video disc VIDEO CD Audio CD When loading During playback During playback During playback When loading When loading Example Example When playing back the same title chapt...

Страница 9: ...o change the playback speed To locate preceding succeeding chapter or track Joy Stick Joy Stick Volume control Band control For VCD discs to change the audio channel SEL 11 16 20 20 19 14 13 15 18 Not...

Страница 10: ...e than 30 in each direction of the front of the remote sensor 2 Remote sensor and remote control eye jack Connect the remote control eye jack to the remote sensor unit L Not used when using the remote...

Страница 11: ...Purple PURPLE CABLE AMPLIFIER TURN ON Purple with white stripe 5 BROWN CABLE POWER SCREEN 6 GREEN FRONT RIGHT SPEAKER GREY GREY WITH WHITE STRIPE 8 BROWN CABLE REAR LEFT SPEAKER BROWN BROWN WITH WHIT...

Страница 12: ...out See page 23 2 3 When playing DVD video discs or audio CDs encoded via the DTS recording please use the coaxial cable And the Audio Setting please refer to page 19 When using the audio cable do no...

Страница 13: ...R 3 THE UNUSED SPEAKER CABLES MUST BE PROPERLY INSULATED WITH TAPE OR TERMINATING CONNECTORS TO AVOID A SHORT NOTE 2 1 Refer to the owner s manual for the connected monitor as well 2 Connect the DVD...

Страница 14: ...e down into the disc slot Place the disc in the slot the disc will go into the slot automatically Do not push the disc into the slot fast doing so may cause the loader to malfunction Press the OPEN bu...

Страница 15: ...instructions of this DVD player Some DVD discs are produced in a manner that allows specific or limited operation during playback As such the DVD player may not respond to all operating commands This...

Страница 16: ...layer plays in mode 7 8 7 8 Notes The DVD player does not play sound and subtitles during reverse and forward scan of DVD discs or VIDEO CDs However the DVD player plays sound during fast forward or f...

Страница 17: ...n You can play a disc from the desired location Locating a specific location by entering the track number the chapter number or the time DVD VCD CD Note Some discs may not respond to this process Some...

Страница 18: ...r buttons of the digest you want If a VIDEO CD contains a track menu you can locate a specific track using the track menu function Press MENU in PBC on mode Press TITLE in digest mode Press ENTER the...

Страница 19: ...the next item You cannot select title chapter and track numbers not included on the disc The programmed selections will be cleared when you turn off the DVD player or you remove the disc 9 You can pla...

Страница 20: ...a title chapter or track Repeats the same track Repeats the same chapter Repeats the entire disc Repeats the same title Resumes normal playback Resumes normal playback DVD VCD MP3 CD Playing without...

Страница 21: ...front panel 34 Adjust SOUND as you like Adjust SOUND as you like To Balance Bass Treble Fader Loudness BAl xx BAss xx trE xx FAd xx Loud x Press the VOL button adjust the setting as you like xx change...

Страница 22: ...the screen you can change the AUDIO Mode Press the AUDIO button the setting appears on the screen Stereo L R Mode L R mode highlighted press ENTER to change the audio channel L R mode changes as foll...

Страница 23: ...Good evening DVD You can display subtitles on the screen and select a preferred subtitle language Each time you press the SUB SUBTITLE button the subtitle languages included on the DVD disc change NO...

Страница 24: ...g time of the current track Elapsed track Total track number Disc type Elapsed time Remaining time of the current title Elapsed chapter and total chapter number Elapsed title and total title number An...

Страница 25: ...6 9 TV System NTSC NTSC PAL PAL M AUTO 4 3 LETTERBOX Select when 4 3 TV is connected displays theatrical images with masking bars above and below the picture 4 3 PAN SCAN Select when a 4 3 TV is conne...

Страница 26: ...his is the function of DVD for restricting the viewing age as stipulated by laws in different countries The way in which viewing is restricted differs from DVD to DVD Sometimes the DVD can not be play...

Страница 27: ...umber button When the MENU is not on the screen To play the preceding or the next track To select the track with the number button on the remote directly then press ENTER button to play the track To m...

Страница 28: ...EK button on the front panel less than 0 5 seconds and release the button the display steps up the desired frequency Press MEM button more than 1 second then press the number button from 1 5 on the fr...

Страница 29: ...seconds store the desired station by press the MEM button and favour number button In radio mode Press the BAND button you change the current band to others in turn F1 F2 F3 A1 A2 In MW band press SET...

Страница 30: ...ust or mechanical shock Operation If the player is brought directly from a cold to a warm location or is placed in a very damp room moisture may form on the lenses inside the player Should this occur...

Страница 31: ...oth before using Attention Do not write on dics Do not use pickup cleaning dispersing solution anti static electricity solution or any other kind of solutions to clean disc Do not stick label or glue...

Страница 32: ...emote and the player 2 Point the remote at the remote sensor on the player 3 Replace the battery in the remote with new one if it is weak There s no picture 1 Check that the player is connected secure...

Страница 33: ...Projecting parts Weight 1 5Kg w h d Design and specifications are subject to change without notice Audio Video Speaker output Power General Frequency range 87 5 108MHz Usable sensitivity 10dBf Signal...

Страница 34: ...tion cable x 1 CABLE REMOTE CONTROL Remote control x 1 Mounting Grommet X 1 Mounting Screw M5 equipped on the rear of the unit X 1 Remote sensor x 1 31 Accessories and Hardware 3 V Lithium Button Cell...

Страница 35: ...per before use Apply the paper cover supplied on the screw hole to keep out dust There are 2 mounting screws on the case of the DVD player shows to protect the unit during shipping You need to remove...

Отзывы: