


YA
LI D
IG
IT
A
L, P
A
R
A
D
A
, R
A
M
O
, I
N
ST
A
LL
AT
IO
N A
N
D O
PE
R
AT
IN
G M
A
N
U
A
L
20
16
-02
-0
1
|
68
GB
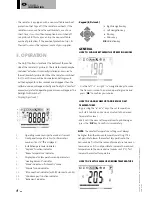
GENERAL
INFORMATION
RADIATOR CONNECTED TO A CENTRAL
CLOCK BY WIRE, OR WIRELESSLY
CONNECTED TO AN LVI RF CENTRAL
PROGRAMMER
• When connected to a central programmer, select the
automatic operation mode.
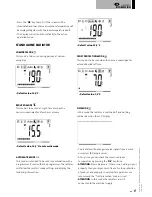
CONNECTED TO A CENTRAL CLOCK BY WIRE (Picture 4A)
AUTOMATIC MODE
• Comfort mode/temperature is active. The , in
section 8 of the LCD display, is constantly displayed.
• Reduced mode/temperature is active. The , in
section 8 of the LCD display, blinks.
WIRELESS LVI RF CENTRAL PROGRAMMER
AUTOMATIC MODE
• Comfort mode/temperature is active. The , in
section 8 of the LCD display, is constantly displayed.
• Reduced mode/temperature is active. The , in
section 8 of the LCD display, is constantly displayed.
• Frost protection mode/temperature is active. The ,
in section 8 of the LCD display, blinks.
• The radiator is switched off. The , in section 8 of the
LCD display, blinks and "OFF" is constantly displayed.
The icon is active when wireless programmer and
radiator thermostat exchange information (e.g. order to
change the operating mode).
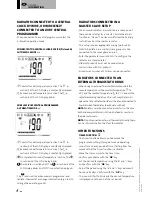
RADIATORS CONNECTED IN A
MASTER SLAVE SETUP
• When several radiators are installed in a room, one of
them can be selected as a “master”, while the others
function as “slaves”. The slaves will follow the heating
instructions from the master radiator.
• This setup requires appropriate wiring (picture 4A).
Note! All radiators in a master/slave group must be
connected to the same phase on pin 1.
• Enter the parameter menu (11 SLA) to configure the
radiator as a slave radiator.
• Older LVI products must not be connected as
master/slave with this product.
• A maximum number of 10 slaves can be connected.
RADIATORS CONNECTED TO AN
EXTERNAL THERMOSTAT OR BMS
• When using an external thermostat which controls the
room temperature, set the comfort temperature to
30°C and the reduced temperature to 5°C. Connect the
radiator according to picture 4A in such way that pin 3 is
open when the radiator should emit heat and connected to
Neutral when the radiator should not emit heat.
NOTE:
Radiators must be connected as masters in this case.
Each and every radiator must also be defined as master in
the parameter menu.
NOTE:
Do not connect an external thermostat directly to pin
1 or 2 as this will shorten the life of the radiator.
OTHER FUNCTIONS
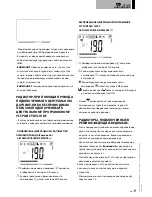
TIMER FUNCTION
The timer function allows you to override the
programmed settings (temperature and operating
mode) for a chosen period of time, starting from the
moment that the timer function is activated.
• Move the frame cursor to the timer icon.
• Confirm your choice with the “
OK
” key.
• Set the desired temperature using the“
+
” and “
-
” keys
and confirm with the “
OK
” key.
• Adjust the period using the “
+
” and “
-
“ keys between 1
hour and 44 days. Confirm with the “
OK
” key.
• The icon will start to blink and the desired temperature
is displayed until the end of the set period.


