


7
Assembly
Assembling the Rear Wheels
□
Pull the rear wheel downward so that the rear wheel can
rotate freely, then lift the rear wheel bracket to the
proper position. The rear wheel bracket will
automatically attach with the spring. See Figure 1-1.
□
Attach the upper handle to the lower bracket on the main
body of the tiller. Properly align the holes and then secure
with M8x45 bolt, washer, and plastic wing nut.
Align the face plate holes on the upper part of the handle.
Insert a bolt and nut to secure. See Figure 1-2
Figure 1-2.
3
1
Assembling the Upper Handle
2
Assembling the Depth Regulator
4
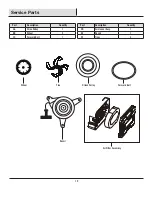
Assembling the Tines
□
First attach the depth regulator to the drag bar holder, choose
proper height and then lock the depth regulator with a cleves pin.
See Figure 1-3.
□
Insert the dust cover, tines, secondary tines, and disc to drive
shaft in sequence and lock tines with D-Pin. See Figure 1-4
NOTICE:
This tiller is shipped without gasoline or oil in the engine.
Fill up the gasoline and oil BEFORE operating your machine.
Figure 1-1
Rear Wheel
Bolt
Plastic
Wing Nut
Flat washer
Face Plate
Bolt
Nut
Depth Regulator
Cleves Pin
Figure 1-3
D-Pin
Secondary Tine
Disc
Dust Cover
Tine
Figure 1-4


