background image

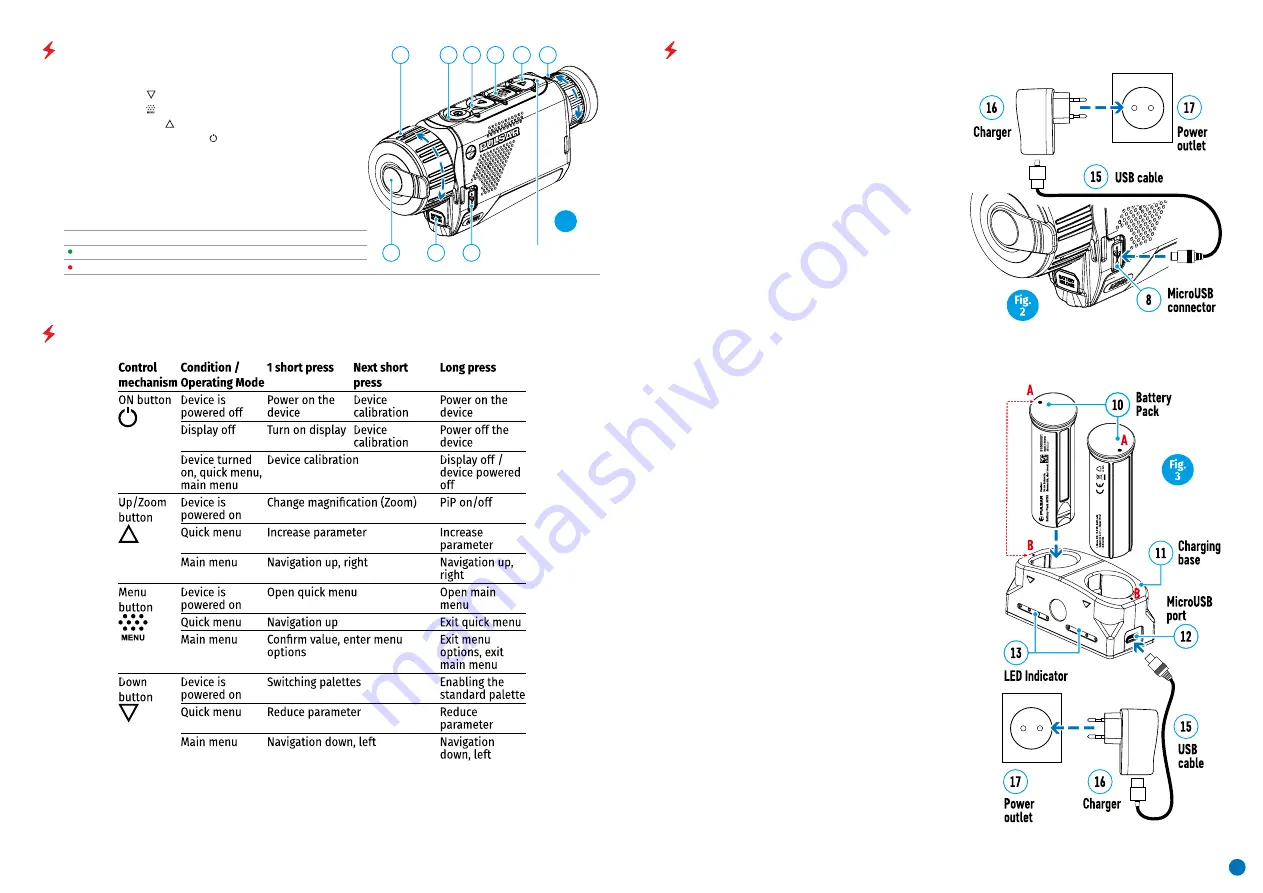
8.  MicroUSB connector


LED Indicator 

Operating Mode

LED indicator displaying current status of the device


Device is powered on


Device on / battery charge <10%

9.  Battery release button

7.  Lens cap

1.  Eyepiece dioptre adjustment ring

2.  Down button  

3.  Menu button


4.  Up/Zoom button     

5.  On/Calibration ON button  

6.  Lens focus ring

USING THE RECHARGEABLE BATTERY

Charging the battery
Option 1  (Fig.2) :

џ

Install the battery (10) into its slot on the instrument 

case (14) by aligning the icons to form a 'dot' on the 

device and the battery.   (see Fig. 4).

џ

Attach a USB cable (15) to the microUSB connector 

(8) on the device.

џ

Connect the other end of the USB cable (15) to the 

mains charger (16) or to a USB socket connected to 
another power source with rated output of 5V or less. 

AXION  KEY  thermal  imagers  are  supplied  with  a 
rechargeable  APS3  Lithium-ion  Battery  Pack  which 
enables the  thermal  imager  to  be  used  for  up  to  3 
hours. The battery should be charged before first use.    

џ

Connect the mains charger (16) to the mains power 

supply.

џ

Point A on the battery and Point B on the charger 

should be aligned.

џ

Two batteries can be charged at the same time – a 

second slot is provided for this. 

џ

Attach the microUSB plug on the USB cable (15) to 

the microUSB connector on the mains device (16). Plug 

the device into a 100–240V power outlet  (17). 

џ

Insert the rechargeable battery (10) supplied with 

your device, or purchased separately, fully along the 
guide  rail  into  the  APS  charger  slot 

vailable 

separately

(11). 

Note: 

The PB8I* Power Bank may be used as a charger 

(see Item 7).

Option 2  (Fig.3) :

Attention! 

AXION  KEY  thermal  imagers  require  a 

licence when exported outside your country.

џ

Attach the second plug of the microUSB cable to the 

socket (12) of the mains charger (11).

џ

The LED indicator (13) will light up. 

COMPONENTS AND CONTROLS

BUTTON OPERATION 

1

2

3

4

5

6

7

9

8

LED indicator

Fig. 

1

2

Содержание AXION KEY X?22

Страница 1: ...AXION KEY Thermal Imaging Monoculars Operating Instructions English Fran ais Deutsch Espa ol Italiano...

Страница 2: ...s Imageurs Thermiques AXION KEY 8 14 Fran ais Mode d emploi W rmebildkameras AXION KEY 15 21 Deutsch Bedienungsanleitung Generador de im genes t rmico AXION KEY 22 28 Espa ol Instrucciones de uso Term...

Страница 3: ...rsionoftheUser sManualmaybefoundonthewebsitewww pulsar vision com AXION KEY monoculars can be used for night time hunting observation and terrain orientation and carrying out rescueoperations AXION KE...

Страница 4: ...PS3 Lithium ion Battery Pack which enables the thermal imager to be used for up to 3 hours Thebatteryshouldbechargedbeforefirstuse Connect the mains charger 16 to the mains power supply Point A on the...

Страница 5: ...e devicepoweringoff The device will switch to operation from the external power source while the APS3 battery will be gradually recharged Attachtheexternalpowersourcetothedevice sUSBconnector 8 Fig 1...

Страница 6: ...vice is turned on the image is projected onto the display with thebrightnessandcontrastsettingssavedfromthepreviouspoweroff Contrast bypressingtheUP 4 DOWN 2 buttonsandchangingthedisplaycontrastvaluef...

Страница 7: ...rntothefactorypixelmapand NO ifyoudonot DeletethedefectivepixelwithashortpressoftheOn CalibrationONbutton 5 fixed cross that is required to facilitate a search for the defective pixel and to align the...

Страница 8: ...f When the device is switched on press and hold the ON button 5 The display will disappear and the message Displayoff willappear WhentheONbutton 5 isheld thedisplaywillshow Displayoff andacountdown DI...

Страница 9: ...e requirements of European standard EN 55032 2015 Class A Caution Operating this product in a residential area may cause radio interference Malfunction Thermal imager does not power up Does not operat...

Отзывы: