


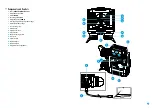


12
Built-In Laser Rangefinder
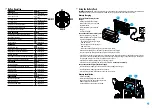
The binoculars are equipped with a built-in rangefinder
(17)
, allowing you to
measure distance to objects up to 1000m away.
How the rangefinder works:
•
Turn on the device, set up image according to section
•
Press the
UP (2)
or
LRF (21)
button on remote control - rangefinding reticle
appears; in the top right corner of the display dashes of distance values with
unit of measurement appear
, i.e. the rangefinder enters the stand-by
mode.
•
If PiP mode is activated, the aiming reticle disappears upon activation of the rangefinder and in the PiP
window remains active.
•
Point the rangefinding reticle at an object and press the
UP (2)
button.
•
In the top right corner of the display you will see distance in meters (or yards - depending on settings).
Note:
if the rangefinder is idle longer than for 4 seconds, it turns off automatically.
Operation in SCAN mode:
•
To measure distance in scanning mode, hold down the
UP (2)
or
LRF (21)
button on remote control for
longer than two seconds. Measurement readings will be changing in real time as you point the binoculars at
different objects. Message
SCAN
appears in the top right corner.
•
To exit
SCAN
mode, press
UP (2)
or
LRF (21)
button again.
•
If measurement fails, dashes will appear on the display.
•
In 4 seconds of inactivity (no measurement is taken) the rangefinder turns off, the rangefinding reticle with
readings disappears from the display.
Notes
:
•
To select a rangefinding reticle, please see the
•
To select a unit of measurement (meters or yards) go to the
Peculiarities of operation:
•
Accuracy of measurement and maximum range depend on the reflection ratio of the target surface, the angle
at which the emitting beam falls on the target surface and environmental conditions. Reflectivity is also
affected by surface texture, color, size and shape of the target. A shiny or brightly colored surface is normally
more reflective than a dark surface.
•
Measuring range to a small sized target is more difficult than to a large sized target.
•
Accuracy of measurement can also be affected by light conditions, fog, haze, rain, snow etc. Ranging
performance can degrade in bright conditions or when ranging towards the sun.
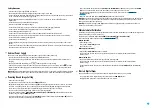
Display Off Function
The Display Off function deactivates transmission of image to the display by minimizing its brightness. This
prevents accidental disclosure. The device keeps running.
•
When the device is on, hold down the
ON/OFF (1)
button. Display goes out,
message
“Display Off”
appears.
•
To activate the display, press briefly the
ON/OFF (1)
button.
•
When you press and hold the
ON/OFF (1)
button, the display shows the message “Display
Off” with a countdown. Pressing & holding the button down for the duration of the
countdown will power the device off completely.
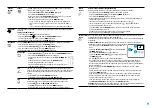
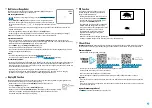
SCAN
125
m
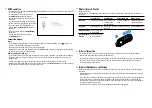
PiP Function
PiP (“Picture in Picture”) allows you to see a
zoomed image simultaneously with the main
image in a dedicated window.
•
Enabling/disabling the PiP function is carried
out in the main menu (see section
•
Change zoom ratio in the PiP window with a
short press of the
DOWN (5)
button.
•
The zoomed image is displayed in a dedicated
window, while the image in the rest of the
screen is displayed at base magnification (2.5x).
•
When PiP is turned on, you can operate
the discrete and continuous digital zoom.
Magnification will take place only in the
dedicated window.
•
When PiP is turned off, the image magnification
in the main window changes to the value that was set for the PiP window.
Stream Vision
Accolade 2 LRF Pro
thermal imaging binoculars support Stream Vision technology which allows you to stream
an image from the display of your thermal imager to a smartphone or tablet PC via Wi-Fi in real time mode.
Firmware Update
•
Download free of charge Stream Vision App”
https://play.google.com/store/apps/
https://apps.apple.com/us/app/
•
Connect your Pulsar device to your mobile device (smartphone or tablet).
•
Launch Stream Vision and go to section “My Devices”.
•
Select your Pulsar device and press “Check Updates”.
•
Wait for the update to download and install. Pulsar device will reboot and will be ready to operate.
Important
:
•
if your Pulsar device is connected to phone, please turn on mobile data transfer (GPRS/3G/4G) to download
update;
•
if your Pulsar device is not connected to your phone but it’s already in the “My Devices” section, you may use
Wi-Fi to download update.
Is your firmware up to date?
Click
to check the latest firmware for your device.
2.5x
5.0x
Содержание ACCOLADE 2 LRF XP50 PRO
Страница 1: ...ACCOLADE 2 LRF XP50 PRO USER MANUAL Thermal Imaging Binoculars ...
Страница 15: ...pulsar vision com ...


