6
Safety Measures
•
Only use the charger supplied with your device.
•
The battery should be partially charged for long-term storage – 50 to 80 %.
•
Do not charge the battery immediately after bringing the battery from cold environment to a warm one. Wait
for 30 - 40 minutes for the battery to get warm.
•
Charge the Battery Pack at a temperature from 0 °C to +35 °C. Otherwise, batter’s life will decrease
significantly.
•
Do not leave a battery unattended while charging.
•
Never use a modified or damaged charger.
•
Do not leave the battery in a charger connected to the mains after charging is complete.
•
Do not expose the battery pack to high temperature or to a naked flame.
•
Do not submerge the battery in water.
•
Do not connect external device with a current consumption that exceeds permitted levels.
•
The Battery Pack is short circuit protected. However, avoid any situation that may cause short-circuiting.
•
Do not dismantle or deform the Battery Pack.
•
Do not drop or hit the battery.
•
When using the battery at negative temperatures, battery’s capacity decreases, this is normal and is not a
defect.
•
Do not use the battery at the temperatures above those shown in the table – this may decrease battery’s life.
•
Keep the battery out of the reach of children.
External Power Supply
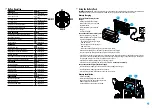
The device can be powered with an external power supply such as Power Bank (5 V).
•
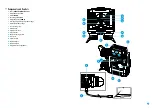
Connect the external power supply to the USB port
(15)
of the device.
•
The device switches to operation from external power supply, and the IPS7 Battery Pack will begin slowly
charging.
•
The display will show the battery icon
with charge level as a percentage.
•
If the device operates on external power supply but the IPS7 battery is not connected, icon
is shown.
•
When the external power supply is disconnected, the device switches to the internal battery pack without
powering off.
Attention!
Charging IPS7/IPS14 batteries at air temperatures below 0 °C can result in reduced battery life. When
using external power, connect Power Bank to the switched-on device, which have worked for several minutes.
Powering On and Image Setting
•
Open the lens cover
(13)
.
•
Turn the device on with a short press of the
ON/OFF (1)
button.
•
Adjust the interpupillary distance with the rings
(6)
by moving the eyepieces farther or closer to each other.
•
To obtain a crisp image of the icons on the display, rotate the diopter adjustment ring
(7)
. Once adjusted,
there is no need to rotate the diopter adjustment ring for distance or any other conditions.
•
To focus on the object being observed rotate the lens focusing ring
(8)
.
•
Select the calibration mode:
manual (M), semi-automatic (SA)
or
automatic (A)
in the main menu (enter the
menu by long pressing the
МENU (3)
button).
•
Calibrate the image with a short press of the
ON/OFF (1)
button (when calibration mode
(SA)
or
(M)
has been
selected). Close the lens cap before manual calibration.
•
Select the desired observation mode (
Forest, Rocks, Identification
or
User
) by a long press of the
DOWN
(5)
button or in the main menu. User mode allows you to configure and save custom
•
To set up display brightness and contrast and continuous zoom, please refer to the
section.
•
After use, press and hold down the
ON/OFF (1)
button to turn the device off.
Warning!
Do not point the objective lens of the device at intensive sources of light such device emitting laser
radiation or the sun. This may render the electronic components inoperative. The warranty does not cover
damage caused by improper operation.
Warning!
The radiator cooling system
(12)
becomes warm during operation: this is normal and allows an
increase in the sensitivity of the device.
Microbolometer Calibration
Calibration allows levelling of the background temperature of the microbolometer and eliminates image flaws
(such as frozen image, vertical stripes etc.).
There are three calibration modes:
manual (M), semi-automatic (SA)
and
automatic (А)
.
Select the desired mode in the menu option
.
Mode М (manual)
•
Close the lens cover.
•
Press briefly the
ON/OFF (1)
button.
•
Open the lens cover.
Mode SA (semi-automatic)
•
Press briefly the
ON/OFF (1)
button to calibrate.
•
You do not need to close the lens cover (the microbolometer is closed with the internal shutter
automatically).
Mode А (automatic)
•
The device calibrates by itself according to the firmware algorithm.
•
You do not need to close the lens cover (the microbolometer is closed with the internal shutter
automatically).
•
In the automatic mode, the user can calibrate the microbolometer with the
ON/OFF (1)
(in the
SA
mode)
button.
Discrete Digital Zoom
The device allows you to quickly increase the base magnification of 2.5x by 2, 4 or 8 times.
•
To operate the discrete digital zoom, press successively the
DOWN (5)
button.
•
The digital zoom will not be saved after the device is re-started.
Содержание ACCOLADE 2 LRF XP50 PRO
Страница 1: ...ACCOLADE 2 LRF XP50 PRO USER MANUAL Thermal Imaging Binoculars ...
Страница 15: ...pulsar vision com ...


