background image


29 


IP Camera Parameter Setup 

Web User Interface Introduction 

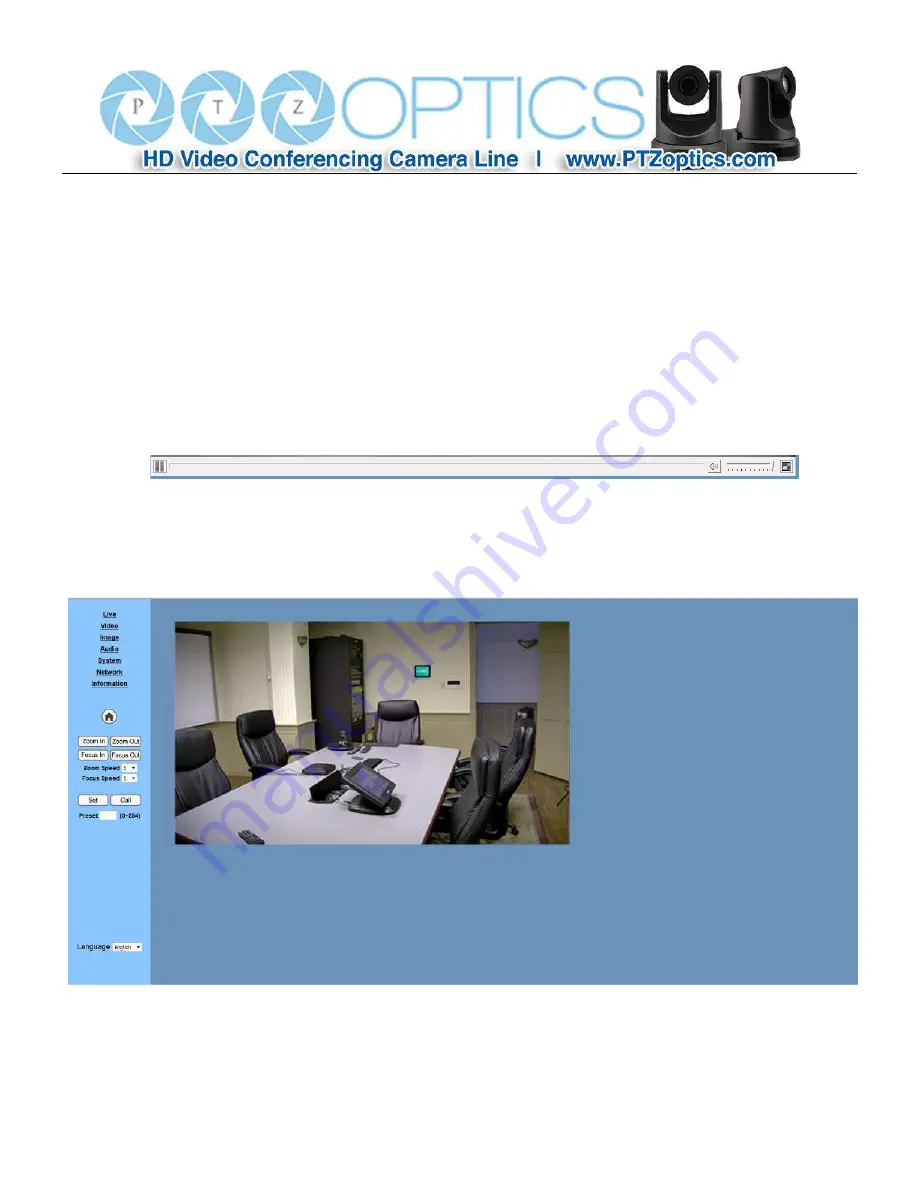
All pages include 2 areas: 

On the left is the menu   

On the right is real time monitoring - displaying video image and the Parameter settings   

Live Video viewing window 

Click “

Live

” in the menu area.    The video viewing window will be resized based upon video resolution, the higher th

resolution is, the bigger the playing area is. Double click the viewing window and it will show in full-screen.    Double 

click again and it will return to the initial size. 

The Status bar in the viewing window is as shown below: 


1

Video playback/pause button: controls real-time video.    Pause to freeze the image, play to return to live video. 

2

Audio control buttons: Mute and Volume controls for audio input on camera, if being used.


3

Full screen button will switch between Full Screen and Windowed view. 


PTZ Controls


(only lens controls are available on this model as it is fixed rather than full PTZ) 

Home

 Button 

Press to set zoom to Home Position. 

‘Zoom In’

 Button 

Содержание 20X-ZCAM

Страница 1: ...Rev 1 1 1 17 PTZ Optics 20X ZCAM User Manual V1 1 English...

Страница 2: ...Removal of the cover may result in an electric shock In case of abnormal operation contact the manufacturer Never operate outside of the specified operating temperature range humidity or with any oth...

Страница 3: ...5 Main Unit 4 6 Serial Communication Control Command Listings 5 7 Menu Setting 17 8 Networking 21 9 Maintenance and Trouble Shooting 37 Supplied Accessories When you unpack your camera check that all...

Страница 4: ...a maximum current supply of 1A Polarity of the power supply plug is critical and is as follows Handling Avoid any stress vibration or moisture during transportation storage installation and operation...

Страница 5: ...nce in low illumination situations 0 2 Lux 7 Full 1920x1080p HD Resolutions up to 60 frames per second 8 2D and 3D noise reduction with our latest low noise CMOS sensor 9 Button controls on back of ca...

Страница 6: ...t Compensation Yes Digital Noise Reduction 2D 3D Digital Noise Reduction Video S N 55dB Horizontal Angle of View 3 6 tele 58 6 wide Vertical Angle of View 2 0 tele 35 1 wide Ceiling Installation Yes I...

Страница 7: ...4 Main Unit 1 3G SDI Female connector 2 Ethernet Port 3 RS485 4 Menu Navigate Buttons 5 Audio in out 6 DC 12V power jack 7 Power indicator 1 2 3 5 6 4 7...

Страница 8: ...rol The camera can be controlled via RS485 Half duplex mode with support for VISCA Pelco D or Pelco P protocol The parameters of RS485 are as follows Baud rate 2400 4800 or 9600 bps Start bit 1 bit Da...

Страница 9: ...FF Indicates that two sockets are already being used executing two commands and the command could not be accepted when received Command Canceled z0 6y 04 FF y Socket No Returned when a command which...

Страница 10: ...3p FF Direct 8x 01 04 48 0p 0q 0r 0s FF pqrs Focus Position Auto Focus 8x 01 04 38 02 FF AF On Off Manual Focus 8x 01 04 38 03 FF Auto Manual 8x 01 04 38 10 FF CAM_ZoomFocus Direct 8x 01 04 47 0p 0q...

Страница 11: ...F pq Gain Position Gain Limit 8x 01 04 2C 0p FF p Gain Position CAM_Bright Reset 8x 01 04 0D 00 FF Bright Setting Up 8x 01 04 0D 02 FF Down 8x 01 04 0D 03 FF Direct 8x 01 04 0D 00 00 0p 0q FF pq Brigh...

Страница 12: ...On 8x 01 04 61 02 FF Image Flip Horizontal On Off Off 8x 01 04 61 03 FF CAM_PictureFlip On 8x 01 04 66 02 FF Image Flip Vertical On Off Off 8x 01 04 66 03 FF CAM_RegisterValu e 8x 01 04 24 mn 0p 0q F...

Страница 13: ...Reset Reset 8x 01 04 A0 10 FF Reset Factory Setting CAM_Brightness Direct 8x 01 04 A1 00 00 0p 0q FF pq Brightness Position CAM_Contrast Direct 8x 01 04 A2 00 00 0p 0q FF pq Contrast Position CAM_Flip...

Страница 14: ...0q FF pq R Gain CAM_BGainInq 8x 09 04 44 FF y0 50 00 00 0p 0q FF pq B Gain CAM_AEModeInq 8x 09 04 39 FF y0 50 00 FF Full Auto y0 50 03 FF Manual y0 50 0A FF Shutter priority y0 50 0B FF Iris priority...

Страница 15: ...F Off CAM_LR_ReverseI nq 8x 09 04 61 FF y0 50 02 FF On y0 50 03 FF Off CAM_PictureFlipIn q 8x 09 04 66 FF y0 50 02 FF On y0 50 03 FF Off CAM_RegisterValu eInq 8x 09 04 24 mm FF y0 50 0p 0p ff mm Regis...

Страница 16: ...Big Version Numbers Little Version Numberuuuu Yearvv Monthww Day CAM_ModeInq 8x 09 04 A6 FF y0 50 00 FF Mode0 y0 50 02 FF Mode2 CAM_GainLimitIn q 8x 09 04 2C FF y0 50 0q FF p Gain Limit CAM_DHotPixelI...

Страница 17: ...0p 0p 0q 0q 0r 0s tt 0u vv ww 00 xx 0z FF pp R_Gain qq B_Gain r WB Mode s Aperture tt AE Mode u bit2 Back Light u bit1 Exposure Comp vv Shutter Position ww Iris Position xx Bright Position z Exposure...

Страница 18: ...Preset 0xFF Address 0x00 0x03 0x00 Preset ID SUM Clear Preset 0xFF Address 0x00 0x05 0x00 Preset ID SUM Call Preset 0xFF Address 0x00 0x07 0x00 Preset ID SUM Auto Focus 0xFF Address 0x00 0x2B 0x00 0x0...

Страница 19: ...t 0xA0 Address 0x00 0x03 0x00 Preset ID 0xAF XOR Clear Preset 0xA0 Address 0x00 0x05 0x00 Preset ID 0xAF XOR Call Preset 0xA0 Address 0x00 0x07 0x00 Preset ID 0xAF XOR Auto Focus 0xA0 Address 0x00 0x2...

Страница 20: ...ion value Optional items 7 7 Effective only when ExpCompMode is On Bright Brightness value Optional items 0 17 Effective only when Bright mode is On Shutter Shutter speed setting Optional items 1 30 1...

Страница 21: ...G Blue gain Optional items 10 10 in Auto mode 0 255 in Manual mode Saturation Color Saturation Optional items 60 200 Hue Chroma adjustment Optional items 0 14 4 IMAGE Move the cursor to the Image item...

Страница 22: ...nu and press HOME button NOISE REDUCTION menu appears as shown in the following figure 2D NR 2D noise reduction Optional items Close Auto 1 5 3D NR 3D noise reduction Optional items Close 1 8 7 SETTIN...

Страница 23: ...nu and press HOME button INFORMATION menu appears as shown in the following figure Version Installed Firmware version Date Date of firmware release AF Version AutoFocus version IP Assigned IP address...

Страница 24: ...ch cable or directly to your PC via a CAT5 or CAT6 crossover cable 2 Turn on camera power 3 If successful the orange network light will illuminate and the green light will start flashing If unsuccessf...

Страница 25: ...22 Picture 1 1 Direct connections via cross over network cable Picture 1 2 Connections to LAN via patch cable to LAN wall jack or LAN switch...

Страница 26: ...ds web site Run upgrade exe Click the Search tab Click the Search Button The software will show the camera s IP address subnet mask network gateway and the camera s MAC address as shown below If you h...

Страница 27: ...click the Set button Note In order to view or control the camera the PC must be able to see this IP address either by virtue of being in the same subnet or by appropriate routing settings in a router...

Страница 28: ...ut http your IP address where your IP address is the IP address set for the camera into the URL line of your browser Results may be better with IE web browser others may cause latency or fail to show...

Страница 29: ...ree VLC player software Please go to http www videolan org vlc Click the download VLC button If a download window appears click Save Then install the VLC player software by executing the file from you...

Страница 30: ...layer monitoring 1 VLC media player procedure 1 1 Install the free VLC Media Player software be sure to get appropriate version for your OS Windows MAC http www videolan org vlc index html 1 2 Open VL...

Страница 31: ...28...

Страница 32: ...the viewing window and it will show in full screen Double click again and it will return to the initial size The Status bar in the viewing window is as shown below 1 Video playback pause button contr...

Страница 33: ...down list to set speed of focus adjustments Set Saves a PTZ preset location zoom only on this model using the preset number entered below Call Recalls a PTZ preset location zoom only on this model us...

Страница 34: ...First Stream Resolution Set the desired video stream resolution The first stream allows 1920x1080 1080p 1280x720 720p or 1024x576 The second stream allows 720x576 480x270 or 320x240 only allows 320x24...

Страница 35: ...ate setting allowing for low motion scenes to use less bandwidth Fluctuate level This setting affects how aggressive variable bit rate adjustments will be 1 6 Spikes that are too large may affect vide...

Страница 36: ...Hue Hue 0 14 Use the slider control The box on the right shows the corresponding numerical value The Default setting is 7 Flip Mirror Check the Flip box to invert the image vertically for a ceiling m...

Страница 37: ...o 30dB adds gain or attenuates right channel of audio input signal ADTS Options On or Off indicates whether the Audio Data Transport Stream container type will be used for AAC streaming Press Apply to...

Страница 38: ...cel to revert to previous settings Network Settings Click Network The network parameters may now be set in the right side area LAN Settings IP settings for the device can be set here IP Configuration...

Страница 39: ...our PC until your PC is set for and connected successfully to the same subnet as the camera or visible to the camera via proper network routing configuration Port Settings While the IP address identif...

Страница 40: ...address Port Enter the multicast port Press Apply to confirm changes note some changes require a reboot of camera to take effect Press Cancel to revert to previous settings Information Click Informati...

Страница 41: ...38...

Страница 42: ...our software Image is shaky or vibrating 1 Check whether camera is mounted solidly or sitting on a steady horizontal and level surface 2 Check the building and any supporting furniture for vibration C...

Отзывы: