background image

NAS System


User Manual 

85 


5.


Enter Account as “admin” and password as “proware” and click the Logon 
command button. 


Login Screen 


NOTE: proNAS supports language options: English, Chinese 
(Taiwan), Chinese (China), Japanese, Korean, Polish (Poland), and 
Russian (Russia). You can select your preferred language before 
logon. 


6.


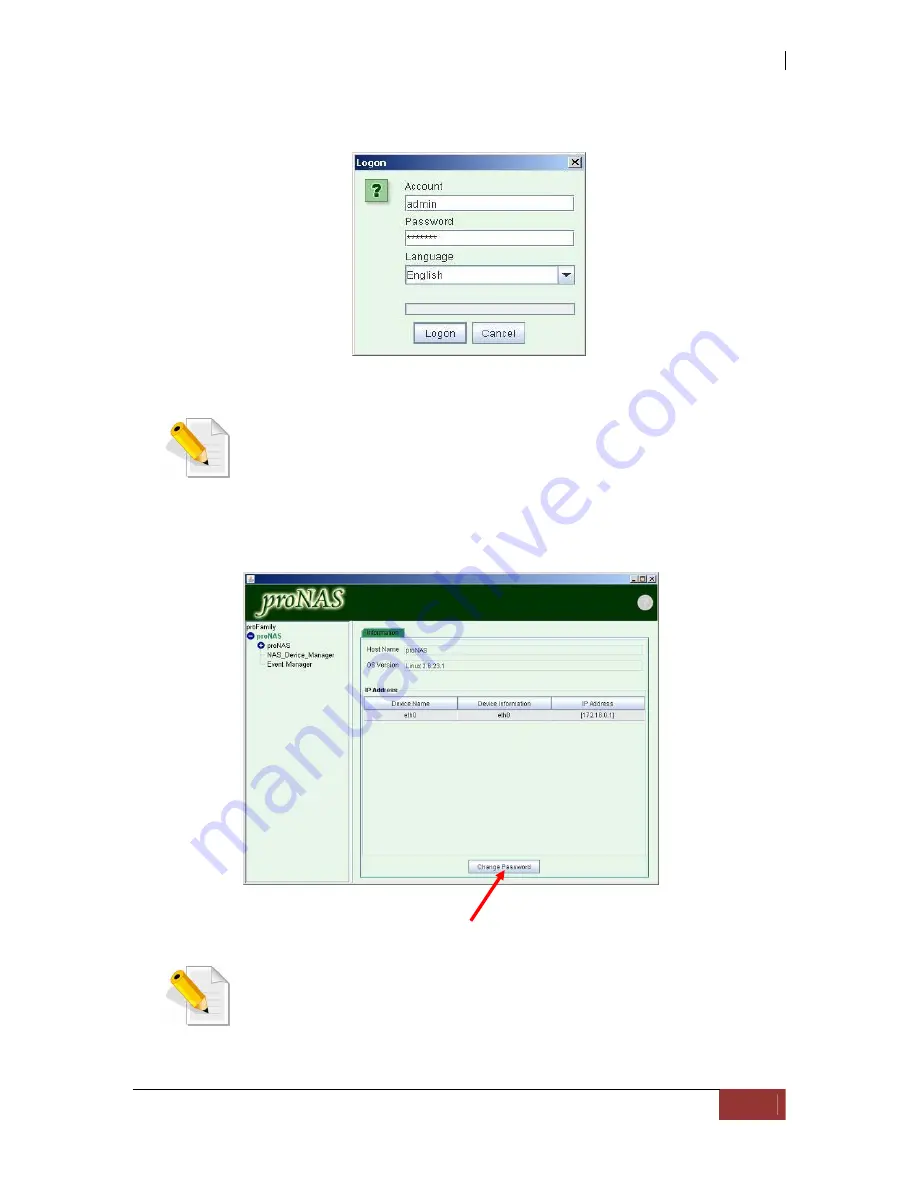
The proNAS main screen will be displayed showing proNAS, NAS Device Manager, 
and Event Manager. 


NOTE:  For security reason, it is necessary to change the default 
proNAS admin password. Click the “Change Password” button and 
enter the new admin password. 


“Change Password” option

Содержание Epica

Страница 1: ...NAS System User Manual Revision 1 2 P N PW0020000000351...

Страница 2: ...cement 17 1 3 4 Disk Failure Detection 17 1 4 Array Definition 18 1 4 1 Array 18 1 4 2 Volume 18 Chapter 2 Installation Overview 19 2 1 Packaging Shipment and Delivery 19 2 2 Unpacking the NAS System...

Страница 3: ...Modify Array 48 5 4 Delete Array 49 5 5 Create Volume 50 5 6 Modify Volume 53 5 7 Delete Volume 54 Chapter 6 Network and System Management 55 6 1 Network Management 55 6 1 1 Network Settings 55 6 1 2...

Страница 4: ...ume Group 94 9 1 2 Logical Volume Configuration 96 9 1 2 1 Create new Logical Volume 96 9 1 2 2 Extending Logical Volume Size 98 9 1 3 Volume Snapshot 100 9 1 3 1 Create Snapshots Manually 101 9 1 3 2...

Страница 5: ...g a Share 145 9 4 1 4 Deleting a Share 146 9 4 2 Properties Setting 147 9 4 3 Protocol Setting 148 9 4 3 1 CIFS 148 9 4 3 2 NFS 149 9 4 3 3 AppleTalk 149 9 4 3 4 Novell 149 9 4 4 Privilege Setting 151...

Страница 6: ...ght 211 10 5 Change Password and Logout 211 Chapter 11 proBackup 212 11 1 Introduction to proBackup 212 11 2 Administrator Logon 212 11 3 Create Backup Plan 215 11 4 Restore Backup 221 11 5 Account De...

Страница 7: ...reproduced stored in a retrieval system or transmitted in any form or by any means electronic mechanical photocopying recording or otherwise without the prior written consent Trademarks All products...

Страница 8: ...munications However there is not guarantee that interference will not occur in a particular installation If this equipment does cause interference to radio or television equipment reception which can...

Страница 9: ...ambient temperature Before plugging in any power cords cables and connectors make sure that the power switches are turned off Disconnect first any power connection if the power supply module is being...

Страница 10: ...NAS System 10 User Manual PART I Hardware Components and RAID Subsystem...

Страница 11: ...AS High Availability and proBackup client backup solution to provide businesses with the most flexible scalable securable and manageable NAS environment It helps to control the total cost of ownership...

Страница 12: ...system 128MB Disk on Module Centralization of Data and Storage Management Using Market Leading Java Technology Latest volume snapshot technology Apply volume replication to enhance data protection Sup...

Страница 13: ...as several megabytes These stripes are then interleaved in a rotating sequence so that the combined space is composed alternately of stripes from each drive The specific type of operating environment...

Страница 14: ...orm simultaneous independent read operations Mirroring thus doubles the read performance of a single non mirrored drive and while the write performance is unchanged RAID 1 delivers the best performanc...

Страница 15: ...o RAID 5 in that data protection is achieved by writing parity information to the physical drives in the array With RAID 6 however two sets of parity data are used These two sets are different and eac...

Страница 16: ...ly redundant 2 3 Data is striped across several physical drives Parity protection is used for data redundancy 3 5 Data is striped across several physical drives Parity protection is used for data redu...

Страница 17: ...sub arrays Capacity for RAID 30 or 50 1 3 2 Logical Unit Number LUN A logical unit is a drive group read by the host system as a logical device The subsystem supports up to eight 8 LUNs for each driv...

Страница 18: ...e smallest disk will become the effective capacity of all the disks in the Array 1 4 2 Volume A Volume is seen by the host system as a single logical device A Volume must be created on an Array If the...

Страница 19: ...the contents of the carton are damaged If any damage is found do not remove the components contact the dealer where you purchased the subsystem for further instructions 2 2 Unpacking the NAS System T...

Страница 20: ...NAS System 20 User Manual 2 3 Identifying Parts of the NAS System The illustrations below identify the various parts of the NAS system 2 3 1 Front View 2 3 2 Rear View...

Страница 21: ...nel B Connect to Host s SCSI adapter or other devices This enables another host to use the RAID function and detect a RAID volume from the NAS 5 R Link Port The subsystem is equipped with one 10 100 E...

Страница 22: ...ED and alarm will sound Fan Fail LED Turns RED when a fan s speed is lower than 2000 RPM or fan fails Over Temperature LED If system temperature is over 70o C or disk temperatures exceed 55o C the tem...

Страница 23: ...w buttons Use the Up or Down arrow keys to go through the information on the LCD screen This is also used to move between each menu when you configure the subsystem Select button This is used to enter...

Страница 24: ...the NAS 2 Attach network cable to the Ethernet port eth0 Connect the other end to your network hub or switch You may also connect the other Ethernet ports eth1 and eth2 if needed 3 2 Powering On 1 Plu...

Страница 25: ...orizontal this indicates that the Drive Carrier is locked When the Lock Groove is vertical then the Drive Carrier is unlocked Lock and unlock the Drive Carriers by using a flat head screw driver a The...

Страница 26: ...disk drive It is designed for maximum airflow and incorporates a carrier locking mechanism to prevent unauthorized access to the HDD 3 3 2 Disk Drive Status Indicator Every Drive Carrier has 2 status...

Страница 27: ...arrier is lockable and is fitted with a lock indicator to indicate whether or not the carrier is locked into the chassis or not Each carrier is also fitted with an ergonomic handle for easy carrier re...

Страница 28: ...terminal connected through the controller s serial port Front panel touch control keypad Web browser based proRAID Manager GUI IMPORTANT Only one method can be used to configure the RAID subsystem Tw...

Страница 29: ...NAS System User Manual 29 4 The default setting of the monitor port is 115200 baud rate 8 data bit non parity 1 stop bit and no flow control...

Страница 30: ...he preset password is 8 zeroes Type 00000000 6 Then press Enter to enter screen The Main Menu will appear Keyboard Function Key Definitions Enter key to confirm a selected item Ctrl Q key to exit a se...

Страница 31: ...System User Manual 31 VT100 terminal configuration Utility Main Menu Options Select an option and the related information or submenu items display beneath it The submenus for each item are listed bel...

Страница 32: ...Volume RAID Management Create single or multiple Arrays and Volumes with custom parameters SCSI Configuration Set SCSI parameters such as SCSI ID speed and Tag Queue System Management Set System para...

Страница 33: ...ollow these steps 1 Shut down the host computer system if a host computer is connected 2 Start a terminal connection to the disk array and access the Menu area 3 From the Main Menu scroll down to Syst...

Страница 34: ...ile and click Open 7 Select Ymodem under Protocol YMODEM is the file transfer protocol used by the terminal emulation software 8 Click Send to send the Firmware file to the RAID controller 9 When Firm...

Страница 35: ...ID subsystem password is set to 00000000 by manufacture default Function Key Definitions Parts Function Exit button Press this button to return to the previous menu Select button This is used to enter...

Страница 36: ...Model Name RAID READY IOP 80331 FW1 30 RAM 256MB HD 8 Temperature System 40 C S 1 34C S 2 31C S 3 33C S 4 32C S 5 34C S 6 29C S 7 29C S 8 31C MF PSU A 3214rpm MF PSU B 3213rpm Array1 A 899G Fr 399G I...

Страница 37: ...ter version must be installed in the PC which will be used to manage the RAID subsystem 4 3 1 Login to proRAID Manager Open a web browser and enter http xxx xxx xxx xxx where xxx xxx xxx xxx is the IP...

Страница 38: ...enu items Click the icon of the menu item and the sub menu will be displayed The right pane shows the list of subsystems that you have logged in to You can login to several subsystems at a time using...

Страница 39: ...NAS System User Manual 39...

Страница 40: ...bsystem name you can use any name to identify the subsystem you are going to manage the IP address and the subsystem password The subsystem name will appear in the list of subsystem on the right scree...

Страница 41: ...Modify Array Delete Array Create Volume Modify Volume RAID Delete Volume Network Setting SNMP Setting SMTP Setting NTP Setting Network Sync RTC System Setting Channel Manager Modify Password Upgrade F...

Страница 42: ...e Array Modify Array Delete Array Create Volume Modify Volume and Delete Volume NOTE Any FREE or un used hard disk will automatically become Global Hot Spare disk which means it can replace any failed...

Страница 43: ...ll appear as a disk device to the host RAID Level Select the RAID Level you want the Array to use The RAID level option will depend on the number of disk drives selected Stripe Size This parameter set...

Страница 44: ...will be created NOTE Quick Setup can only be used if there s no existing Array NOTE In Quick Setup the Array will be created in background initialization mode which means the Volume will be available...

Страница 45: ...RAID menu click Create Array 2 Enter the Array Name change the Re Mapped BS count as necessary select the disks drives to be included in the Array and set the RAID Level Stripe Size Block Size and Ta...

Страница 46: ...versions Use 512 bytes Due to LSI chip limitation 16 Byte CDB option must run at U320 mode Task Priority The priority for background tasks such as rebuilding Options are LOW MEDIUM and HIGH LOW priori...

Страница 47: ...ization in Foreground mode or still initializing in Background mode a Volume can created NOTE Any FREE or un used hard disk will automatically become Global Hot Spare disk which means it can replace a...

Страница 48: ...tion to modify settings of an existing Array To modify Array i In RAID menu click Modify Array Change the settings of the Array as necessary NOTE Some settings are read only and cannot be modified ii...

Страница 49: ...D menu 2 Select the Array to be deleted from the list of Arrays displayed on the left side 3 Click Submit when done A warning message will be displayed Click OK to proceed with deletion IMPORTANT Make...

Страница 50: ...an be created in an Array as long as there is free capacity in the Array Up to 32 Volumes can be mapped to a LUN in each Host Channel LUN ID 0 to 31 for Host A and for Host B 1 To create a Volume sele...

Страница 51: ...20 characters Volume Size The capacity you want to give to the Volume value is in GB Note that the available capacity that can be used in displayed in Maximum Capacity field Read Ahead The Maximum nu...

Страница 52: ...NAS System 52 User Manual 4 Click Submit when done The Volume will be created IMPORTANT Once a LUN number is already assigned to a Volume it cannot be used again...

Страница 53: ...function in RAID menu To modify a Volume 1 Select Modify Volume from RAID menu Select the Array name from the Array List and then select the Volume to be modified 2 Change the settings as necessary N...

Страница 54: ...y List select the Array name which contains the Volume to be deleted Then select the Volume to be deleted 2 Click Submit A warning message will be displayed Click OK to proceed 3 The Volume will be de...

Страница 55: ...ect Network Settings from Network menu 2 Set the following options Option Description IP Address Enter the IP address you want to assign to the RAID subsystem Gateway Enter the Gateway IP Address you...

Страница 56: ...MP Notification option Then setup the necessary options Option Description Description Enter a description Contact Enter the Contact information Name Enter the Name information Location Enter the Loca...

Страница 57: ...the necessary options Option Description SMTP Server Enter the SMTP Server IP address Use Secure Authentication To use secure authentication in SMTP server enable this option Account Enter the account...

Страница 58: ...d you need to use Sync RTC RTC Stands for Real Time Clock and is used to set the time on the RAID controller Setting the correct time plays an important role in the system administration which helps a...

Страница 59: ...function must be used whenever the RAID subsystem is started or restarted RTC Stands for Real Time Clock and is used to set the time on the RAID controller Setting the correct time plays an important...

Страница 60: ...le the RAID subsystem alarm tone generator When Alarm Beeper option is checked the alarm beeper is enabled Cache Type The RAID subsystem supports Write Through and Write Back cache type Write Back all...

Страница 61: ...ice Disk clone succeeded Notice Volume created Notice Volume deleted Notice Volume modified Notice Over temperature Warning Over voltage Warning Low voltage Warning PSU not present Warning Fan not pre...

Страница 62: ...map ID to a host channel Wide If enabled for a wide bus the throughput is double transfer rate because each transfer is of 16 bits or two bytes For example if Wide option is enabled the Speed Setting...

Страница 63: ...NAS System User Manual 63 After setting the preferred option click Update to save the changes To see the current settings click Refresh...

Страница 64: ...set or change the login password of RAID subsystem click Modify Password function in System menu Enter the old password in the Old Password field and the new password in the New Password and Confirm N...

Страница 65: ...2 4 Upgrade Firmware The RAID controller s firmware can be upgraded when new firmware version is available Select Upgrade Firmware function in System menu then click Upload Select the firmware file C...

Страница 66: ...file will be uploaded to the RAID controller Then the upgraded process will be started After the upgrade is completed the subsystem will automatically restart User needs to login again to proRAID Man...

Страница 67: ...em User Manual 67 6 2 5 Restart The RAID subsystem can be restarted using the Restart function in System menu This is normally done after firmware upgrade Click the Submit button to restart the RAID s...

Страница 68: ...Other proRAID Manager Menu Functions 7 1 Event Log 7 1 1 Event Log The RAID subsystem s event log information can be displayed by selecting Event Log function in Event Log menu To update the current...

Страница 69: ...2 Export Log The RAID subsystem s event log information can be saved to local destination by selecting Export Log function in Event Log menu Click Submit to save the event log The file type of the exp...

Страница 70: ...vendor model capacity number of remapped bad sectors firmware version and state are shown When disks are already member of an Array the State will show USED It will show FREE when not yet used Each m...

Страница 71: ...Array and Volume in the RAID subsystem select RAID function in Info menu Then select the Array name from the list of Arrays The Array Info and Logical Volume Details will be displayed The logical vol...

Страница 72: ...PU Speed Memory Size Memory Speed BBM Module installed or not ECC DRAM support Subsystem Model Controller Model Firmware Version Disk Channel Type Number of Host Channels Host Channel Type Host Channe...

Страница 73: ...s the power supply status fan speed temperature and voltage levels of the RAID subsystem All items are also unchangeable The warning messages will indicate through the LCD LED and alarm buzzer Item Wa...

Страница 74: ...u The List of Arrays and the RAID Level Capacity Member Disks and Status are displayed Status The states available are Ready Need to Rebuild Initializing Rebuilding Expanding Verifying Cloning Fail If...

Страница 75: ...check the consistency of parity blocks i e verify that parity information matches the stored data Click Check Parity button to start performing parity check A message will be displayed The percentage...

Страница 76: ...ct Disk Health in S M A R T menu Then click the disk drive The Disk ID and Disk Status of the selected disk are displayed The SMART attributes and its values and threshold values are also shown The Th...

Страница 77: ...T menu There are two types of diagnosis Quick and Extended After selecting the Diagnosis Type click Submit The disk diagnosis process will start NOTE When Disk Diagnosis is running it cannot be stoppe...

Страница 78: ...NAS System 78 User Manual PART II proNAS System...

Страница 79: ...me snapshot and volume replication Account Manager Local and external account configuration Import large accounts Backup Manager Supports system configuration backup and setup the backup plan for data...

Страница 80: ...s described in Chapter 9 Section 9 2 1 Create or import accounts with Account Manager as described in Chapter 9 Section 9 3 Setup the shares using Share Manager and assign account group permissions Th...

Страница 81: ...ip this section 1 Configure your client computer to be able to connect to RAID controller s R Link IP address default is 172 16 0 2 2 Open web browser enter the IP address and login to proRAID Manager...

Страница 82: ...included in the Array and select RAID Level and Stripe Size Block Size should remain as 512 Bytes Click Submit when done 5 The Array and Volume will be created and initialized in background mode and t...

Страница 83: ...el B LUN 0 must be disabled To modify the LUN mapping select Raid menu then Modify Volume Select the Array name and Volume name Click Activate option of Host B to remove the check mark and then click...

Страница 84: ...network settings of your computer to connect to eth0 IP address see table below and be able to open the NAS administration page NAS Default Values 2 Open Web browser 3 Enter the following URL in the a...

Страница 85: ...Chinese China Japanese Korean Polish Poland and Russian Russia You can select your preferred language before logon 6 The proNAS main screen will be displayed showing proNAS NAS Device Manager and Even...

Страница 86: ...tems when you login to the proNAS system The IP Address section lists the NAS systems connected to the network proNAS Multi Node Technology is based on UDP Multi Casting technology The proNAS managers...

Страница 87: ...d folders reside on these Logical Volumes The default proNASVG Volume Group cannot be deleted When proNASVG is created the XFS file system is set in each default Logical Volume XFS file system is also...

Страница 88: ...remove LV in this VG join any new disk remove any disk and reset the VG NOTE If the Disk List in Volume Manager does not show any RAID disk for example dev sda but and Array and Volume has already bee...

Страница 89: ...sda dev sdb etc that will be joined to proNASVG from the list of Available Disk s The default Unit Size of proNASVG is 512MB If needed the Unit Size can also be changed Click OK when done NOTE Unit Si...

Страница 90: ...d system memory A warning message will be displayed Click OK to close the message 8 Re login to proNAS management GUI The Volume Manager will show the joined disk as IN_USED and the Volume List will s...

Страница 91: ...t using proRAID Manager If a new Volume has already been created the NAS system must be restarted in order to detect the new RAID disk To restart the NAS select System Manager under proNAS then click...

Страница 92: ...tem 92 User Manual 3 A confirmation message will appear Select Yes to proceed 4 Click Join New Disk to continue with creating the new Volume Group 5 Check the disk s to be joined to the VG Click OK wh...

Страница 93: ...ly created VG will be shown NOTE The new VG has no default Logical Volumes Admin can create new Logical Volumes NOTE The NAS supports up to 5 Volume Groups Volume Group is the highest level abstractio...

Страница 94: ...ose to reset the Volume Group all the data will be erased Use the Reset Volume Group function only when necessary and when the data from the VG have been backed up or you do not want to keep the data...

Страница 95: ...Select Yes from the confirmation message 5 Verify from Volume Group List in Volume Manager that the VG has been removed NOTE The system default Volume Group proNASVG cannot be deleted or reset Only cu...

Страница 96: ...lick Create New Volume button 2 The LV Configuration tab will be displayed Enter the Logical Volume name and the volume size in MB You can also enable the Send email when not enough space option to se...

Страница 97: ...NAS System User Manual 97 3 Select Yes from the confirmation message to create the LV 4 A process window will be shown 5 The new Logical Volume will be shown...

Страница 98: ...xtended to allow more space for storing data To extend the LV size follow these steps 1 Select the LV that will be extended then click Extend LV Size button 2 Enter in the Extend size box the addition...

Страница 99: ...NAS System User Manual 99 4 Verify the new LV size...

Страница 100: ...s exactly like the original at the time the snapshot was created A Snapshot can be created manually or scheduled Admin need to enable first this special function NOTE Logical Volume with snapshot cann...

Страница 101: ...confirmation message will appear Select Yes 3 The Snapshot configuration window will be displayed A system created Snapshot name is automatically created The default snapshot name can be renamed if ne...

Страница 102: ...ates the amount of free space on the volume group where the new snapshot volume will be created Mount When checked the created snapshot volume will be automatically mounted When a snapshot volume is m...

Страница 103: ...al 103 9 1 3 2 Create Snapshots Based from Schedule To create scheduled snapshots 1 Select the Logical Volume go to Snapshot tab and click Edit 2 Edit the following snapshot options listed below then...

Страница 104: ...ute Day Specifies whether the scheduled task is to run on the selected day s Execute time Once Specifies the time of the day when the scheduled task will be taken Every Specifies how often the schedul...

Страница 105: ...k Enable Scheduled to active scheduled snapshot 6 A clock like icon will appear on the left side of the LV which means a scheduled snapshot is active To disable the schedule click Disable Scheduled 7...

Страница 106: ...Delete Snapshots 1 Select the Logical Volume where snapshot will be deleted then go to Snapshot tab Click the snapshot that will be deleted then click Delete Snapshot 2 Select Yes to delete the snapsh...

Страница 107: ...NAS System User Manual 107 4 The deleted snapshot will no longer exist in the Snapshot List...

Страница 108: ...exact copy of the source volume This is done by mirroring the whole block device via a standard network interface This solution creates a real time replication of data However it does not create a clu...

Страница 109: ...administration page of the two NAS servers 2 On the primary NAS source select the Logical Volume which will be replicated then click Create Replication NOTE The logical volume to be replicated from so...

Страница 110: ...rve as the channel between the source and destination NAS servers This is where the replication of data takes place Please be sure to have a good connection on this medium As much as possible set this...

Страница 111: ...vironment e g bonding on Gigabit Ethernet Send buffer size K It is the size of the TCP socket send buffer You can specify smaller or larger values Larger values are appropriate for reasonable write th...

Страница 112: ...ization Replication still needs to be initialized After selecting Initial Replication the first node will then connect to the second node and starts to synchronize Synchronization typically takes quit...

Страница 113: ...NAS System User Manual 113 7 The volume replication synchronization process will start 8 After the initial synchronization process is completed the Status will show Primary Secondary Consistent...

Страница 114: ...y node must not be mounted Please do not attempt to mount it manually Setting the primary volume to be secondary To set the primary volume to be secondary just press the Set Secondary button on the pr...

Страница 115: ...llowing are the steps 1 Abort the replication by selecting Abort Replication 2 Remove or delete the replicated logical volume on the destination proNAS 3 Extend the capacity of the source logical volu...

Страница 116: ...iSCSI target LUN Note You can t enable iSCSI function in a Logical Volume if Snapshot or Replication exists To enable iSCSI function select Volume Manager then click Options tab and tick Enable iSCSI...

Страница 117: ...k the Enable iSCSI option 3 Enter the target name If you want to enable CHAP authentication check the Enable Auth CHAP option and enter the account and password NOTE iSCSI Target name can only use a z...

Страница 118: ...d Select Yes to continue 6 A progress box will be displayed 7 The iSCSI volume is ready Note that there is an i icon on the left of logical volume name to denote that this is an iSCSI volume 8 You may...

Страница 119: ...disable iSCSI 1 Select the logical volume and click the iSCSI tab 2 Click Edit and remove the check mark in Enable iSCSI option Click Save when done 3 A confirm message box will be displayed Select Y...

Страница 120: ...ion The existing data in the logical volume will be deleted so if there are important data in the logical volume a backup must be made To restore iSCSI to normal volume 1 Select the logical volume and...

Страница 121: ...l 121 4 A process window will show that the volume is being restored back to normal logical volume 5 The logical volume is restored to normal volume Note that the i icon on the left of logical volume...

Страница 122: ...Select the iSCSI volume Click Extend LV Size 2 Enter the additional capacity for the volume in the Extend size box Note that you cannot exceed the free available size from the volume group Click OK 3...

Страница 123: ...NAS System User Manual 123 4 The iSCSI logical volume capacity is extended...

Страница 124: ...ame of proNAS it should be unique Domain Workgroup Windows domain name or workgroup Domain name is limited only up to 15 characters For example mydomain DNS Suffix The DNS suffix appended to server na...

Страница 125: ...led in this adapter A default gateway is a local IP router that is used to forward packets to destination beyond the local network Only one default gateway can be enabled in a certain time Device Disp...

Страница 126: ...ress the Ctrl key then at the same time select the adapters that will be included in the network trunking then click on Trunk Adapter button 10 A warning message will be displayed Click OK to proceed...

Страница 127: ...address This selects the same slave for each destination MAC address This mode provides load balance and fault tolerance Link Aggregation 802 3ad 802 3ad policy Combines multiple physical network link...

Страница 128: ...ation options DHCP s IP range starting from means the lower bound starting range of private IP addresses for DHCP DHCP s IP range ending with means the upper bound ending range of private IP addresses...

Страница 129: ...tor proNAS network traffic Select Service tab of System Manager then enable SNMP MRTG service Click Start to enable the service To view the SNMP MRTG network traffic information select the SNMP tab in...

Страница 130: ...on allows to test whether a particular host is reachable or to check connectivity to a particular IP address To test enter the IP address in the IP address box then click Network Test button The resul...

Страница 131: ...xternal Accounts Integration Joining Windows or NIS Domain You can utilize external directory services to authenticate accounts Currently PDC ADS and NIS authentication are supported You may choose an...

Страница 132: ...r Windows NT Server or ADS for Windows 2000 2003 2008 Server Auto Detect Enctypes This option automatically detects the encryption type used in Windows authentication To manually select the encryption...

Страница 133: ...IP is not detected not shown you can manually specify the Domain Server IP by removing the check mark in Automatic Detect Domain IP and entering the Domain Server IP address 9 Enter the Domain Adminis...

Страница 134: ...n Options NIS Domain Enter the NIS domain name NIS server Enter the IP Address of NIS server 9 3 1 4 Sample Steps to Join NIS Domain 1 Under Account Manager select NIS Authentication tab Click Edit 2...

Страница 135: ...can perform the following functions Create a new Local Account Enable and Disable an Account Modify and Delete an Account Mass Import Accounts Refresh the Account List Creating a new Local account Fol...

Страница 136: ...assign a unique user number called UID to access the system resource UID range is 1 to 65535 proNAS may either assign a new UID automatically starting from 500 or you can manually specify the UID Doma...

Страница 137: ...the same No account names must be the same with share names Account names cannot contain blank spaces Account names cannot begin with a dash and cannot consist of only a single dash Account names cann...

Страница 138: ...automatically be a member of users group Enabling and Disabling an Account Account Manager allows the administrator to enable or disable a user account When an account is disabled the account cannot b...

Страница 139: ...nly modify the permissions Importing of Accounts proNAS provides Import Account function for creating large number of accounts instead of adding an account one by one Administrator can create multiple...

Страница 140: ...ator to Create or Delete a Local group Modify a Group Refresh the Group List proNAS has two default groups users and proBackup Every local user that will be created will automatically become a member...

Страница 141: ...to the group Current Member s shows the list if accounts that are currently member of the group NOTE AD domain accounts cannot be joined to local groups Use the following guidelines to ensure that you...

Страница 142: ...d to be deleted Default group users and proBackup cannot also be deleted Modifying a Group To modify a group double click the group in Group List tab The Group List tab will be displayed in edit mode...

Страница 143: ...sync utility is used to copy files either to or from a remote host or locally on the current host In the Share List tab you can list the current shares and also display share information such as share...

Страница 144: ...hare button 2 Configure all necessary share options in Properties Protocol and Privilege tabs 3 Click Save button to save share settings NOTE After creating the share and setting the Properties Protoc...

Страница 145: ...into all of its child directories and files For example if user1 has read write permission on the sub folder but read only on the share after applying ACL user1 will now have a read only permission o...

Страница 146: ...you delete a share all the data in the share is deleted If the data in the share is no longer needed or a backup of the data has been made you may delete a share If there is no data backup we recommen...

Страница 147: ...ill also display the available space of the volume group Create New Volume LV If you check this option system will create LV as well as create the new Share The LV name will be the same as the share n...

Страница 148: ...operate without conflicts MediaHarmony MXF This option enables media file interoperability for non linear editors It allows on the fly unwrapping of MXF wrapped DV essence so that a Final Cut Pro clie...

Страница 149: ...it means only the port under 1024 can access it provides higher security Subtree check Use this option to enable or disable subtree checking A subtree check happens if a subdirectory of a filesystem i...

Страница 150: ...t temp local mount point on the client For CIFS share Usage mount t smbfs x x x x share mnt temp o username account password secret or mount cifs x x x x share mnt temp o username account password sec...

Страница 151: ...n share folder select the group name and press REMOVE button Sample Steps to Assign Group Account Permission to Share 1 Select Share Manager Select the share name where account will be given permissio...

Страница 152: ...y to remove the users group from the permission list in order to prevent access of other members of users group to the share Choose the account and press ADD button and the account will be displayed i...

Страница 153: ...Select the account name that will be given permission and click ADD NOTE When account name is selected it will be highlighted If you want to select more than one account at the same time press Shift...

Страница 154: ...Talk or Netware protocol you can only set ACL permission by account or group Sample Steps to Limit Share Connections to Selected IP Range 1 Select Share Manager Select the share name where account wil...

Страница 155: ...isted below are the share permissions defined in proNAS Read Only Read Write Allow Deny Allow Deny Access share sub folder Access share sub folder Read Read Write Write Edit Modify Edit Modify Delete...

Страница 156: ...proNAS can accept incoming Rsync connections where as in client mode proNAS is the one who initiates the synchronization To use as a server mode you must start the RSYNC server first Go to System Man...

Страница 157: ...y When checked all files within this share will be read only to any Rsync client Anonymous When checked anonymous connections will be accepted Maximum Connections This specifies the maximum number of...

Страница 158: ...ies the IP address of the remote Rsync server Remote Path This specifies the share on the remote Rsync server Account The valid account name that will be required by the Rsync server for authenticatio...

Страница 159: ...kup dir and suffix options backup dir dir In combination with the backup option this tells Rsync to store all backups in the specified directory This is very useful for incremental backups You can add...

Страница 160: ...re are lot more useful options that are not included in this list It may vary depending on your usage for more information on Rsync please visit http samba org rsync After completing the above setting...

Страница 161: ...The duplication files will be directed to a share which you can access via share protocols or by telnet service Duplication can be invoked manually or by schedule Select the share folder in Share Mana...

Страница 162: ...se be warned Snapshot Numbers Specifies the total number of snapshots that can be created The maximum total number of duplication a share can have is 256 Note The destination space must be larger than...

Страница 163: ...Duplication files on the previous destination path will not be removed Duplication files of other shares on the same destination path will not also be removed Getting the Duplication List To get the l...

Страница 164: ...contain the most recent snapshot and the duplication with the highest interval number will contain the oldest snapshot When a new duplication is run it will rotate all the duplication directories The...

Страница 165: ...vidual shares of all users It cannot be deleted public a share intended for all users Any type of user including guests or anonymous can logon to this share and is given read write permissions proBack...

Страница 166: ...r is composed of different tabs which is responsible for the configuration of proNAS system settings and services such as Firmware Upgrade Account and Share reports Date and Time Zone Serial Ports and...

Страница 167: ...rs Free Total The number of disks in the subsystem Free means the disks those are not joined in volume group Vol Group Numbers The total number of volume groups Volume Numbers The total number of logi...

Страница 168: ...ad the latest version from URL ftp support xxxxxxxx upgrade proware com tw proNAS If you would like to see if there is latest version please press Check Updates button The system will search if there...

Страница 169: ...nt or Share or both and set the Day and Time when to generate the report The system will generate the report and save in the path mnt proNAS home admin The path can be modified If you would like to re...

Страница 170: ...ime manually if not selected then set the Date and Time To set the date press then the system will display a calendar to choose the date If you would like to synchronize time with NTP server select Sy...

Страница 171: ...or and cable If you choose smart mode proNAS supports three UPS Vendor a APC b BeamTech and c HyperPro Select the UPS vendor then set the UPS Model and Cable Model The only Beamtech UPS model supporte...

Страница 172: ...ower off and power on You can also shutdown the system immediately using Shutdown Now button Scheduling Power Off Select the day or days and set the Hour and Minute when the system will shutdown Sched...

Страница 173: ...file error or I O error from system log or VG can not mount or system shutdown abnormally it is recommended to use the function Reboot File System Check In case the file system check fails you can sel...

Страница 174: ...r Stop button proNAS system services are as follows Samba services Provides CIFS file sharing MS Windows users need this to access proNAS NFS service Provides NFS file sharing UNIX users need this to...

Страница 175: ...UPS monitor If you would like to connect UPS you have to enable this service SNMP MRTG service Provides SNMP MRTG service to view system information proNAS can send trap messages if A logical volumes...

Страница 176: ...a file is extended AppleShare Service Languages set the language used for Apple Share service proBackup Service IP of Rx Tx backup streams Enter the proNAS network interface IP address for proBackup s...

Страница 177: ...can click the Connections button to display current connection list Click the Top button to display system summary information and tasks list Click the PS button to display information about active p...

Страница 178: ...NAS System 178 User Manual 9 5 10 MRTG tab This tab shows information about MRTG graphs and includes CPU Loading Memory Usage Disk IO and Network Traffic...

Страница 179: ...figuration via Backup Manager In Backup Manager tab you can check the existing backup plans in the Backup Plan List which includes backup plan name next backup time and if the backup plan schedule is...

Страница 180: ...ould like to save the file and enter the file name System will backup the configuration information as an xml file If you would like to restore the configuration later press Apply button NOTE Not all...

Страница 181: ...Enter the Backup Plan Name and then press to choose the backup destination your destination could be remote share tape or local device NOTE If a disk is already selected as Local Device backup destin...

Страница 182: ...the remote machine you may query it by using the command smbclient bash 3 00 smbclient L 192 168 100 164 Login account Account that has full access permission on the remote share For NFS Path 192 168...

Страница 183: ...ackup Plan Setting tab In the field of Description system will display you backup destination remote share tape local disk in Type area Please press Edit Backup Item List button System will display th...

Страница 184: ...tal backup stores all files that have changed since the last backup The advantage of an incremental backup is that it takes the least time to complete However during a restore operation each increment...

Страница 185: ...mpleted the settings Go back to Backup Plan Setting tab You will see the backup plan in the backup plan list If you would like to modify the backup plan please choose the backup plan in the left tree...

Страница 186: ...d from tape drive Status This shows some information about current status of tape such as tape is online When using the rewind forward erase eject option a confirmation message will be displayed You c...

Страница 187: ...A Preparing the NAS and Creating Backup Plan 1 Connect the Tape Backup device to the available Tape SCSI port on the NAS Note that you need to shutdown the NAS before connecting the Tape Backup device...

Страница 188: ...m 188 User Manual 4 Enter a Backup Name In Destination click button In the dialog box that appears select Tape as backup destination Click Save 5 The destination tape device is set Click Edit Backup I...

Страница 189: ...NAS System User Manual 189 6 Select the data Volume Share to be backed up Click Save 7 Click Save again 8 In the Confirm Dialog Box click Yes...

Страница 190: ...s enables the tape to be rewound to the beginning of the tape forward tape to the end of data This enables the tape to be forwarded to the end of data erase all data in tape This enables the data on t...

Страница 191: ...NAS System User Manual 191 B Manual Backup and Restore 1 Select the backup plan under Backup Manager 2 Click Backup Now In the dialog box click Yes to confirm...

Страница 192: ...S System 192 User Manual 3 The backup process will be started 4 When backup is completed a message will be displayed Click OK 5 To check the backup made while in the backup plan name select Restore ta...

Страница 193: ...l 193 6 To restore data try to delete old data from the share folder 7 To restore data from tape backup in Restore tab select the backup name from backup Item s then click Restore 8 In the dialog box...

Страница 194: ...e process of restoring data will be started 10 When restore is completed a message will be displayed 11 To verify restore process from log select Log Manager then BAK backup log 12 Check the share fol...

Страница 195: ...ackups NOTE Manual backups are always Full backup which means their Backup Level is always 0 zero 1 Update copy and or delete some data to the share folder 2 Select the backup plan then click Backup N...

Страница 196: ...ystem 196 User Manual 4 A message will be displayed after backup is completed 5 A second backup is created 6 Update copy and or delete some data to the share folder 7 Click Backup Now Select Yes to co...

Страница 197: ...er Manual 197 8 The backup process will start 9 When completed a message will be displayed 10 In Restore tab check the backup items Note that the Backup Levels are 0 11 The backup items can be restore...

Страница 198: ...tape and select backup items Then click Edit 2 Select Schedule Backup tab Select the backup frequency Daily Weekly or Monthly Set the starting date ending date and starting time Specify the backup typ...

Страница 199: ...NAS System User Manual 199 3 Click Save when done Select Yes to confirm 4 Scheduled backup has been configured...

Страница 200: ...System 200 User Manual 5 To enable the scheduled backup click Enable Scheduled A clock icon will appear beside the name of backup plan 6 When the proper time comes the scheduled backup will be execut...

Страница 201: ...ystem User Manual 201 7 Click OK to close the message In Restore tab check the backup name created 8 In the succeeding days if backup is configured for daily backup the backup will be created automati...

Страница 202: ...erify in Restore tab the backup items that have been created NOTE The procedure for restoring backup from schedule backups is the same as in manual restore That is select the backup name from Backup I...

Страница 203: ...p or boot messages DSK This log contains information about the changes to volume Its path is var log storage log It can store information of 7 days SMB This log contains information about CIFS and Sam...

Страница 204: ...Edit button to edit the following fields Sender E mail Address Enter the sender s e mail address SMTP Server Enter the IP address of the SMTP server Port Enter the port number Default is 25 Accounts E...

Страница 205: ...isplayed only after you have started or logon into these services The event options are Application Event Purpose proNAS Web service stopped Notify if Apache web service is stopped proNAS Over Quota N...

Страница 206: ...the file itself A browser s upload window will show up and user needs to locate the file from local computer to be uploaded to the current directory Create a file User needs the write permission of th...

Страница 207: ...all the files and sub folders under the share The function of access right is for share owner to do more detail management for the users accessing the shares Share owner can increase or delete the ac...

Страница 208: ...een of file Manager will display and help users to understand the possible options and to perform file management There are 4 Main Menu in the File Manager screen CurrentDir Upload Setting and Logout...

Страница 209: ...rmitted This must be done in Share Manager in proNAS GUI Current Dir Shows possible options that can be done in the current directory Create Allows user to create a new directory Chmod Allows user to...

Страница 210: ...ange the Access Rights of different users on the current directory Upload An option used to upload a local file into the current directory Use the Browse button then select the file to upload WARNING...

Страница 211: ...ed only in the current directory or sub folder To update other directories or sub folders below the current directory use the Apply ACL button This will propagate the current ACL to the ACL off all fi...

Страница 212: ...1 2 Administrator Logon The administrator account admin can login to proBackup In proNAS Manager admin can also assign other privileged users to become member of the proBackup group Only admin and mem...

Страница 213: ...status login to proBackup Java GUI can be done The default Logical Volumes proBackup Device and proBackup Extended Device will also be created To login to proBackup java GUI open web browser then type...

Страница 214: ...It is advised that only the organization privilege persons can assume the role of administrator since it can restore all others data which may contain sensitive information The proBackup Java GUI Welc...

Страница 215: ...NAS System User Manual 215 11 3 Create Backup Plan To create backup plan either click the Create Plan button in the proBackup main screen or click the New button in Plan Manager...

Страница 216: ...If checked the backup will be in compressed format Backup Entry Home Directory Click the button then select the directory when data will be backed up Backup File Directory Entries Click the button Sel...

Страница 217: ...General tab Refresh Refresh the information about the current backup plan Enable Activates the backup plan schedule When enabled a Disable button will appear which can be used to deactivate the backu...

Страница 218: ...l pass before a differential backup will be done A cycle begins with a full backup and follows rounds of differential backup Enter the number of differential backups that will be made before starting...

Страница 219: ...in the list and click Delete To view detailed information about the backup double click the item from the History tab Log details is used to display detailed information about the execution process Er...

Страница 220: ...Another alternative to do backup or restore is to use the Backup Wizard and the Restore Wizard Click proBackup in the left tree node The Welcome screen will be displayed where the Backup Wizard and R...

Страница 221: ...kup item from the History tab The Execution Log Detail window will appear Click Restore Then input the destination where the data will be restored Or click the Browse button then select the destinatio...

Страница 222: ...NAS System 222 User Manual 11 5 Account Detail Under Plan Manager click the account name to view information about the account...

Страница 223: ...he switch over procedure can also be triggered manually to handle scheduled downtime more gracefully and user transparently ProNAS HA can be manually instructed to switch over the critical operations...

Страница 224: ...either on each proNAS box 10 ProNAS HA service cannot be started if iSCSI volume exists Replication is running or snapshots exist Make sure to remove all iSCSI volumes stop Replication or delete snap...

Страница 225: ...socket Ethernet network running TCP IP protocol Each server must install a dedicated IP to attach to the private net RS 232 serial port One free serial port per server A null modem cable must be insta...

Страница 226: ...r then Services tab highlight proNAS HA service then click Start proNAS HA node will then appear on the left tree after it starts successfully 5 On the designated Active Server go to proNAS HA General...

Страница 227: ...rvers Event Log Level Select the type of logging that will be used for proNAS HA service Default is Normal which shows operation processes Other option is Trace which shows operation and traceable pro...

Страница 228: ...p Cluster Operation Start Cluster Start Cluster Operation Get peer IPs Get the IP s of the peer server and display it in the host peer table Network Test Tool for testing network IP address e g ping i...

Страница 229: ...Number Specify an unused TCP port for each server to receive the heartbeat sent from the peer server The default value is 5000 Local peer IP Address Specify the IP Addresses of the network interface...

Страница 230: ...rver to receive the heartbeat sent from the peer server Baud Rate Specify the Baud Rate of the selected serial ports Heartbeat Interval Specify the period of time between two consecutive heartbeats Ac...

Страница 231: ...nning on both servers and at least one of the private net is functioning Buttons Add Resource Group button Add new resource group member User can specify the name of the resource group This name must...

Страница 232: ...ckup server to the Target server automatically when the Target Server is available again Auto Bring In An option for enabling the resource group to be brought in automatically when Cluster is started...

Страница 233: ...ource group of the peer server will be taken over Skippable if releasing resource fail This option is disabled by default Basically all of the resource group of the peer server will be taken over when...

Страница 234: ...NAS System 234 User Manual 18 Click the resource group name on the left tree node then press Bring In The resource name will be brought in 19 The Cluster Servers will be in Active Standby mode...

Страница 235: ...eaning Active Mode Error Mode Fail Mode Offline Mode Standby Mode Startup Mode The private net status The colored lines between the servers indicate the status of the private net Also status is displa...

Страница 236: ...rce group status Buttons Stop Cluster button Stop Cluster Operation Start Cluster button Start Cluster Operation Get peer IPs button Get the IP s of the peer server and display it in the host peer tab...

Страница 237: ...t and all logical volumes will still have Replication After you clear all HA configuration and clear all Replication you can re configure another HA This is normally used when one of the proNAS server...

Страница 238: ...ical volumes will be displayed Click Yes to remove Replication in all logical volumes or No to just clear HA but replication of logical volumes still exists 4 An information message will be displayed...

Страница 239: ...eplication 12 6 License Registration To apply ProNAS HA license codes and register them to ProNAS HA users must first get the S N of the two servers Forward the S N to your local ProNAS HA provider Th...

Страница 240: ...r Manual 12 7 Event Log Properties All the messages generated by ProNAS HA will be displayed in the Event Log The messages can help users to identify the possible reasons that prevent ProNAS HA from o...

Отзывы: