background image

10 


6.  Leuchtmittel wechseln 


  WARNUNG! Elektrischer Strom! 

Stellen  Sie  sicher,  dass  die  Strom-
zuführung 

unterbrochen 

wurde, 

bevor  Sie  das  Leuchtmittel  wech-
seln. So vermeiden Sie Unfälle! 


  ACHTUNG! 

Verwenden 

Sie 

nur 

Original-

Leuchtmittel  von  Provita.  Ungeeig-
nete 

Leuchtmittel 

können 

die 

Leuchte zerstören. 


  HINWEIS! 

Glaskörper  der  Lampe  niemals  mit 
bloßen  Fingern  berühren.  Entweder 
die  Originalverpackung  oder  ein  sau-
beres  Tuch  bzw.  einen  Textilhand-
schuh  benutzen!  Andernfalls  wird  die 
Lebensdauer der Lampe verringert. 


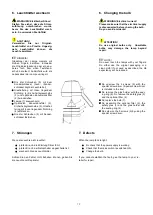
Die  drei  Schrauben  (5)  mit  dem 
Sonderschlüssel  lösen.  (Sonder-
schlüssel liegt der Leuchte bei). 


Glashaltering  mit  innen  liegendem 
Dichtring  (4)  Sicherheitsglasscheibe 
(3)  und  optionalen  Konversionsfilter 
(2) herausziehen. 


Lampe (1) auswechseln. 


Optionalen 

Konversionsfilter 

(2), 

Sicherheitsglasscheibe  (3),  Glashal-
tering mit innen liegendem  Dichtring 
(4) aufstecken. 


Die  drei  Schrauben  (5)  mit  Sonder-
schlüssel festziehen. 


7.  Störungen 


Wenn die Leuchte nicht leuchtet: 


prüfen Sie, ob die Zuleitung Strom führt. 


prüfen Sie, ob der Netzschalter eingeschaltet ist. 


wechseln Sie das Leuchtmittel. 

 
Sollten  Sie  den  Fehler  nicht  beheben  können,  geben  Sie 
die Leuchte zur Reparatur 


6.  Changing the bulb 


WARNING! Electrical current!


Please make sure that the electrical supply 
is disconnected before chaning the bulb.  
So you avoid accidents! 


ATTENTION!


Do  use  original  bulbs  only.    Unsuitable 
bulbs  may  damage  the  lamp  beyond 
repair. 


  NOTE! 

Do  never  touch  the  lamps  with  your  fingers. 
Do  either  use  the  original  packaging  or  a 
clean  cloth!  If  not  used  as  described,  the  life 
expectancy will be reduced. 


Do  unscrew  the  3  screws  (5)  with  the 
spezial screw driver. (Special screw driver 
is included in the box). 


Do  remove  the  glas  holder  with  the  seal-
ing ring (4). Do remove the safety glas (3) 
and the optional filter (2). 


Do replace the bulb (1). 


Do  assemble  the  optional  filter  (2),  the 
safety  glas  (3)  and  the  glas  holder  with 
the sealing ring (4). 


Do screw on the 3 screws (5) by using the 
spezial screw driver. 


7.  Defects 


When the lamp fails to light: 


Do check that the power supply is working 


Check that the mains switch is switched ON. 


Change the bulb. 

 
If  you  cannot  establish  the  fault,  give  the  lamp  to  your  re-
tailer for repair. 


Содержание 1 Series

Страница 1: ... bisherigen Erfahrungen und Erkenntnisse nach bestem Wissen Technische Änderungen im Rahmen der Weiterentwicklung behalten wir uns vor Für Schäden die aufgrund der Nichtbeachtung dieser Gebrauchsanleitung entstehen übernehmen wir keine Haftung 1 General Information Usage Instructions These instructions for use should enable you to use the lamp Series 1 safely and properly Please read these in stru...

Страница 2: ... Sehen Sie niemals direkt in die Leuchte hinein Hel les Licht kann zu Augenverletzungen führen Die Wand und Deckenbefestigung muss statisch sicher sein Symbols in the instructions for use Important instructions in these instructions are highlighted with symbols as shown below WARNING This symbol refers to safety instructions Failure to comply with these could result in injury or even death WARNING...

Страница 3: ...euchte mit einem defekten Kabel Es besteht erhebliches Verletzungsrisiko Geben Sie eine defekte Leuchte zur Reparatur an einen Fachhändler Hazards caused by an electrical current As the light operates on electricity there is basically a risk of electrical failure Please note the following Never handle the plug with wet hands plug not supplied with all options When you want to pull the plug out of ...

Страница 4: ...er gewählten Ausführung 3 1 Deckenleuchte Darstellung ohne Baldachin 3 2 Wandleuchte 3 Installation Unpacking Unpack the lamp and all of the accessories and check that the contents are intact Dispose of any packaging materials that are no longer required in accordance with the current legislation in your country Please contact your retailer immediately if you observe any damage caused during trans...

Страница 5: ...mfang enthal ten Die Deckenleuchte muss mindestens mit 3 gleich mäßig verteilten Schrauben sicher und tragfähig befestigt werden Senkbohrung Mitte Schwenkbereich 3 1 Mounting of the ceiling mounted light Content of delivery 1 Light with articulated arm 1 Ceiling unit 1 Operating instructions 11 K2S48096 Washer 3 for adjustment 8 K2K7099 Plasticwasher 4 K2K7109 Bush 4 K2S48296 Lockwasher 3 K2S47396...

Страница 6: ...n ganz an die Decke und schrauben Sie ihn mit dem Haltering fest 1 Decke Ceilling Scheibe Washer Hülse Bush Kunststoffscheibe Plasticwasher Deckenflansch Ceilingplate Kunststoffscheibe Plasticwasher Scheibe Washer Federring Lockwasher Schraube Screw Ceiling unit has to be levelled with wash ers and spacers then screws can be as sembled please see picture Should the ceiling be uneven and the ceilin...

Страница 7: ...auben die Wandleuchte senkrecht aus richten und fest verschrauben Achtung Die Senkschraube M6 x 12 DIN 966 ist eine Spezial schraube mit einer maximalen Länge von 12 mm 3 2 Assembling of the wall mounted light Content of delivery 1 Light with wall mounted arm and wall housing 1 Assembling plate with pre mounted transformer 4 Screws with anchors 2 Countersunk screws 1 Operating manuals 1 Torx Key 5...

Страница 8: ...8 ...

Страница 9: ...hend außer Betrieb genommen werden Es dürfen nur Originalersatzteile verwendet und nur von ei nem Fachmann bzw Kundendienst ausgetauscht werden Richtige Anwendung Right application Falsche Anwendung Wrong application 3 3 Electrical connection of the lamp The lamp can be used with main power supply of 230 V only More or less voltage can affect the light intensity and the life expectancy of the lamp...

Страница 10: ...trom führt prüfen Sie ob der Netzschalter eingeschaltet ist wechseln Sie das Leuchtmittel Sollten Sie den Fehler nicht beheben können geben Sie die Leuchte zur Reparatur 6 Changing the bulb WARNING Electrical current Please make sure that the electrical supply is disconnected before chaning the bulb So you avoid accidents ATTENTION Do use original bulbs only Unsuitable bulbs may damage the lamp be...

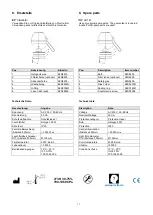
Страница 11: ...temperatur 4300 Kelvin Lebensdauer 3000 h Betriebsbedingungen 10 C 30 C rF 30 75 700 1060 hPa 8 Spare parts NOTE Use only original spare parts The guarantee is rendered invalid if other spare parts are used Pos Description Item number 1 Bulb K2S8439 2 Filter lense optional K2N5224 3 Safety glas K2N5204 4 Glas holder E2K5223N 5 Sealing ring K2K0749R 6 Countersunk screw K2S38596 Technical data Discr...

Страница 12: ...erschrift Datum Unterschrift Wartungsnachweis Der Betreiber ist verpflichtet in regelmäßigen Abständen das System zu überprüfen Sollte einer der Punkte negativ bewertet werden ist die betroffene Komponente umgehend stillzulegen Bitte bestätigen Sie mit Ihrer Unterschrift die mit positivem Ergebnis durchgeführte Überprüfung folgender Punkte Sollten ein oder gar mehrere Punkte nicht in Ordnung sein ...

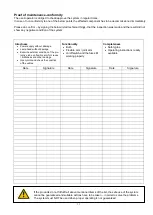
Страница 13: ...oof of maintenance conformity The user operator is obliged to check approve the system in regular times In case of non conformity to one of the below points the affected component has to be decommissioned immediately Please do confirm by signing the below listed technical things that the inspection was made and the result did not show any negative condition of the system If the products do not fit...

Страница 14: ...14 provita medical gmbh Auf der Huhfuhr 8 42929 Wermelskirchen Germany Phone 49 0 21 93 51 05 0 Fax 49 0 21 93 51 05 269 www provita de info provita de ...

Отзывы: