background image

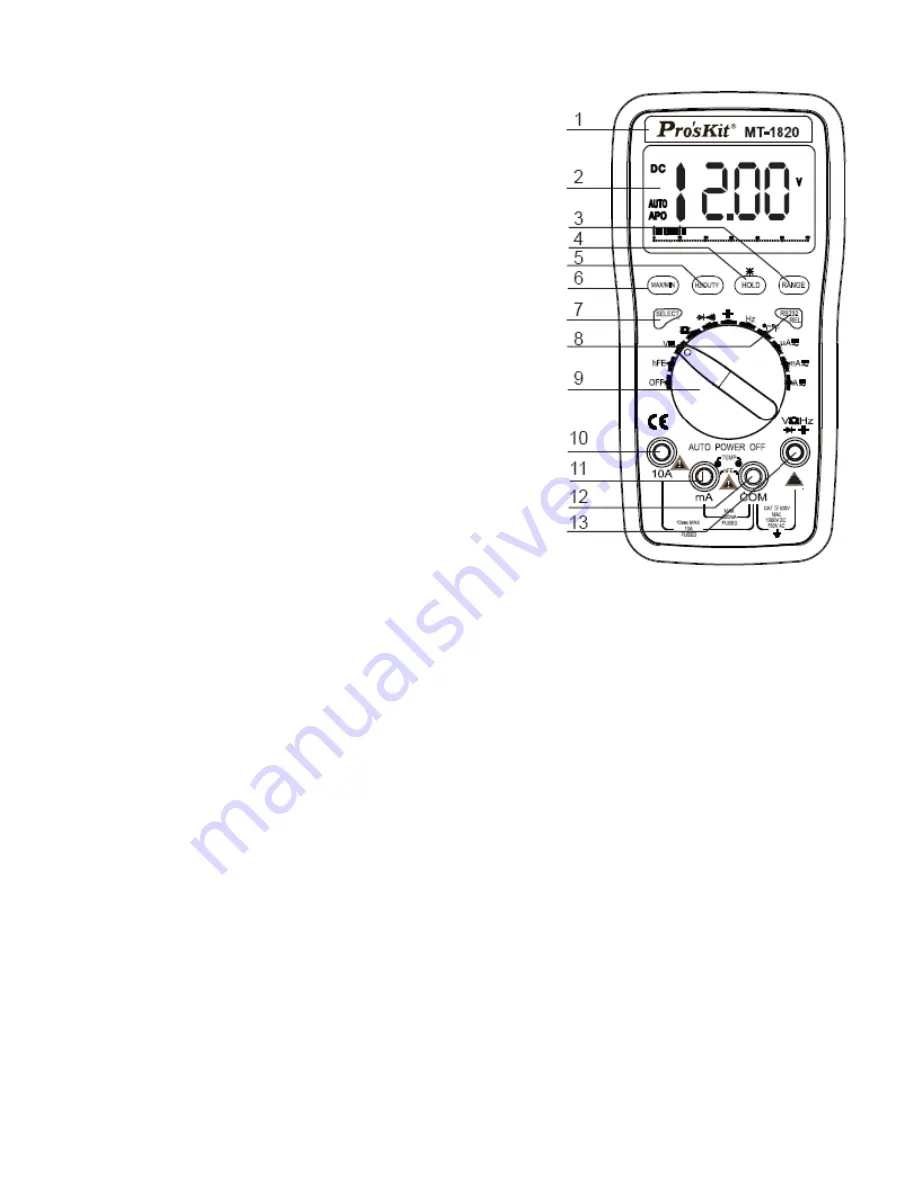
Front Panel Description 

1. Instrument Model Number 

2. LCD Display 

3. RANGE: Auto Range/ Manual 

Range switch, the default is set as 

Auto Range mode when    turning 

on, press the button and switch to 

Manual Range. At the Manual 

Range mode, press the button 

once, the range is switched to the 

higher one, press the button again 

to switch the range to the lowest 

one when measuring the highest 

range, the cycle is in proper order 

from low to high. Keep pressing the button for 2 sec, return to 

Auto Range mode. There is no Manual Range mode at 

Frequency, hFE and Capacitance range. 

4. HOLD: Date Hold button, press the button, the value is held on 

LCD; Press the button again, exit the hold mode and get into the 

normal measuring status. Press the button more than 2 seconds, 

the back light will be light up, press again the backlight turns off 

or automatically turns off after 10 seconds. 

5. HZ/DUTY: Frequency/Duty Circle selection button, press the 

button to switch between the Frequency and Duty Circle mode at 

Frequency Range; Press the button to switch to Voltage or 

Current/Frequency/Duty Circle model at AC Voltage or AC 

Current Range. 

Содержание MT-1820

Страница 1: ...MT 1820 3 5 6 Dual Display DMM w USB Connector User s Manual 1st Edition 2016 2016 Copyright by Prokit s Industries Co Ltd...

Страница 2: ...el Description 5 Property 7 DC Voltage DCV 7 AC Voltage ACV 8 DC Current DCA 9 AC Current ACA 11 Resistance 12 Diode and Continuity Test 14 Capacitance C 15 Frequency Hz 16 Transistor Test 18 Temperat...

Страница 3: ...MANUAL range selection Auto Power Off and Alarm Buzzer The instrument adopts the directly driven 4 digits microprocessor and dual integral A D converter which provide the high solution and high accura...

Страница 4: ...ck 3 It meets the requirements of the safety standard only to use the instrument with the equipped test lead If the test lead is broken should replace it by the same type and same electric specificati...

Страница 5: ...ould operate it by the specially trained or qualified professional people 11 The function range selection knob should be set in the correct range when measuring When switching the function range selec...

Страница 6: ...n for 2 sec return to Auto Range mode There is no Manual Range mode at Frequency hFE and Capacitance range 4 HOLD Date Hold button press the button the value is held on LCD Press the button again exit...

Страница 7: ...cancel the Relative Value Measurement Keep pressing the button more than 2 seconds to switch to RS232 symbol appears on LCD it indicates the instrument is getting into the status of data transmission...

Страница 8: ...g including batteries Technic Property 1 Accuracy a reading digits at 23 5 C relative humidity 75 2 One year calibration guarantee since the time dispatched from the factory DC Voltage DCV 1 Turn the...

Страница 9: ...1000V DC or 750V AC peak value AC Voltage ACV 1 Turn the function range selection knob to ACV DCV press SELECT button to switch to ACV measurement mode Insert the red and black test lead separately to...

Страница 10: ...plete the measurement Range Accuracy Resolution 6V 0 8 10d 1mV 60V 10mV 600V 100mV 750V 1 0 10d 1V Input impedance 10M Overload protection 1000V DC or 750V AC peak value Frequency response 40 400Hz In...

Страница 11: ...gher than 600mA at mA Range otherwise the fuse will be burnt out or the instrument will be damaged b Do not connect the test lead to any circuit in parallel when the test lead is inserted in the curre...

Страница 12: ...aneously 3 At the Manual Range mode if OL is displayed on LCD it indicates the tested current value has exceeded the present range limit please select the higher range to complete the measurement Note...

Страница 13: ...5A 250V fuse 10A 250V fuse Duty Circle Indication 0 1 99 9 Resistance 1 Turn the function range selection knob to insert the red and black test lead separately to V Hz and COM input terminal 2 Connect...

Страница 14: ...been turned off and all capacitors are fully discharged b It will cause the reading incorrect to input any voltage when measuring the resistance If the voltage exceeds 250V over range protection volta...

Страница 15: ...he red test lead to the positive pole of the tested diode BLACK test lead to the negative pole 4 Read the present test result from LCD Note no Bar Graph display at Diode Range Note a If the diode is o...

Страница 16: ...Connect the test lead to the tested capacitor in parallel the tested capacitor value will be displayed on LCD 3 If OL is displayed on LCD it indicates the test capacitor value has exceeded the presen...

Страница 17: ...ert the red and black test lead separately to V Hz and COM input terminal 2 Connect the test lead to the tested signal source in parallel Read the present test result from LCD Note no Bar Graph displa...

Страница 18: ...nd press the button third to return to the mode of AC current or voltage measurement Note a Do not input the signal more than 60V Otherwise it is possible to damage the instrument and endanger the saf...

Страница 19: ...esent test result from LCD Note a Do not input the current or voltage at the input terminal of mA COM or transistor accessory otherwise it is possible to damage the instrument or endanger the safety o...

Страница 20: ...grade temperature measurement mode Note a Without the signal input LCD automatically displays the present temperature b Do not replace the temperature sensor at will Otherwise the accuracy can t be as...

Страница 21: ...mode Keep holding REL RS232 button more than 2 seconds RS232 symbol is displayed on LCD it indicates it is the status of the instrument connecting with PC then connect the instrument to PC by USB Cab...

Страница 22: ...5 1 Loose the screw that fixes the batteries and remove the battery case 5 2 Remove the spent 1 5V batteries and replace them by two same type new batteries It is better to use alkaline batteries for...

Страница 23: ...ck your Computer Properties Hardware Device Management COM 3 Open the software select the port number of this meter on the software interface of OPEN COM 4 After successfully connecting the wording US...

Страница 24: ...If the fault still can t be eliminated please contact the maintenance center or the distributors Fault Solution No display Power off turn on the power Hold Key set a correct mode Replace battery symb...

Страница 25: ...24 MT 1820 3 5 6 USB 25 25 2 5 27 27 2 8 2 9 DCV 29 ACV 30 DCA 31 ACA 32 34 35 C 36 Hz 37 38 39 40 40 41...

Страница 26: ...25 MT 1820 3 5 6 USB 24mm LCD 61 REL USB LCD 4 A D K USB MT 1820 IEC1010 2...

Страница 27: ...26 30V 10mA 2 3 4 5 6 7 8 9 10 11 12 LCD 13 14...

Страница 28: ...27 1 2 61 LCD 3 RANGE 2 fHE 4 HOLD 5 Hz DUTY 6 MAX MIN MAX MIN MAX MIN 2 MAX MIN...

Страница 29: ...28 7 SELECT 8 RS232 REL 2 PC LCD RS232 PC 2 RS232 LCD RS232 9 10 10A 10A 11 mA hFE 12 COM hFE 13 1 15 5 2 RS232 REL RS232 REL...

Страница 30: ...29 RS232 USB 3 HOLD 2 10 HOLD 2 5999 3 5 6 A D 3 OL 0 40 80 10 50 80 1 5V AAA 185mm x 92mm x 48mm 390g d 23 5 75 DCV 1 V Hz COM 2 LCD AUTO RANGE 3 LCD...

Страница 31: ...0 a DC1000V AC750V b c OL 600mV 0 5 4d 0 1mV 6V 1mV 60V 10mV 600V 100mV 1000V 1 0 6d 1V 600mV 60M 10M 1000V 750V ACV 1 SELECT V Hz COM 2 SELECT LCD AUTO RANGE Hz DUTY 220V 50Hz 400Hz 380V 50Hz 400Hz 3...

Страница 32: ...31 a DC1000V AC750V b c OL 6V 0 8 10d 1mV 60V 10mV 600V 100mV 750V 1 0 10d 1V 10M 1000V 750V 40 400Hz 0 1 99 9 DCA 1 COM mA 10A 2 LCD AUTO RANGE 3 4 OL...

Страница 33: ...32 a 10A 10A uA 6000uA mA 600mA b 60OuA 1 0 10d 0 1 A 60O0uA 1 A 60mA 10 A 600mA 100 A 6A 1 2 10d 1mA 10A 10mA 10A 15 0 5A 250V 10A 250V ACA 1 COM mA 10A 2 SELECT...

Страница 34: ...33 3 OL a 10A 10A uA 6000uA mA 600mA b 600uA 1 5 10d 0 1 A 6000uA 1 A 60mA 10 A 600mA 100 A 6A 2 0 15d 1mA 10A 10mA 10A 15 0 5A 250V 10A 250V 40 100Hz 0 1 99 9...

Страница 35: ...34 1 V Hz COM 2 3 LCD AUTO RANGE 4 OL a b 250V c 600 600 0 8 5d 0 1 6k 0 8 4d 1 60k 10 600k 100 6M 1k 60M 1 2 10d 10k...

Страница 36: ...35 400mV 250V 2 V Hz COM SELECT 3 4 a OL b c 250V 1 0mA 3 0V 50 0 5V...

Страница 37: ...36 C 1 V Hz COM 2 3 OL a b 100uF 15 C 40nF 5 0 30d 10pF 400nF 3 5 8d 100pF 4 F 1nF 40 F 10nF 200 F 5 0 10d 100nF 250V...

Страница 38: ...37 Hz 1 Hz V Hz COM 2 3 Hz DUTY Hz DUTY 4 Hz DUTY Hz DUTY Hz DUTY a 60V b 100Hz 0 5 4d 0 01Hz 1000Hz 1Hz 10kHz 10Hz 100kHz 100Hz 1MHz 1kHz 30MHz 10kHz 1 0V 250V 0 1 99 9...

Страница 39: ...38 1 hFE 2 mA COM 3 NPN PNP E B C 4 a mA COM b hFE NPN PNP 0 1000 1mA VCE 2 1V...

Страница 40: ...39 1 2 COM mA 3 SELECT SELECT a b c 20 400 1 0 50d 0 1 400 1000 1 5 15d 1 0 750 1 0 50d 0 1 750 1832 1 5 5d 1 K...

Страница 41: ...40 1 USB USB 2 COM5 3 OPEN COM 4 USB2 0 1 2 START 3 HELP 1 2 20 3 4 1...

Страница 42: ...41 2 3 4 5 LCD a b 2 1 5V 1 5V c d 1 1000V 2 3 4...

Страница 43: ...42 MT 1820 12 CD 0755 83692415 83692986 83246594 83247554 0755 83692143...

Страница 44: ...43...

Отзывы: