background image

Using Smart Albums

When enabled, the Smart Album feature helps you manage picture and video files created on 

your phone. Pictures and videos you take are organized according to time created and location 

data. In order to use this, you must have location tracking or GPS tracking enabled on the 

phone. Smart Album does is not applied to all picture or video files, only to those you have 

created recently. It will help you to organize digital pictures and videos a day or two after 

creating them.

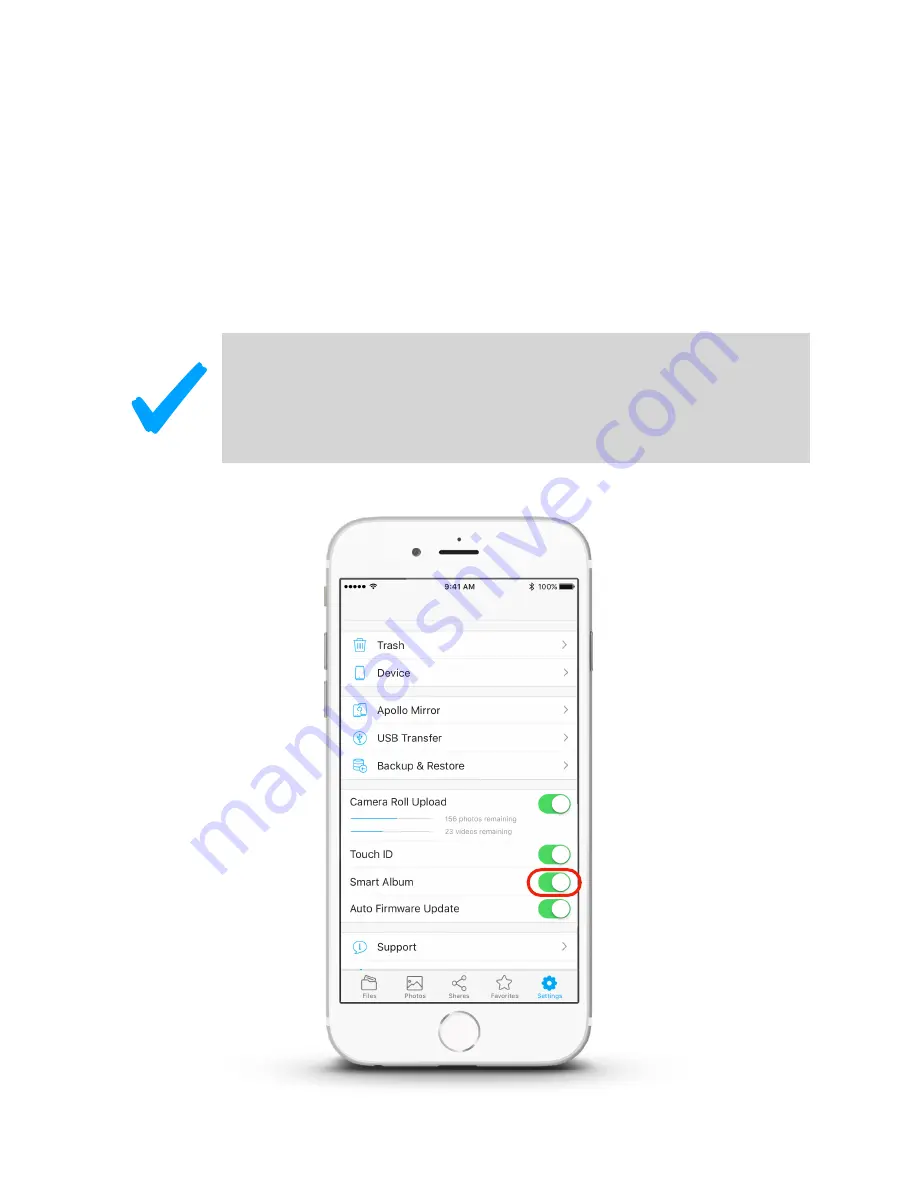
To enable the Smart Album feature, go to the Settings menu and slide the Smart Album switch 

to the right. 

28

Enable Smart Album

Important  

Smart Album requires that you enable location tracking on your 
phone. Smart Album helps to automatically organize photos and 
videos that have been recently created on your phone. The photos are 
organized according to the time they are created and location. 

Содержание Apollo Cloud 2 Duo

Страница 1: ...Apollo Cloud 2 Duo Storage and Sharing Reinvented ...

Страница 2: ...tup 6 Using the Apollo Cloud App 7 First Time Setup 7 How to Download and Launch Apollo Cloud App 8 Claiming Apollo with QR Code 9 Claiming Apollo with Auto Search 14 Claiming Apollo with Manual Find 18 Apollo Cloud App 2 0 23 Add Content Create Folders and Manage Files 24 Adding Photos From iPhone 24 Files by Category 26 Using Camera Rolls 27 Using Smart Albums 28 Managing Members 29 Adding New M...

Страница 3: ...nt from a USB Storage Device 51 USB Transfer with Apollo App 51 USB Transfer with Apollo Utility 53 Using Apollo Mirror 55 Using Apollo Mirror with the App 55 Using Apollo Mirror with Apollo Utility 59 Apollo Maintenance 62 How to view device status information 62 How to Change Device Name 63 Updating Apollo Firmware 65 How to Get Notifications 66 Sign Out of Apollo Cloud App 67 Using the Apollo U...

Страница 4: ...in Apollo Utility 75 Changing the Sync folder in Apollo Utility 76 Viewing Events in Apollo Utility 77 Viewing Software Version and Settings 78 Reset Apollo 79 Hardware Repair 80 Hard Drive Replacement 80 Drive Failure Indicators 83 Contacting Technical Support 84 Limited Warranty 86 Disclaimer of Other Warranties 86 Your Responsibilities 87 Returning the Product For Repair 87 ...

Страница 5: ...thernet Cable AC Power Adapter Requirements for Apollo use In addition to the items shipped with the device you need these items before you can setup and use the Apollo 1 An Internet connection This can be a broadband router or office network with an Internet connection The recommended minimum Internet connection speed upload AND download for Apollo is 4Mbits sec 2 Any one or more of the following d...

Страница 6: ...60 x 10 mm RAID function RAID 0 1 OS Support iOS 9 0 Mac OS 10 10 or later Android 5 0 or later Windows 7 8 Vista 10 USB Port One USB 3 0 LAN One Gigabit 1G Ethernet port Temperature Operating 5 35 C 41 95 F Humidity Operating 10 95 non condensing Storage 5 95 non condensing Dimensions 123 x 213 x 137 mm 4 8 x 8 4 x 5 4 in Weight 2 3 kg 5 lbs Certification FCC Canada ICES 003 CE BSMI VCCI RCM KC I...

Страница 7: ...ached to the ports Link Speed LED Green light is 100 Mbps Amber light is 1000 Mbps Power input Use the AC power adapter shipped with your Apollo USB 3 0 port You can use this to back up data on your Apollo Connect to a USB memory device to transfer back up data Ethernet port Connect this to your router or local network LAN Make sure it will be able to connect to the Internet ...

Страница 8: ...Front of Apollo Cloud 2 Duo 4 Capacitive touch LED button Did you know When the Apollo is in sleep mode the LED changes from dim to bright slowly in a repeating pattern ...

Страница 9: ...eed to touch the power button to power on White White light indicates the unit has been claimed The white light will flash when there is activity from a user or when it is finishing the registration process with the public server Orange Orange light indicates that the Apollo might not be available for use This can be because it is updating system firmware transferring content to a USB drive or reb...

Страница 10: ...o a networking device that allows the Apollo to connect to the Internet such as a broadband router or office Ethernet LAN that is connected to the Internet The Apollo does not require configuration of network settings or any other settings for initial system setup Just make sure it has an available path to the Internet Example Hardware Setup 6 ...

Страница 11: ...he Apollo Cloud App on your iOS or Android device or Mac or Windows computer Instruction for downloading the App are included below Once you have the App installed use the App to locate and claim your Apollo There are three different methods available for claiming the Apollo You can use the QR scanner embedded in the Apollo Cloud App and scan the QR code included in the Apollo package please see in...

Страница 12: ...labeled Apollo add Apollo to begin the claiming procedure Touch to select Apollo A new menu appears with a dialog box asking if you want to allow the App to have access to the camera The QR Code claim method requires camera access For Auto Search or Manual Search claim methods it makes no difference Choose OK to allow access or Don t Allow to deny access 8 Select Apollo Cloud App icon Apollo Cloud ...

Страница 13: ...rpose If your mobile device has a working camera it should be able to use this method employing the QR code reader embedded in the Apollo Cloud App Please locate the QR code on a card included with your Apollo then follow these steps to complete the QR code scanner method for claiming the Apollo 1 Touch to select Apollo A new menu appears with a dialog box asking if you want to allow the App to ha...

Страница 14: ...ccessful scan will change the menu to list the Serial Number and Key Code for the Apollo When you see the Serial Number and Key Code appear touch the Claim button 10 Scan the QR Code sent with your Apollo The Serial Number and Key Code appear the Apollo is ready to be claimed ...

Страница 15: ... frequently See Backing up Apollo content to USB storage on page 47 for information You can also backup to another Apollo Touch the Next button to continue A new menu appears 4 You must indicate that you agree with the User Agreement to proceed You can select the View Agreement option to read the user agreement When you are ready to proceed select the I agree to the User License Agreement and touc...

Страница 16: ...tton A new menu appears 6 Check your Email inbox for the validation code Use this to verify your account and bind your Email address as the Apollo owner If you do not see the Email check your spam folder It might be mistaken by your Email service to be an advertisement 7 Type the validation code in the space provided and touch Verify A new menu appears 12 Enter the Apollo owner Email address and r...

Страница 17: ...to create a password that is difficult to guess Type the same password again to confirm it is typed correctly 9 That s it If you have typed the validation code correctly you should be logged in and ready to start using Apollo The Files menu for Apollo will appear 13 Enter a password to use for the Apollo owner account login Success Apollo Files menu ...

Страница 18: ...earch option near the bottom 3 If there are more than one unclaimed Apollo on your network you will see a list of Serial Numbers for the unclaimed Apollo devices that have been discovered If you do not know which one is yours check the Serial Number on the bottom of the Apollo unit This is used to identify each device Choose the Apollo in the list with the same Serial Number and touch the Claim bu...

Страница 19: ... frequently See Backing up Apollo content to USB storage on page 47 for information You can also backup to another Apollo Touch the Next button to continue A new menu appears 5 You must indicate that you agree with the User Agreement to proceed You can select the View Agreement option to read the user agreement When you are ready to proceed select the I agree to the User License Agreement and touc...

Страница 20: ...tton A new menu appears 7 Check your Email inbox for the validation code Use this to verify your account and bind your Email address as the Apollo owner If you do not see the Email check your spam folder It might be mistaken by your Email service to be an advertisement 8 Type the validation code in the space provided and touch Verify A new menu appears 16 Enter the Apollo owner Email address and r...

Страница 21: ...ral Make sure to create a password that is difficult to guess Type the same password again to confirm it is typed correctly 10 That s it If you have typed the validation code correctly you should be logged in and ready to start using Apollo The Files menu for Apollo will appear 17 Enter a password to use for Success Apollo Files menu ...

Страница 22: ... housing with the Serial Number and Key code printed on it in small font You might need a magnifying glass to read it Keep in mind that the Serial Number and key code are case sensitive so they must be entered exactly as they appear on the key card or on the bottom of the Apollo device Follow these instructions if you do not see the Apollo listed when you are asked to choose a device 1 Touch to se...

Страница 23: ...For Apollo menu select the Find Manually option near the bottom 3 In the new menu type the Serial Number and Key in the spaces provided and touch the Claim button 19 Choose Find Manually Type the Serial Number and Key ...

Страница 24: ... frequently See Backing up Apollo content to USB storage on page 47 for information You can also backup to another Apollo Touch the Next button to continue A new menu appears 5 You must indicate that you agree with the User Agreement to proceed You can select the View Agreement option to read the user agreement When you are ready to proceed select the I agree to the User License Agreement and touc...

Страница 25: ...tton A new menu appears 7 Check your Email inbox for the validation code Use this to verify your account and bind your Email address as the Apollo owner If you do not see the Email check your spam folder It might be mistaken by your Email service to be an advertisement 8 Type the validation code in the space provided and touch Verify A new menu appears 21 Enter the Apollo owner Email address and r...

Страница 26: ...to create a password that is difficult to guess Type the same password again to confirm it is typed correctly 10 That s it If you have typed the validation code correctly you should be logged in and ready to start using Apollo The Files menu for Apollo will appear 22 Enter a password to use for the Apollo owner account login Success Apollo Files menu ...

Страница 27: ...a brief introduction to get you started using the App There are some minor differences in appearance and function between the two smart phone versions Android and iOS of Apollo Cloud App Most of the examples pictured in this document are from the iPhone the Android interface is nearly identical in appearance but there is no functional difference between the two versions 23 Apollo Cloud Files menu af...

Страница 28: ...one To add photos located on the iPhone and upload them to Apollo you can create a folder first or just choose and add photos to Apollo then you can create a folder and place them in it later 1 To begin adding photos touch add photos and choose the action you want to take in the menu that pops up In this example we will add photos without first creating a folder Choose Add photos Videos 2 Select t...

Страница 29: ...e folder When you have chosen the files you want touch Complete to being uploading The time it takes to upload depends on the amount of data photos you selected and the speed of your WiFi or Wireless Data connection 25 A maximum of up to 100 photo video files can be selected for upload Document files can be selected one at a time for upload Select photos to upload to Apollo ...

Страница 30: ...bottom of the Apollo Cloud Folder menu link to menus for All all file types Recent within the past week and Shared content you have shared with other members Use these to go to files and content in that category 26 All files and folders ...

Страница 31: ...e Internet but your mobile device must support a wireless Internet data connection via a 3G and 4G network Wireless Internet data transfer is enabled separately in the same place you enable automatic uploads from your Camera Roll You should only enable this if you cannot use a local WiFi connection to access the Internet since there are typically usage fees for this service To enable the Camera Ro...

Страница 32: ...ture or video files only to those you have created recently It will help you to organize digital pictures and videos a day or two after creating them To enable the Smart Album feature go to the Settings menu and slide the Smart Album switch to the right 28 Enable Smart Album Important Smart Album requires that you enable location tracking on your phone Smart Album helps to automatically organize p...

Страница 33: ... pictures that are shared Users also have the option to share their own user content with the public Adding New Members In addition to sharing files and folders the Apollo owner can send invitations for membership to share space on the Apollo This is an exclusive privilege of the Apollo owner To add a new member to the Apollo user group follow these steps 1 In the Apollo main menu select the Membe...

Страница 34: ... send an invitation and select OK to create the new member account 3 Now you are asked to send an invitation to the new member The link is copied to the clipboard and you can choose how to share it 30 Enter name for new member Choose method to send invitation ...

Страница 35: ...this will bring up a web referral menu where the recipient can choose to go to the App Store or Google play to get the Apollo Cloud App If the App is already installed then activating the link launches the App The new member then must login and create a password similar to the Apollo setup procedure for claiming the Apollo Note that while the member invitation is pending a notification appears in ...

Страница 36: ...at member To delete a member from the Apollo user group go to the Members menu select the member that you want removed and choose the Delete option A dialog pops up asking that you confirm that you want to delete the member To permanently delete the member content and remove the member from the Apollo touch Delete 32 Delete Member Confirm you want to remove a member ...

Страница 37: ...as go into effect as soon as they are created To set a member storage quota with the App go to the Members list choose the member you want to adjust and touch Max Capacity to see the quota menu Choose the quota to set from the list and touch Save The quota becomes effective immediately Note that it is not possible to set a quota smaller than what the member has already used 33 Drag to set maximum st...

Страница 38: ...ch user to select the fellow Apollo members that can view videos or pictures that are shared Users also have the option to share their own user content with the public Sharing Folders with Members Follow these steps 1 Go to the File menu find the folder to share Slide the tab left to reveal the More and Delete options 34 Slide tab left choose More option Go to the File menu choose folder to share ...

Страница 39: ...2 Select the More option 3 Select the Share option A new menu appears 4 Select Member Sharing A list of members appears 35 Choose Member Sharing Choose Share ...

Страница 40: ...5 You can now customize how to share content in the folder You can turn sharing On or Off and allow Read Write or Read Only privilege 36 Choose members and type of sharing for folder ...

Страница 41: ...pasting into a social media site or email You can also choose an App for sharing the link To create a public share 1 Go to the File menu find the folder to share Slide the tab left to reveal the More and Delete options 2 Select the More option 3 Select the Share option A new menu appears 37 Go to the File menu choose folder to share and Share option Choose Public Sharing ...

Страница 42: ...rd type password in space provided You can also customize how long the link to the shared content remains valid using the slider bar up to 30 days 6 Select the Copy Shared Link button and choose which App you prefer in the new menu paste the link and send it 38 Choose Public Sharing Choose public sharing settings ...

Страница 43: ...publicly shared content links go to the Shares menu and choose Member or Public Sharing to see what you are currently sharing To disable sharing choose the file to see details and slide the Sharing switch left to turn off 39 Display current shared Public files Change sharing options ...

Страница 44: ...ember from the Apollo user group go to the Members menu select the member that you want removed and choose the Delete member option A dialog pops up asking that you confirm that you want to delete the member To permanently delete the member content and remove the member from the Apollo user group type confirm and touch OK 40 Choose Delete this member Confirm you want to remove a member ...

Страница 45: ...iles in the trash can be restored from the Trash to the original location or they can be permanently removed by the user Delete Files To remove files from any folder you control simply select the files by touching Select or Select All then touch the Trash icon at the bottom of the menu A menu pops up asking if you really want to delete the files Touch Delete to delete send to Trash folder or Cance...

Страница 46: ... you wish to restore to the original folder or if you just want to see what is in the Trash folder you can go to the Apollo device menu To see what is in the Trash got to the Settings menu touch the Trash icon to open the Trash contents folder 42 Go to Trash contents ...

Страница 47: ...cation they were placed previously select the files from the content listed in Trash and touch the Restore icon You need to confirm that you want the files restored in a pop up menu Touch OK to restore the files or Cancel to leave them in the Trash 43 View Trash contents ...

Страница 48: ...ck the Trash icon at the bottom of the menu If you remove these files at this point they cannot be recovered they are gone from Apollo Make sure this is content you do not want stored on Apollo If you want to permanently delete the files touch OK to delete the files or Cancel to leave them in the Trash 44 View Trash contents View Trash contents ...

Страница 49: ...ansfer function upload from USB drive to Apollo use the Apollo Utility The Backup and Restore procedure is the same for the App or the Utility Note that USB storage drive operations are available only to the Apollo owner USB Drive Requirements for Apollo Backup Restore For Apollo Backup and Restore on USB storage functions the USB storage device must fit the following requirements File system exFA...

Страница 50: ...ent to USB Storage Connect a USB storage device to the Apollo then follow these steps 1 Go to Device menu select the Settings menu then select the Backup Restore option 46 Device Settings Backup Restore choose Backup Backup ...

Страница 51: ...ups move the Schedule daily backup slider to the right then choose a time for the daily backup This will perform a backup everyday at the chosen time Again scheduled backups are optional If you want to begin backing up immediately just one time touch Start and the backup will begin 47 Enable scheduled backup optional Choose backup schedule optional ...

Страница 52: ...take to complete the transfer For this reason it is recommended to use a USB 3 0 device since the transfer speed is much faster than legacy USB storage devices When the backup is completed 100 displays under the progress bar Touch the OK button to go back to the Settings menu 48 Backup in progress Backup finished ...

Страница 53: ...o and follow the instructions below Connect the USB storage device with your previously saved backups to the Apollo then follow these steps 1 Go to the Settings menu select Backup Restore 2 Select Restore 3 You must confirm that you want to begin the restore process Type Confirm in the new menu and select OK 49 Select Restore Confirm that you want to proceed with Restore ...

Страница 54: ...4 During the restore process progress is displayed Do not unplug the USB device 5 When the restore is completed touch the Done to go back to the Settings menu 50 Restore in progress Restore in progress ...

Страница 55: ... increase proportional to the amount of data being transferred USB Transfer with Apollo App To begin a USB Transfer to Apollo attach a USB storage device to the USB port on Apollo and use the Apollo App to perform the steps below 1 Click the Settings icon and select the USB Transfer option 2 If the USB device is connected and ready for use you will see the Start in blue text If you see a message t...

Страница 56: ...while the transfer is in progress 4 When the USB transfer is completed a message appears informing you that it is done It is now safe to disconnect the USB storage device 52 USB Transfer in progress Please connect a USB storage device Note If a USB drive is not detected or not connected a message appears that instructs you to connect a USB drive ...

Страница 57: ... on page 74 for instructions on using the Apollo Utility for various operations 1 Open the Preferences menu and click the USB Transfer icon 2 If the USB device is connected and ready for use you will see the External hard drive is ready message If you do not see Choose USB transfer in Preferences menu 53 Note Apollo requires the USB drive to use one of the following file systems exFAT NTFS HFS EXT...

Страница 58: ...he Start button to begin After a few seconds a progress bar appears this represents how much of the transfer has been completed DO NOT DISCONNECT the USB storage device while the transfer is in progress 5 When the USB transfer is completed a message appears informing you that it is done It is now safe to disconnect the USB storage device 54 ...

Страница 59: ...imed Using Apollo Mirror with the App If you are using a device that was previously claimed backup all data make sure the firmware is up to date then reset the Apollo so the it is unclaimed Apollo Cloud 2 Duo can only be mirrored to another Apollo Cloud 2 Duo that is not claimed To setup Apollo Mirror with the App c 1 In the Settings menu select Apollo Mirror A new menu appears This is the claim m...

Страница 60: ...s that have been discovered If you do not know which one is yours check the Serial Number on the bottom of the Apollo unit Touch to select the Apollo you will use for mirroring and touch Next 4 A warning appears informing you that anything in the Trash will be permanently deleted Touch Next if you want to proceed 56 Choose the Apollo used for mirroring Trash on the original Apollo will be permanen...

Страница 61: ...e Apollo owner If you do not see the Email check your spam folder It might be mistaken by your Email service to be an advertisement 6 Type the validation code in the space provided and touch Next A new menu appears 57 Type validation code you received via email The claiming process starts then the mirroring process ...

Страница 62: ...hen the task is done another menu appears informing you the mirroring has been completed The mirror device will now duplicate data as it is added or deleted on the Apollo 58 Replication progress is displayed until completion When mirroring is done the Mirror Complete message appears ...

Страница 63: ...rror make sure the firmware is up to date then reset the Apollo so the it is unclaimed Apollo Cloud 2 Duo can only be mirrored to another Apollo Cloud 2 Duo that is not claimed To setup Apollo Mirror 1 In the Settings menu select the Apollo Mirror menu 2 Make sure both Apollo devices are powered on and connected to the same network Click the Start button The Utility begins searching for any unclai...

Страница 64: ... that you need to keep click on the Continue button 4 Since your email address is already known you are sent a Validation Code to the email account of record Check your email and get the code Then enter the code in the space provided and click the Next button 5 When the validation code is accepted the mirroring begins 60 ...

Страница 65: ...ancel the procedure at any time if you wish To cancel Apollo Mirror click on Stop Mirroring 7 A message informs you when the mirror is complete Click OK to accept You can still cancel the mirror by clicking Cancel Mirror Configuration You will need to confirm this in a separate menu 61 ...

Страница 66: ...nd to update Apollo firmware How to view device status information To see some basic information about the Apollo go to the device menu go to Settings then touch the device name near the bottom of the menu If you are experiencing problems with the Apollo Cloud App go to this menu to see if the Apollo is online 62 View device information Information displayed in the device menu includes Name Serial...

Страница 67: ...irst go to the Settings menu Follow these steps starting in the Settings menu to change the device name 1 Touch the Apollo device name in the Settings menu to go to the device menu 2 Touch the Name of the Apollo in the device menu A new menu appears for changing the name 63 Go to the device menu Access name change menu ...

Страница 68: ...3 In the Rename menu enter the new device name for the Apollo and touch OK to make the change 64 Enter new device name ...

Страница 69: ... running on the Apollo open the device menu and touch the Check firmware version button near the bottom of the menu Apollo Cloud will query PROMISE for the latest firmware version information It might take a few seconds A report will inform you if the current version running is up to date If the firmware is not the latest version you will be asked if you want to update it now 65 Go to the Settings...

Страница 70: ...erates event notifications for system and device events such as a USB backup or a firmware change You can see these by touching the notifications link just below the owner avatar pic in the Settings menu 66 Access notifications View Apollo notifications ...

Страница 71: ...o the Settings menu scroll to the bottom and touch Sign Out You will need to login again the next time you want to use Apollo Cloud If you do not sign out you remain logged in even if you turn off your computer phone or tablet device 67 Go to profile menu Sign out ...

Страница 72: ...r Mac OS X 10 8 or later operating system to begin using Apollo with your computer Launch the Apollo Cloud Utility and login the same way you do on a mobile device If you are using the utility to claim a new Apollo the procedure is the same as the claim procedure for a mobile device except there is no QR Code Scanner option Please see Claiming Apollo automatic method on page 9 for a description of...

Страница 73: ...es are how the different operating systems present icons and menu access for applications in general For Windows an Apollo icon appears in the System Tray and in Mac the Apollo icon appear in the Dock as well as in the menu bar on the top of the desktop in default Mac settings 69 Apollo Utility icon in Windows System Tray Apollo Utility icon in Dock on Mac ...

Страница 74: ...ility Quit Apollo Utility Open sync folder View sync records You can also view the current Firmware version running on the Apollo as well as the current software version of the Apollo Utility 70 Right click on Apollo Utility icon in Windows System Tray Right click on Apollo Utility icon in Mac Menu Bar Right click to open sync folder Windows Apollo sync folder icon after device name change See Cha...

Страница 75: ...y content create folders delete content etc You can also add content with Apollo Utility from the Files menu Or open the sync folder by right click on the desktop icon When you create folders here those folders are eligible for synchronizing to the Apollo To add content or create a new folder click on Add Content near the top of the menu 71 Apollo Utility Files menu Apollo sync folder in Windows o...

Страница 76: ...Just type a keyword search term in the Search entry field and press the Enter key Sorting Content to View in the Apollo Utility Sorting content in Apollo works the same as it does in your operating system Choose the category Name Size Last Modified etc for sorting at the top of the menu 72 File search on Apollo Sorting files and folders ...

Страница 77: ...nctions are described in a separate section Please see USB drive operations with Apollo on page 46 for instructions Using Quickview for Picture Files The Quickview feature is enabled by default It is used to speed up loading of photo files for viewing especially on mobile devices When Quickview is enabled pictures stored on Apollo are displayed on your mobile device using 1 Megapixel resolution Th...

Страница 78: ...ust click on an audio file supported audio formats mp3 aac au m4a m4r wav the music player launches automatically The default Repeat play in sequence mode will play audio files sequentially as listed in the folder Shuffle mode plays audio files in the folder in a random order Apollo Music Player continues to play as long as the Apollo Utility is running You can continue to perform other operations i...

Страница 79: ...tings icon in the side panel then the Settings icon in the Preferences menu 2 Click on the Edit icon in the Device Name row of the menu display 3 Type in the preferred device name for Apollo and press Enter to make the change Note that if the Apollo is being Mirrored you cannot change the device name 4 Click the OK button to complete 75 If the Apollo is currently being mirrored you cannot change t...

Страница 80: ...your computer follow these steps 1 Click the Settings icon in the side panel 2 Click on the Apollo Sync icon A new menu appears 3 Use the menu to choose a different folder or location for the Apollo Sync folder 4 Click the Save button to complete 76 Go to Apollo Sync menu Choose a new Sync folder ...

Страница 81: ...e Notifications icon in the side menu to see event notifications invitation acceptances firmware updates etc 77 Only the Apollo owner can view the Apollo Notifications menu Members will see only the Invitations list Event Notifications display ...

Страница 82: ...click the Settings icon in the side panel then the Settings icon in the Preferences menu This menu is also where you can change default settings to enable or disable automatic launch of the Apollo Utility on system startup to display event notifications and enable automatic firmware updates 78 ...

Страница 83: ...vice in the Apollo Utility go to the Settings menu click on the Reset this Apollo button A warning dialog appears You must type confirm in the entry field and click the OK button to complete the reset 79 Reset the Apollo Caution When you reset the Apollo you are removing the claim to it ALL DATA will be lost when you reset the Apollo To use the Apollo again you will need to go through the claim pr...

Страница 84: ...llo Cloud 2 Duo It will require a light force to remove it No tool is required for the removal of the cover 80 Caution It is recommended that the Apollo be powered off and unplugged before attempting to replace the hard drives Damage caused by improper attempts to replace the hard drives will not be covered under the manufacturer warranty Lift the cover ...

Страница 85: ...2 Use a Philips screwdriver to remove the two small screws on either side of the fan Then gently lift the fan assembly out 81 Remove screws Lift fan assembly ...

Страница 86: ...3 The hard drives have a plastic tab on the top of each drive Carefully lift up on the hard drive to remove it 82 Remove the hard drive ...

Страница 87: ... of the Apollo Cloud 2 Duo is off you will see two LED indicators numbered 1 and 2 In the event of a hard drive failure this light will illuminate indicating which drive has the failure 83 Hard drive 2 LED indicator Hard drive 1 LED indicator ...

Страница 88: ...vide product information updates for the most efficient service and support Promise offers free phone and web support for the first 90 days after purchase of the product Additional charges may apply Promise offers local Phone Support for Apollo during normal business hours 7 days per week Please visit the Apollo support help desk portal at https getsupport promise com Home And click on the HELP DESK l...

Страница 89: ...t suits your schedule and needs When you contact Technical Support please have the following information available Product model and serial number A description of the problem situation 85 Important You can find the Serial Number on a card that should have been included in the Apollo packaging or look on the bottom of the Apollo ...

Страница 90: ...ranty covers only parts and labor and excludes coverage on software items as expressly set above Except as expressly set forth above PROMISE disclaims any warranties expressed or implied by statute or otherwise regarding the product including without limitation any warranties for fitness for any purpose quality merchantability non infringement or otherwise PROMISE makes no warranty or representati...

Страница 91: ... before installing any product and for regularly backing up your data after installing the product PROMISE is not liable for any damage to equipment or data loss resulting from the use of any product Returning the Product For Repair If you suspect a product is not working properly or if you have any questions about your product contact our Technical Support staff at https getsupport promise com 7 D...

Страница 92: ...ou must pay for any additional shipping options such as express shipping and return of the defective part or unit To contact Technical Support use the link https getsupport promise com Home Copyright 2017 Promise Technology Inc All rights reserved 88 Important Obtain an RMA number from Technical Support before you return the product and write the RMA number on the label The RMA number is essential...

Отзывы: