background image

7

ASSEMBLY INSTRUCTIONS
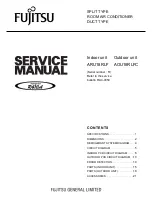
Secondary 

Support 

Screw

Open Loop

Support 

Washer

Secondary 

Spring 

Washer

11

11. Tighten the secondary support screw securing the 

braided cable.

10

9

Secondary

Support Screw

Braided Cable

Outlet Box

Brace

10. Install secondary support screw, secondary spring 

washer, and support washer partly into the side of the 

brace installed in the ceiling. Then lift the braided cable up 

and over the ceiling brace and place the open loop of the 

braided cable around the secondary support screw.

Note: 

The ceiling support brace may not be accessible 

from below. If not, it must be accessed from above.

Important: 

The braided cable must make a complete 

circle around the support brace to secure the fan.

SECONDARY HANGING SYSTEM
For installation in the United States:

 Building codes 

in the U.S.A. do not require installation of a Secondary 

Hanging System. If desired, the braided cable can be cut 

and removed using wire cutters (sold separately). 

Skip to 

Step 12. 

For installation in Canada:

 In compliance with building 

codes in Canada, installation of the Secondary Hanging 

System is required. 
9. Feed the loop of the braided cable, preassembled to the 

motor assembly, up through the outlet box mounted in the 

ceiling.

Содержание 50650

Страница 1: ......

Страница 2: ...r x3 27 Pull Chain Extension x2 28 Secondary Support Screw 29 Support Washer 30 Secondary Spring Washer 31 Blade Balancing Kit Unpack your fan and check the contents You should have the following item...

Страница 3: ...is best suited for ceilings lower than 8 feet It does not utilize the downrod Downrod Mount is best suited for ceilings 8 ft or higher For taller ceilings you may want to use a longer downrod not incl...

Страница 4: ...ation instructions are not meant to cover all possible conditions and situations that may occur It must be understood that common sense caution and care are factors which can not be built into this pr...

Страница 5: ...ctric shock or personal injury mount to the outlet box marked acceptable for fan support and use the mounting screws and washers provided with the outlet box 3 Remove the ten motor screws washers and...

Страница 6: ...downrod ball with the tab on the mounting bracket may result in fan falling causing serious injury or death 7 Insert the downrod into the yoke and reinstall the downrod pin and downrod clip Then reti...

Страница 7: ...Note The ceiling support brace may not be accessible from below If not it must be accessed from above Important The braided cable must make a complete circle around the support brace to secure the fan...

Страница 8: ...e arm to the underside of the motor assembly with previously removed motor screws Tighten each blade arm completely before moving to the next 12 Use wire connectors to connect the fan wires to the pow...

Страница 9: ...emoved switch housing screws secure the light kit to the switch housing Light Cage Bracket Bulb Cage Screw Shade 16 Remove the four cage screws from the brackets inside the shade Install the E26 base...

Страница 10: ...nward airflow creating a wind chill effect In cooler weather push the reverse switch up which will result in upward airflow that can help move stagnant hot air off the ceiling area Important Wait for...

Страница 11: ...canopy and mounting bracket are tightened securely to outlet box and outlet box is mounted firmly to ceiling joist 4 Switch one blade with a blade from the opposite side Or balance the fan using a bal...

Страница 12: ...rmed by an unauthorized person will render the warranty invalid Due to varying climate conditions this warranty does not cover any changes in brass finish including rusting pitting corroding tarnishin...

Отзывы: