
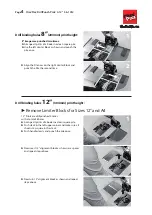


Drill binding holes
A4
Portrait and Landscape:
A4 Portrait has 4 binding holes, A4 Landscape has 3 binding holes.
Insert A4 Portrait alignment block as shown as
a spacer and arrange all prints of the book in a
clean square pile.
Push stack in the left upper corner and make sure
all sheets stay square in the stack.
Push handle slowly and punch the pile once.
Insert A4 Landscape alignment block as shown
as a spacer and arrange all prints of the book in a
clean square pile.
Push stack in the left upper corner and make sure
all sheets stay square in the stack.
Push handle slowly and punch the pile once.
Turn the alignment block as shown and repeat
punching.
Turn the alignment block as shown and re-
peat punching.
StudioAlbums
Page
5
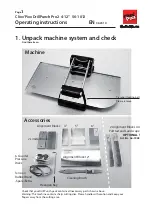
Clixx’Pixx DrillPunch Pro2 4-12” 56-1012
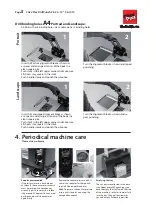
4. Periodical machine care
Please always observe
Counter pressure disk
If the last pictures in a stack are not
cut cleanly, the counter pressure disk
must be rotated. Use hexagon key
wrench to pull it towards you, rotate
it by around 30 degrees to an unused
position and push it in backwards
again firmly.
Emptying the tray
The cut-outs are collected in the back
tray. About every 500 punchings you
have to empty the tray. Tap on the side
of the machine, so that all remains falls
into the tray. Then pull out towards
you and empty. Put back in position.
Por
tr
ait
Landscape
Replace the counter pressure disk, if
there is no space for further punch-
ings left (like on picture above).
Hint:
To remove the counter pressure
disk, push it towards you using the
hexagon key wrench.
1
2
1
2
1
3
2


