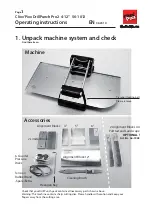


Punch
Alignment
Bar
Tension
Rubber
Band
45°
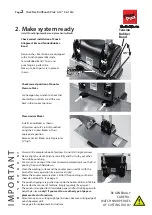
2. Make system ready
Install PunchAlignmentBar and place LimiterBlocks
StudioAlbums
Page
2
Clixx’Pixx DrillPunch Pro2 4-12” 56-1012
Check correct installation of Punch
Alingment Bar and TensionRubber-
Band
New punches, like this one, are equipped
with a PunchAlignmentBar and a
TensionRubberBand. This assures
punching in a perfect line.
Make sure, both parts are in place as
shown.
Check correct position of Counter
Pressure Disks
Use hexagon key wrench to check that
CounterPressureDisks are all the way
back in their correct position.
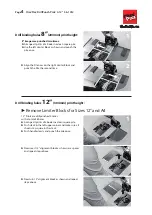
Place Limiter Blocks
Install LimiterBlocks as shown.
All pictures up to 8” are drill-punched
using the 2 Limiter Blocks in their
appropriate position.
Remove Limiter Blocks only for pictures
12” high.
1
2
3
4
5
6
7
8
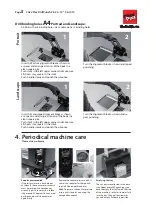
Always drill a complete book of pictures. Do not drill single pictures.
Please align the stack of pictures carefully and fix it with your other
hand while punching.
Put a misprint on top of the stack to avoid unwanted marks on the first
print by the punch hold down.
Clean the working surface and the counter pressure disks with the
brush after every operation (see picture at right).
Rotate the counter pressure disks a little, if the punchings on the last
sheet do not look OK. (See page 5).
The punch clippings are pushed up inside the hollow drills and fall into
the wastbasket on rear of machine. Empty regularly. (See page 5)
The punch is designed for SilverHalide paper and for DryInk paper with
polyethylen layer
only!! If you want to use other type of papers,
please contact us for advice.
After intensive use, cutting might get arduous, because cutting edge of
punch becomes dull.
See page 6 for replacement instructions.
4
IMPOR
TANT
BE GENERALLY
CAREFUL:
WATCH SHARP EDGES
OF CUTTING TOOLS!


