background image

5

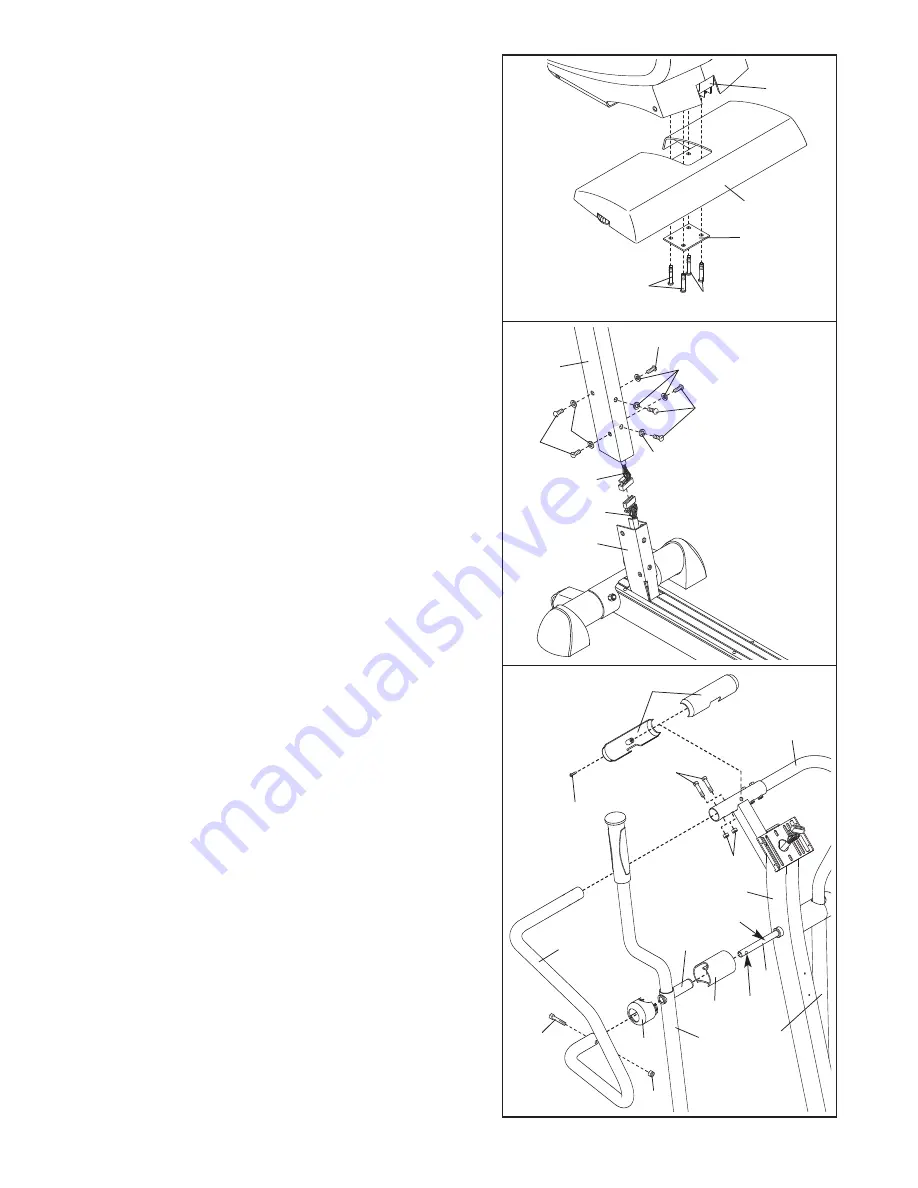
3. Have another person hold the Upright (2) in the posi-

tion shown.

Connect the Upper Wire Harness (30) to the Lower

Wire Harness (42). Insert the connectors on the Wire

Harnesses up into the Upright (2). Carefully pull the

upper end of the Upper Wire Harness to remove

the slack from the Wire Harnesses.

Slide the Upright (2) onto the Frame (1). Be careful to

avoid pinching the Wire Harnesses (30, 42). Attach

the Upright with six M10 x 20mm Button Screws (49)

and six M10 Split Washers (73). Be careful to avoid

damaging the Wire Harnesses with the Button

Screws. Do not tighten the Button Screws yet.

73

73

73

49

49

49

30

42

3

4

21

31

Grease

2

85

3

22

29

25

26

69

80

81

29

4. Apply a generous amount of the included grease to

the Pivot Axle (25). Next, insert the Pivot Axle into the

Upright (2) and center it. Reapply grease to both ends

of the Pivot Axle. Orient the indicated hole as shown.

Slide an Upper Body Arm Cover (26) onto the indicat-

ed tube on an Upper Body Arm (29). Next, slide the

Upper Body Arm and the Upper Body Arm Cover onto

the left end of the Pivot Axle (25). 

Have another person hold the Left Handlebar (21)

near the Upright (2). Slide a Handlebar Cover (31)

onto the lower end of the Left Handlebar. 

Slide the upper end of the Left Handlebar (21) into the

tube on the front of the Upright (2), while sliding the

lower end of the Left Handlebar onto the Pivot Axle

(25). Attach the upper end of the Left Handlebar with

two M8 x 41mm Button Bolts (80) and two M8 Jam

Nuts (81); Make sure that the Jam Nuts are resting

in the hexagonal holes in the Left Handlebar.

Attach the lower end of the Left Handlebar with an M8

x 38mm Button Bolt (85) and an M8 Jam Nut (81).

Then, press the tabs on the Handlebar Cover (31) into

the Upper Body Arm Cover (26).

Repeat this step with the other Upper Body Arm

(29) and the Right Handlebar (22).

Hold the halves of the Upright Cover (3) around the

tube on the front of the Upright (2). Attach the Upright

Cover with an M4 x 16mm Round Head Screw (69).

Do not pinch the

wire harnesses 

during this step.

1

2

81

2. Identify the Rear Stabilizer (6). While another person

lifts the back of the Frame (1), attach the Rear

Stabilizer to the Frame with the Support Plate (64) and

four M8 x 44mm Button Screws (84).

2

6

64

1

84

84

Tube

Hole

Содержание 835 S Elliptical

Страница 1: ...TIONS As a manufacturer we are com mitted to providing complete customer satisfaction If you have questions or if parts are damaged or missing PLEASE CONTACT OUR CUSTOMER SERVICE DEPARTMENT DIRECTLY C...

Страница 2: ...properly tighten all parts regu larly Replace any worn parts immediately 7 Keep children under age 12 and pets away from the elliptical exerciser at all times 8 The elliptical exerciser should not be...

Страница 3: ...andlebar Handgrip Pulse Sensor RIGHT SIDE BACK Wheel Pedal Fan Upper Body Arm Console Upright Book Rack Leveling Foot Pedal Leg Health Fitness Inc REV B B PEN X X Must be able to apply decal with secu...

Страница 4: ...e key number of the part from the PART LIST on page 17 The number following the parentheses is the quantity used in assembly Note Some small parts may have been preassembled If a part is not in the pa...

Страница 5: ...Cover onto the left end of the Pivot Axle 25 Have another person hold the Left Handlebar 21 near the Upright 2 Slide a Handlebar Cover 31 onto the lower end of the Left Handlebar Slide the upper end...

Страница 6: ...f the elliptical exer ciser Regularly tighten both Adjustment Knobs 72 See step 3 Tighten the six M10 x 20mm Button Screws 49 4 10 72 20 83 65 6 65 29 7 The Console 17 requires four D batteries not in...

Страница 7: ...p off the lowest pedal HOW TO USE THE ELLIPTICAL EXERCISER Pedals Handlebars 9 Make sure that all parts of the elliptical exerciser are properly tightened Cover the floor beneath the elliptical exerci...

Страница 8: ...the built in hand grip pulse sensor In addition the console offers eight preset programs Each program automatically changes the resistance of the pedals and prompts you to increase or decrease your p...

Страница 9: ...ppear and the indica tors will again begin to light in succession The lower part of the left display will show your pedal ing pace in revolutions per minute RPM The right display The upper part of the...

Страница 10: ...sure that your hands are positioned as described Avoid moving your hands excessively or squeezing the metal contacts too tightly For optimal performance periodically clean the metal contacts using a...

Страница 11: ...be shown in the flashing Current Segment column and the resistance of the pedals will automatically change to the resis tance setting for the second segment The program will continue until the resist...

Страница 12: ...4 Enter your age When pulse control program 1 is selected the words SET AGE will flash in the lower part of the right dis play You must enter your age to use this program If you have already entered...

Страница 13: ...to the tar get heart rate the resistance may automatically change If you stop pedaling for several seconds a tone will sound and the program will pause To restart the program simply resume pedaling Pu...

Страница 14: ...AL EXERCISER If the elliptical exerciser rocks during use turn one or both of the lev eling feet under the rear stabilizer until the rocking motion is elimi nated HOW TO MOVE THE ELLIPTICAL EXERCISER...

Страница 15: ...s to strengthen your cardiovascular sys tem your exercise must be aerobic Aerobic exer cise is activity that requires large amounts of oxygen for prolonged periods of time This increases the demand on...

Страница 16: ...les Stretch With one leg in front of the other reach forward and place your hands against a wall Keep your back leg straight and your back foot flat on the floor Bend your front leg lean forward and m...

Страница 17: ...d Switch Bracket 54 1 Clamp 55 1 Reed Switch Wire 56 1 Return Spring 57 1 Pillow Block Set 58 1 Resistance Cable Assembly 59 5 M6 x 10mm Button Screw 60 1 Snap Ring 61 1 Idler Pulley Bracket 62 1 M5 x...

Страница 18: ...18 15 94 94 94 48 94 94 16 30 50 13 24 29 14 14 29 23 48 13 12 12 12 3 73 73 73 73 49 49 49 23 14 14 14 14 85 81 85 81 80 80 69 47 31 25 70 31 47 22 21 94 77 91 94 81 81 95 95 91 EXPLODED DRAWING A M...

Страница 19: ...76 82 51 51 66 41 5 65 65 11 27 91 13 91 10 36 61 59 82 34 35 35 38 80 45 92 44 80 43 74 1 33 52 79 79 93 93 35 42 94 39 72 65 65 4 41 66 51 51 72 83 83 20 20 28 28 9 8 40 67 67 89 9 90 89 37 59 59 59...

Страница 20: ...oduct or damage to a product caused by or attributable to freight damage abuse misuse improper or abnormal usage or repairs not provided by an ICON authorized service center products used for commerci...

Отзывы: