INSTALLATION AND OPERATING INSTRUCTIONS
15
DIY
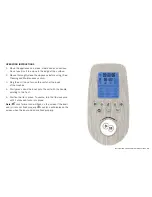
• There are three DIY programs, for recording custom
settings for future use.
• Press this button, and the icon
on LCD will fl ash. Press
button again to select between
• Recording: When the DIY icon fl ashes, press and hold DIY
button for 5 seconds, until the screen shows STEP:01
. Set desired speed, temperature, heat power, timer and press
DIY button again, it comes to STEP:02
; repeat until
fi nish setting, up to maximum STEP:20. When fi nished, hold
DIY button again for 5 seconds to save and record.
• To operate: Press DIY and select the desired DIY function, and
press START to start working as recorded.
• Revise settings: During DIY setting, if the previous setting
needs revising, press DIY button, it goes from STEP:01 until
STEP:20 and returns back to STEP:01. You can revise the
setting of any step. After DIY recorded, repeat recording
process until the desired step to revise, and hold DIY for 5
seconds to keep the updated setting in memory.
• During working of DIY program, the machine will stop for 10
seconds at the end of the step and will beep to allow you to
PAUSE the machine and add ingredients if needed. If left
idle during these 10 seconds, the machine goes to next step
according to the setting.
• During working of DIY program, all settings can be adjusted
freely, but it will not revise the recording.
• Press STOP/CANCEL during recording, and the machine will
stop recording and abandon the records.
PULSE
• The Pulse function is for chopping and mixing ingredients at
maximum speed.
• Press and hold this button for the required time (usually 3-4
seconds).
• When the temperature in the bowl is over 60°C, PULSE cannot
be used.
• Do not use mixing tool with this function.
• Caution: When using this function, ingredients may splash and
might result in burns if the necessary caution is not taken. It
is therefore recommended to turn the measuring cup to lock
position when using Pulse.
• When crushing ice or grinding hard food, press the button in
short bursts until the desired result is achieved.
Содержание PRO-TP
Страница 23: ...INSTALLATION AND OPERATING INSTRUCTIONS 23 ...


