background image

COUNTER CONTENT 

 
D-DAY, D-TIME, AND EVENT 

Count down by time, day, or event.


Add Dday – Count down to an event by days. 

1)


Press the [MENU] button. 

2)


Press [OK]. 

3)


Press the       arrow button until the Add Dday option appears. 

4)


Press [OK]. 

5)


Set the event date using the      and       arrow buttons. 

6)


To move between the month, day, and year, use the      and       arrow buttons. 

7)


Press [OK] to confirm the event date.  

8)


Input your event message and press [OK]. 

9)


Your message will automatically be previewed on the display. Press [ESC] to make a 
change or press [OK] to confirm your entries. 

10)


Press [ESC] to run your message. 


NOTE

:

 Your Dday message will automatically run with your existing messages 

                   and also show the remaining days. For example: “New Years Day  D-128”, 
                   where D-128 is the days remaining. 

 
Add Dtime – Count down to an event by time. 

1)


Press the [MENU] button. 

2)


Press [OK]. 

3)


Press the       arrow button until the Add Dtime option appears. 

4)


Press [OK]. 

5)


Set the event time using the      and       arrow buttons. 

6)


To move between am/pm, hour, and minutes, use the      and       arrow buttons. 

7)


Press [OK] to confirm the event time.  

8)


Input your event message and press [OK]. 

9)


Your message will automatically be previewed on the display. Press [ESC] to make a 
change or press [OK] to confirm your entries. 

10)


Press [ESC] to run your message. 
 

NOTE

:

 Your Dtime message will automatically run with your existing messages 

                   and also show the remaining time. For example: “New Years Day  It is 

                   before 0 hours and 20 minutes”. 

 
Add Event – Event message. 

1)


Press the [MENU] button. 

2)


Press [OK]. 

3)


Press the       arrow button until the Add Event option appears. 

4)


Press [OK]. 

5)


Enter your event message and press [OK]. 

6)


The Automatic Effect option appears. Choose a preferred effect or press [OK] to 

continue 

(refer to the Effects Content section for assistance)

[   ]


[   ]

[   ]

[   ]

[   ]


[   ]

[   ]

[   ]

Page12


[   ]


Содержание Marquee-Lite Plus

Страница 1: ...Remote Keyboard USER GUIDE...

Страница 2: ...nt effects Personalize your messages by including any one of the built in animations and icons Put the final touches on your message by selecting one of several message transition effects Built In sch...

Страница 3: ...Animations Time Date COUNTER CONTENT Dday Dtime And Event CONTENT MODIFICATION Modify Insert and Index Content CONTENT DELETION Erase Unwanted Messages TIME DATE AND TIMER Set Current Time Date And Ti...

Страница 4: ...and Vietnamese Chinesem CHINESE Not Supported LANGUAGE Not supported F1 No Function F2 No Function F3 Preprogrammed headline messages F4 No Function F5 No Function Page 1 POWER Turns the display ON a...

Страница 5: ...11 Humidity 1 Select content 1 Delete Option 2 Delete all 1 Increment Mode 2 Decrement Mode 1 Enter Password 1 Set Time 2 Set Date 3 Set Timer ON 4 Set Timer OFF 1 Reservation 2 Sound 3 Direction 4 Pa...

Страница 6: ...cial icons They will provide helpful and important information regarding product operation and programming NOTE Look for this icon for important notes TIP Look for this icon for important tips and sho...

Страница 7: ...DEF twice The letter E appears 8 Press 5 JKL three times The letter L appears TIP Correct mistakes easily by using the DELETE button 9 Now press the arrow button to advance the cursor NOTE If necessar...

Страница 8: ...he letter H appears 9 Press 2 ABC The letter A appears 10 Press 6 MNO twice The letter N appears 11 Press 5 JKL twice The letter K appears 12 Now press the arrow button once to place the cursor on the...

Страница 9: ...d the font color will change Now continue to press the COLOR button several times to preview all the font colors available When you are satisfied with your selection press the arrow button to move to...

Страница 10: ...can all be used in combination Go ahead try it Exit the Edit Mode 14 Press OK twice NOTE Remember to wait until the prompt disappears from the display before proceeding to press a button If a button...

Страница 11: ...arrow buttons to manipulate the speed of the effect 15 When you are satisfied with your effect preview press OK Preservation Effect The effect used when your message is stationary on the display 16 U...

Страница 12: ...nsert a Move icon Icon Stationary icons 8 Press ICON 9 Use the and arrow buttons to scroll through all the available Icons 10 Press OK to insert an Icon Symbol Grammer punctuations 11 Press SYMBOL 12...

Страница 13: ...graphics 1 Press the MENU button 2 Press OK 3 Press the arrow button until the Add Picture option appears 4 Press OK 5 Use the and arrow buttons to scroll through all the available Pictures 6 Press OK...

Страница 14: ...ffect or press OK to continue refer to the Effects Content section for assistance 9 The Add Contents option appears press OK 10 Press ESC to run your message Display Time Change the appearance of the...

Страница 15: ...o an event by time 1 Press the MENU button 2 Press OK 3 Press the arrow button until the Add Dtime option appears 4 Press OK 5 Set the event time using the and arrow buttons 6 To move between am pm ho...

Страница 16: ...COUNTER CONTENT continued 7 The Add Contents option appears press OK 8 Press ESC to run your message Page 13...

Страница 17: ...be inserted press OK 6 Use the and arrow buttons to select an insertion option type NOTE Insertion options 1 Sentence Insertion 2 Dual Message Insertion 3 Image Insertion 4 Picture Insertion 5 Video...

Страница 18: ...m deletion or ESC to cancel deletion 9 The Delete Option will appear Press ESC 10 Now press ESC again to run your message Delete All Erase all stored messages 1 Press the MENU button 2 Press the arrow...

Страница 19: ...exit the Set Date option Set Timer ON Set the time the display will turn ON automatically 1 Press the MENU button 2 Press the arrow button until the Set Time option appears 3 Press OK The Set Time opt...

Страница 20: ...ode option appears 4 Use the arrow button to scroll to the Decrement Mode option 5 Press OK to select the current option 6 To begin or pause the Stop Watch press OK TIP The and arrow buttons can be us...

Страница 21: ...ord setting appears enables disables password 10 Set accordingly and press the arrow button to go to the next setting 11 The Brightness setting appears set the brightness level 12 Press OK to enter th...

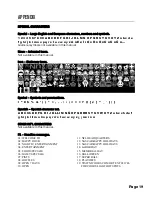
Страница 22: ...sh Spanish character set A B C Ch D E F G H I J K L Ll M N O P Q R RR S T U V W X Y Z a b c ch d e f g h i j k l ll m n o p q r rr s t u v w x y z OTHER INT L CHARACTERS Not available in this manual F...

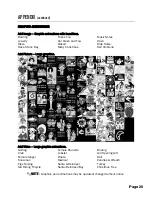
Страница 23: ...tes Open Ride Horse Sell Umbrella Add Picture Large graphics Add Video Large graphic animations Golfing Crab Female Singer Snowman Pigs Talking Girl Riding Tricycle Female Brunette Lobster Pinata Medi...

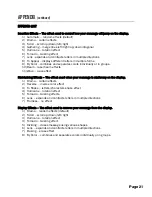
Страница 24: ...Wave wave effect Maintaining Effects The effect used when your message is stationary on the display 1 Drama curtain effects 2 Reverse inverse color effect 3 To Shake letters characters shake effect 4...

Страница 25: ...g is turned ON Refer to Settings section I set a password but I am still able to make changes Make sure the Password setting is turned ON Refer to the Setting section I created a Double Line message b...

Страница 26: ...technical support department My sign does not respond to the remote controller 1 Make sure the batteries are inserted correctly following the polarity diagram inside the battery compartment 2 Stand a...

Страница 27: ...cluded both for property and to the extent of unconscionable for personal injury damage Some states do not allow the exclusion or limitations of incidental or consequential damages so the above may no...

Отзывы: