background image

Slim Panel Connections

46


Wiring and Connecting the Terminal Block

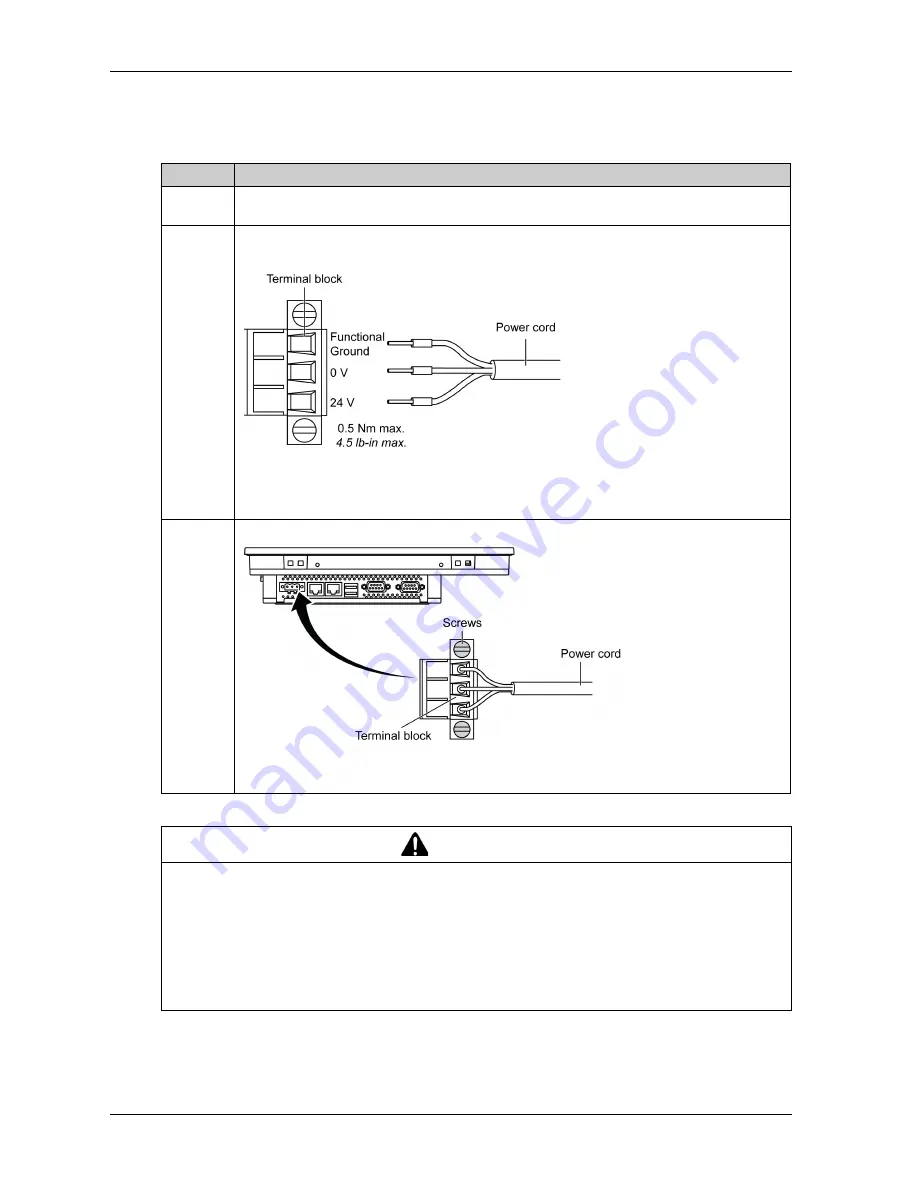
The table below describes how to connect the power cord to the DC terminal block of the Slim 

Panel:

Step

Action

1

Remove all power from the Slim Panel and confirm that the power adapter is disconnected from 

its power source.

2

Remove the terminal block from the power connector and connect the power cord to the terminal 

block:

Use copper wire rated for 75 °C (167 °F) with a section of 0.75 to 2.5 mm

2

 (AWG 18 to AWG 14) 

and use 2.5 mm

2

 wire to make the ground connection.

3

Place the terminal block in the power connector and tighten the screws:

NOTE: 

The recommended torque to tighten these screws is 0.5 Nm (4.5 lb-in).

CAUTION

OVERTORQUE AND LOOSE HARDWARE

Do not exert more than 0.5 Nm (4.5 lb-in) of torque when tightening the installation fastener, 

enclosure, accessory, or terminal block screws. Tightening the screws with excessive force 

can damage the installation fastener.

When fastening or removing screws, ensure they do not fall inside the Industrial Personal 

Computer chassis.

Failure to follow these instructions can result in injury or equipment damage.

Содержание PS5000 Series

Страница 1: ...PS5000 Series User Manual Slim Panel Type Atom Model...

Страница 2: ...s for improvements or amendments or have found errors in this publication please notify us No part of this document may be reproduced in any form or by any means electronic or mechanical including pho...

Страница 3: ...ted 39 First Power up 39 Chapter 6 Slim Panel Connections 41 Grounding 42 Connecting the DC Power Cord 45 AC Power Supply Module Description and Installation 47 Slim Panel Interface Connections 51 Cha...

Страница 4: ...nt Monitoring Rules 106 Account Setting System Setting 124 Chapter 10 Software API 131 Intelligent Management for Embedded Platform 131 Chapter 11 Maintenance 133 Reinstallation Procedure 134 Regular...

Страница 5: ...o warn of potential hazards or to call attention to information that clarifies or simplifies a procedure PLEASE NOTE Electrical equipment should be installed operated serviced and maintained only by q...

Страница 6: ...6...

Страница 7: ...el type S Product generation Second generation 2 Display Slim panel Atom W10 C Slim panel Atom W15 G Box type None N CPU type Atom E3827 A Power supply DC D RAM sizes 4 GB 4 Operating system None 0 Wi...

Страница 8: ...s and or other countries Intel and Atom are registered trademarks of Intel corporation Product names used in this manual may be the registered trademarks owned by the respective proprietors Options No...

Страница 9: ...hazardous locations Failure to follow these instructions will result in death or serious injury WARNING LOSS OF CONTROL The designer of any control scheme must consider the potential failure modes of...

Страница 10: ...sly filled with inert gas To prevent deterioration of panel brightness regularly ventilate the panel For more information please contact your local distributor at http www pro face com trans en manual...

Страница 11: ...Important Information Chapter 1 Important Information General This chapter describes specific aspects related to the operation of the Industrial Personal Computer What Is in This Chapter This chapter...

Страница 12: ...l and test the Industrial Personal Computer to ensure that the electromagnetic energy generated by nearby devices does not interfere with the Industrial Personal Computer s operation Changes or modifi...

Страница 13: ...on Standards Pro face voluntarily tested this product to additional standards The additional tests performed and the standards under which the tests were conducted are identified in the environmental...

Страница 14: ...Important Information 14 KC Markings...

Страница 15: ...el User Manual Physical Overview Physical Overview Chapter 2 Physical Overview Subject of this Chapter This chapter provides a physical overview of the Industrial Personal Computer What Is in This Cha...

Страница 16: ...ing contact your local distributor immediately Slim Panel 8 x installation fasteners for Display Module W10 Multi touch 10 x installation fasteners for Display Module W15 Multi touch Recovery media co...

Страница 17: ...panel firmware initializes automatically when Windows starts up Slim Panel W10 Multi touch Front View 1 Panel 2 Multi touch panel 3 Status indicator The table describes the meaning of the status indi...

Страница 18: ...el NOTE The cooling method is passive heat sink Slim Panel W10 Multi touch Bottom View 1 DC power connector 2 ETH2 10 100 1000 Mbit s 3 ETH1 10 100 1000 Mbit s 4 USB2 USB 2 0 5 USB1 USB 3 0 6 COM2 por...

Страница 19: ...he table describes the meaning of the status indicator Slim Panel W15 Multi touch Rear View 1 Optional AC power supply 2 Slim Panel interface 3 Cover for access mini PCIe card and HDD SSD drive 4 Pane...

Страница 20: ...0 100 1000 Mbit s 4 USB2 USB 3 0 5 USB1 USB 2 0 6 COM2 port RS 232 422 485 7 COM1 port RS 232 8 Optional AC power supply Slim Panel W15 Multi touch Side View 1 Access CFast memory card 2 Slot for the...

Страница 21: ...ser Manual Characteristics Characteristics Chapter 3 Characteristics Subject of this Chapter This chapter lists the product characteristics What Is in This Chapter This chapter contains the following...

Страница 22: ...y 2 5 kg 5 51 lbs W15 Multi touch Industrial Personal Computer Approximately 3 9 kg 8 6 lbs Element 10 Screen size 15 Screen size Display type TFT LED LCD Display size 10 17 15 64 Display resolution W...

Страница 23: ...perating system according to the configuration NOTE All products with Windows 8 must be connected to the Internet during the first start up for the Operating System to activate Operating Systems Windo...

Страница 24: ...nt Characteristics Type 1 x RS 232 422 RS 485 RS 485 with auto data flow control modem capable not electrically isolated and 1 x RS 232 COM1 RS 232 only Amount 2 Transfer rate Maximum 115 2 kbps Conne...

Страница 25: ...ree For use in pollution degree 2 environment Operating temperature 0 55 C 32 131 F with SSD or CFast 0 45 C 32 113 F with optional interface 0 45 C 32 113 F with HDD Storage temperature 20 60 C 4 140...

Страница 26: ...Characteristics 26...

Страница 27: ...Installation Dimensions Installation Chapter 4 Dimensions Installation Subject of this Chapter This chapter describes Industrial Personal Computer dimensions and installation panels What Is in This C...

Страница 28: ...nstallation 28 Dimensions W10 Multi touch Dimensions The figure shows the dimensions without AC power supply The figure shows the dimensions with the AC power supply PFXZPSPUAC2 and the extension kit...

Страница 29: ...nel Type Atom Model User Manual 29 W15 Multi touch Dimensions The figure shows the dimensions without AC power supply The figure shows the dimensions with the AC power supply PFXZPSPUAC2 and the exten...

Страница 30: ...dustrial Personal Computer next to other devices that might cause overheating Keep the Industrial Personal Computer away from arc generating devices such as magnetic switches and non fused breakers Av...

Страница 31: ...sufficient air circulation mount the Slim Panel so that the spacing above below and on the sides of the unit is as follows 1 Air out 2 Air in x1 100 mm 3 93 in x2 50 mm 1 96 in x3 10 mm 0 39 in Mount...

Страница 32: ...n to the weight of the Slim Panel especially if high levels of vibration are expected and the installation panel can move Attach metal reinforcing strips to the inside of the panel near the panel cut...

Страница 33: ...ersonal Computer into a cabinet or panel ensure that the installation gasket is in place The installation gasket provides additional protection from vibration Tighten the installation fasteners using...

Страница 34: ...kness can be up to 2 mm 0 079 in Follow these steps for the easy installation of the Slim Panel Step Action 1 Check that the gasket is correctly attached to the Slim Panel NOTE When checking the gaske...

Страница 35: ...nd push it into the wall The snap hook holds the Slim Panel to the wall 5 Insert the installation fasteners securely into the slots at the top bottom left and right side of the Slim Panel Note 8 insta...

Страница 36: ...f moisture resistance use a torque of 0 5 Nm 4 5 lb in 8 The angle of the unit is tilted no more than the amount allowed by the mounting orientation requirements CAUTION OVERTORQUE AND LOOSE HARDWARE...

Страница 37: ...the VESA video electronics standards association mounting kit Step Action 1 Fasten the VESA mounting kit on the rear side of the Slim Panel 1 VESA plate position size 100 x 100 mm 2 4 x VESA mount sc...

Страница 38: ...ions Installation 38 2 Use the 4 screws into the dedicated holes for installing the VESA The angle of the unit is tilted no more than the amount allowed by the mounting orientation requirements Step A...

Страница 39: ...during startup You can also remove the Windows logo from the login screen and other startup screens Other common features of Windows include the message and dialog boxes WES can filter these messages...

Страница 40: ...nable EWF by running OSLock The system restarts Open the software that customers want to use right after the system resumes from hibernation Hibernate using the HORM tool Click Start Menu All Programs...

Страница 41: ...of This Chapter This chapter describes the connection of the Slim Panel to the main power supply It also describes the USB ports and identifies the serial interface pin assignments What Is in This Ch...

Страница 42: ...n 1 Supply voltage 2 Ground connection pin functional ground connection pin 3 Switching cabinet 4 Grounding strip Wire cross section Maximum line length 2 5 mm2 AWG 14 30 m 98 ft 60 m 196 ft round tri...

Страница 43: ...t the ground pin of the Slim Panel to the cabinet Connect the I O to the controller if needed Connect the power supply to the Slim Panel 2 Check that the grounding resistance is 100 or less 3 When con...

Страница 44: ...ll result in death or serious injury WARNING UNINTENDED EQUIPMENT OPERATION If wiring of I O lines near power lines or radio equipment is unavoidable use shielded cables and ground one end of the shie...

Страница 45: ...age sensing device to confirm power is off Replace and secure all covers or elements of the system before applying power to the unit Use only the specified voltage when operating the Industrial Person...

Страница 46: ...5 mm2 AWG 18 to AWG 14 and use 2 5 mm2 wire to make the ground connection 3 Place the terminal block in the power connector and tighten the screws NOTE The recommended torque to tighten these screws i...

Страница 47: ...s or elements of the system before applying power to the unit Use only the specified voltage when operating the Industrial Personal Computer The AC unit is designed to use 100 240 Vac input Failure to...

Страница 48: ...power supply module Operation temperature of the AC power supply derating curve Element Characteristics Input 90 260 Vac 47 63 Hz 1 6 A at 100 Vac Output 24 Vdc 2 62 A maximum Inrush current 70 A at 2...

Страница 49: ...disconnected from its power source 2 The AC power supply module is mounted to the Slim Panel with 4 screws NOTE The recommended torque to tighten these screws is 0 5 Nm 4 5 lb in 3 Remove the termina...

Страница 50: ...UE AND LOOSE HARDWARE Do not exert more than 0 5 Nm 4 5 lb in of torque when tightening the installation fastener enclosure accessory or terminal block screws Tightening the screws with excessive forc...

Страница 51: ...ry WARNING EQUIPMENT DISCONNECTION OR UNINTENDED EQUIPMENT OPERATION Ensure that power communication and accessory connections do not place excessive stress on the ports Consider the vibration in the...

Страница 52: ...lect RS 232 RS 422 or RS 485 to COM2 port The RS 485 port is designed with auto data flow control capability and automatically detects the data flow direction Pin Assignment RS 232 1 DCD D Sub 9 pin p...

Страница 53: ...tom Model User Manual Configuration of the BIOS Configuration of the BIOS Chapter 7 Configuration of the BIOS What Is in This Chapter This chapter contains the following topics Topic Page BIOS Main Me...

Страница 54: ...a description of the user selected option Lower right This frame displays how to move to other screens and the screen edit commands This table shows the Main menu options that can be set by the user N...

Страница 55: ...guration ACPI Settings Submenu IT8768E Super IO Configuration Submenu Embedded Controller Configuration Submenu S5 RTC Wake Settings Submenu BIOS setting Description Enable ACPI Auto Configuration Ena...

Страница 56: ...he additional hardware capabilities provided by Vanderpool technology BIOS setting Description Critical Trip Point Passive Trip Point BIOS setting Description Serial ATA SATA Enable or disable SATA de...

Страница 57: ...re Update Configuration ME FW Image Re Flash Enable or disable ME FW image re Flash function BIOS setting Description Legacy USB Support Enable or disable legacy USB support Auto option disables legac...

Страница 58: ...it is 100 ms for a hub port the delay is taken from the hub descriptor BIOS setting Description BIOS setting Description CPU Shutdown Temperature Select CPU shutdown temperature IMT WatchDog IRQ Sele...

Страница 59: ...nu BIOS setting Description Intel IGD Configuration BIOS setting Description USB Configuration PCI Express Configuration High Precision Timer Restore AC Power Loss Global SMI Lock BIOS Read Write Prot...

Страница 60: ...ables boot with initialization of a minimal set of devices required to launch active boot option It has no effect for BBS boot options Boot setting Description Launch CSM Enables or disables launch CS...

Страница 61: ...setup menu All Security Setup options such as password protection are described in this section To access the submenu for the following items select the item and press Enter To change the administrato...

Страница 62: ...up without making any permanent changes to the system configuration and reboot the computer Save Changes Select this option to save the system configuration changes without exiting the BIOS setup menu...

Страница 63: ...ware Modifications Chapter 8 Hardware Modifications Subject of This Chapter This chapter describes the hardware modifications for the Industrial Personal Computer What Is in This Chapter This chapter...

Страница 64: ...er supply Always use a properly rated voltage sensing device to confirm power is off Replace and secure all covers or elements of the system before applying power to the unit Use only the specified vo...

Страница 65: ...njury or equipment damage CAUTION STATIC SENSITIVE COMPONENTS Industrial Personal Computer Internal components including accessories such as RAM modules and expansion boards can be damaged by static e...

Страница 66: ...Storages Modifications Overview This section shows the installation of the HDD SSD drives and the CFast card What Is in This Section This section contains the following topics Topic Page HDD SSD Driv...

Страница 67: ...strial Personal Computer and the power supply Always use a properly rated voltage sensing device to confirm power is off Replace and secure all covers or elements of the system before applying power t...

Страница 68: ...on the HDD SSD bracket Screw in the 4 screws on the side of HDD SSD bracket 6 Connect the HDD SSD into the SATA connector Install it in the Slim Panel and fasten it with the 4 dampers and the 4 screw...

Страница 69: ...WARE Do not exert more than 0 5 Nm 4 5 lb in of torque when tightening the installation fastener enclosure accessory or terminal block screws Tightening the screws with excessive force can damage the...

Страница 70: ...voltage sensing device to confirm power is off Replace and secure all covers or elements of the system before applying power to the unit Use only the specified voltage when operating the Industrial P...

Страница 71: ...ing the CFast Card The procedure describes how to insert the CFast card Step Action 1 Insert the CFast card into the card slot 2 Press the CFast card firmly into the card slot NOTE You can attach Myla...

Страница 72: ...Hardware Modifications 72 CFast Card Installation Refer to the relevant procedure in the software installation guide for Slim Panel and terminals The installation guide is shipped with the product...

Страница 73: ...ation What Is in This Section This section contains the following topics Topic Page Optional Interface Installation 74 16DI 8DO Interface Module Description 78 RS 232 422 485 Interface Module Descript...

Страница 74: ...XZPSADSSD2 DANGER HAZARD OF ELECTRIC SHOCK EXPLOSION OR ARC FLASH Remove all power from the device before removing any covers or elements of the system and prior to installing or removing any accessor...

Страница 75: ...DO and 2 m cable and terminal Ethernet interface module PFXZPBMPRE2 1 x Ethernet Gigabit IEEE1588 CANopen interface module PFXZPBMPCANM2 2 x CANopen Profibus DP interface module PFXZPBMPPBM2 1 x Prof...

Страница 76: ...r cover 4 Install the mini PCIe card onto the board NOTE The recommended torque to tighten these screws is 0 5 Nm 4 5 lb in 5 Take out the extension kit PFXZPSADSSD2 and remove the optional interface...

Страница 77: ...AUTION OVERTORQUE AND LOOSE HARDWARE Do not exert more than 0 5 Nm 4 5 lb in of torque when tightening the installation fastener enclosure accessory or terminal block screws Tightening the screws with...

Страница 78: ...DO interface module has been installed The PFXZPBMPX16Y82 offers two counter inputs which can perform event counting frequency measurement and pulse width measurement The counters on the interface mod...

Страница 79: ...input Input channels 16 Input voltage wet contact Logic 0 0 3 Vdc logic 1 10 30 Vdc Input voltage dry contact Logic 0 open logic 1 shorted to GND Input current 10 Vdc at 2 97 mA 20 Vdc at 6 35 mA 30 V...

Страница 80: ...Element Characteristics Assignment Description D Sub 37 pin socket connector IDI0 15 Isolated digital input ID0 7 Isolated digital output ECOM0 External common of IDI0 7 ECOM1 External common of IDI8...

Страница 81: ...e is installed you can verify whether it is properly installed on your system through the Device Manager NOTE If you see your device name listed on it but marked with an exclamation sign it means that...

Страница 82: ...mpatible with the mini PCIe card including isolated non isolated RS 232 422 485 communication cards for automation control The figure shows the RS 232 422 485 interface modules 1 2 x RS 232 422 485 in...

Страница 83: ...4 x RS 422 485 electrically non isolated 4 x RS 232 electrically non isolated Connectors 2 x D Sub 9 pin plug 1 x D Sub 37 pin socket Power consumption 3 3 Vdc at 400 mA 3 3 Vdc at 500 mA Communicati...

Страница 84: ...d 4 x 0 16 mm 26 AWG tinned Cu wire 4 x 0 25 mm 24 AWG tinned Cu wire 4 x 0 25 mm 24 AWG tinned Cu wire Protective earth ground 82 km Wires stranded in pairs Paired shield with aluminum foil Grounding...

Страница 85: ...3 GND GND VEE3 4 CTS3 N C 5 RxD3 TxD3 Data3 6 RI4 N C 7 DTR4 RxD4 8 DSR4 N C 9 RTS4 N C 10 TxD4 RxD4 11 DCD2 TxD2 Data2 12 GND GND 13 CTS2 N C 14 RxD2 TxD2 Data2 15 RI1 N C 16 DTR1 RxD1 17 DSR1 N C 18...

Страница 86: ...you may need to reduce the transmission speed and increase the TX Wait time Device Manager and Hardware Installation Install the driver before you install the interface module into the Slim Panel The...

Страница 87: ...the Ethernet interface module Ethernet Interface Module Description The table shows technical data for the Ethernet interface module Any excessive weight or stress on communication cables may disconn...

Страница 88: ...After the interface module is installed you can verify whether it is properly installed on your system through the Device Manager CAUTION LOSS OF POWER Ensure that communication connections do not pl...

Страница 89: ...Module Description Introduction The PFXZPBMPCANM2 is categorized as industrial communication with fieldbus protocol modules It is compatible with the mini PCIe card The figure shows the CANopen interf...

Страница 90: ...20 ohm The position pin 2 3 is for without terminator resistor Any excessive weight or stress on communication cables may disconnect the equipment Features Values General Bus type Mini PCIe card revis...

Страница 91: ...nager by selecting its device name and press the Remove button Then go through the driver installation process again After the CANopen interface module is properly installed into the Slim Panel you ca...

Страница 92: ...Interface Module Description The table shows technical data for the Profibus DP interface module Profibus DP Specification The table shows the Profibus DP specification Features Values General Bus typ...

Страница 93: ...uipment Device Manager and Hardware Installation Install the driver before you install the interface module into the Slim Panel The driver installation media is included with the package After the int...

Страница 94: ...driver before you install the interface module into the Slim Panel The driver installation media is included with the package After the interface module is installed you can verify whether it is prop...

Страница 95: ...me GSM connections are used for on demand services such as sending SMS alarms or basic remote services such as diagnostics GPRS is more suitable for permanent access to remote installations providing...

Страница 96: ...e access to the network of the Cellular module Features Values General Bus type mini PCIe card revision 1 2 Connector 1 x RF antenna coaxial connectors Power consumption 3 3 3 6 Vdc 700 mA HSPA connec...

Страница 97: ...uration of the Slim Panel is not used with a GPRS connection The default route of the GPRS connection is used instead Thus it is not possible to route through Ethernet when the module is connected to...

Страница 98: ...Hardware Modifications 98...

Страница 99: ...em Monitor Chapter 9 System Monitor Subject of this Chapter This chapter describes the system monitor features of the Industrial Personal Computer What Is in This Chapter This chapter contains the fol...

Страница 100: ...ve health network connection CPU temperature system voltages system fan status and UPS status Remote Monitoring also provides support for function logs so that managers can regularly check the status...

Страница 101: ...the clients Devices that run on the System Monitor console display the health and status information from the System Monitor clients The console has to be made available by the clients over a network...

Страница 102: ...Service to start stop System Monitor Web service PostgreSQL Service PostgreSQL is an object relational database management system ORDBMS As a database server its function is to store data and retriev...

Страница 103: ...g but also provides a distributed connectivity structure that solves the challenges encountered with large scale or multi site device management System Monitor is a real time management platform that...

Страница 104: ...rts mainstream browsers like Chrome Firefox Internet Explorer and Safari The portal page supports multi language and auto detects the language currently used by browsers for default displaying You can...

Страница 105: ...PS5000 Series Slim Panel Type Atom Model User Manual 105 3 User Log Out Click User Log Out from the right corner menu to check out the system Step Description...

Страница 106: ...page is composed of a system hierarchy tree left side and device list right side Device management provides three levels of management view Device List Group List and Map View System hierarchy tree in...

Страница 107: ...er registering Delete device server Click Edit to switch to edit mode and click the icon X to delete this server node Edit device server Click Edit to switch to edit mode and select one of the server...

Страница 108: ...tch to edit mode and select one of the group nodes You can remove and edit this group node 6 Add Delete Edit device Add device Select one of the user accounts or groups and click Add to the pop up men...

Страница 109: ...sses that have already registered to the server and assign a current account or group If the device does not exist you can also add a device directly 8 Search device Click Search Device to pop up the...

Страница 110: ...t device Click Edit to switch to edit mode You can remove and edit devices of the device list in this mode Click selected device name to pop up the Device dialog for editing 11 Remote control KVM view...

Страница 111: ...NOTE you can select KVM connection method on the device agent side System default is System Monitoring KVM Ultra VNC you can select other already installed VNC or disable this function for security c...

Страница 112: ...nd save it on the local client side 15 Hardware monitoring status Real time monitoring chart Click the field Hardware Status of the device list item to display graphically hardware real time parameter...

Страница 113: ...fication about status of the system fan you need to set the appropriate rules see step Hardware monitoring rules 17 Hardware monitoring UPS health status If the UPS kit is t installed a message will n...

Страница 114: ...d so on 19 Add rules Click the button Add Rules button to add a new rule for hardware monitoring You can select the type of monitoring hardware from the menu input threshold values for the correspondi...

Страница 115: ...ardware Monitoring Rule box to pop up the Hardware Monitoring Setting dialog box Delete rules Click the X icon on the left side of the schedule item to delete the schedule Enable Disable schedule Chec...

Страница 116: ...status CPU usage and memory Click the process name to pop up the confirm dialog for killing a specified process after confirming you can kill and force the process to terminate 22 Software monitoring...

Страница 117: ...esponding action Before clicking the OK button to add the rule you can check the option Enable Monitor Rule to enable disable this new added rule NOTE Currently software monitoring can only monitor an...

Страница 118: ...n device administrator status to another account 27 View mode Group status list Click the Group tab to list groups under the selected account or group node The group list shows all group names group h...

Страница 119: ...dule 2 Group software monitoring rules Click the icon in the field of group hardware status to pop up the Set Software Monitoring Rule dialog box The dialog lists current monitoring rules for software...

Страница 120: ...n displaying and click OK to add the new location NOTE Map view supports both Google and Baidu online map These two maps adopt different coordination system you must input correct coordination accordi...

Страница 121: ...NOTE If there are layouts or devices under selected location node you must remove these nodes first before removing location node 6 Edit location Click Edit button to switch to edit mode click the lo...

Страница 122: ...location node name to pop up the dialog of Edit Location to edit the content 8 Add Delete Edit map device Add device Select on one of accounts location or layout node and click Add button to add a ne...

Страница 123: ...e the Event Log user interface Step Description 1 Device event list Select user account or group to decide event range and select event log type All Error Warning Information to browse related device...

Страница 124: ...ription 1 Click Account Setting from menu of up right corner to pop up the dialog of account setting for configuring 2 Default role System provides three default roles with pre defined access rights S...

Страница 125: ...dialog of Role Input role name and corresponding user rights to create a new role View Edit custom role Click Edit to switch to role edit mode Click the icon to edit or view role user rights Click th...

Страница 126: ...unt Click Edit button to switch to edit mode Click arbitrary field in the account list to pop up the dialog for account editing Delete account Click Edit button to switch to edit mode Click in the acc...

Страница 127: ...ce Before applying setting click button to send a mail to check validity of settings NOTE You must enable this email service and check corresponding event notification setting and set up correct email...

Страница 128: ...ach item to enable receiving 6 Advanced settings Click Advanced Settings for message language of email and SMS cycle days of system automatically sends inspection report system warning of low hard dis...

Страница 129: ...lean event log 10 Upgrade setting Use ValidationCode_Generator exe tool to generate MD5 check code of uploading agent upgrade package Input Check Code and select Upgrade Program to upload agent upgrad...

Страница 130: ...System Monitor 130 11 Web SSL setting User can switch SSL Secure Sockets Layer setting and select the port to open or close SSL Step Description...

Страница 131: ...r not it can count the boot times and running hours of the device monitor device health and provide an advanced watchdog to handle errors found as they happen Software API also comes with a secure and...

Страница 132: ...Software API 132...

Страница 133: ...l User Manual Maintenance Maintenance Chapter 11 Maintenance Subject of this Chapter This chapter covers maintenance of the Industrial Personal Computer What Is in This Chapter This chapter contains t...

Страница 134: ...properly grounded wrist strap or equivalent Avoid contact with exposed conductors and component leads Before Reinstallation Hardware required Recover media refer to the leaflet of the recover media Se...

Страница 135: ...ny covers or elements of the system and prior to installing or removing any accessories hardware or cables Unplug the power cable from both the Industrial Personal Computer and the power supply Always...

Страница 136: ...LOSION FIRE OR CHEMICAL HAZARD The battery must always be replaced with identical type For battery replacement contact the field services department Do not recharge disassemble heat above 100 C 212 F...

Страница 137: ...Atom Model User Manual Appendices Subject of this Part This part provides the appendices for the Industrial Personal Computer products What Is in This Appendix The appendix contains the following chap...

Страница 138: ...138...

Страница 139: ...ies and Setting Accessories and Setting Appendix A Accessories and Setting Subject of this Chapter This chapter concerns the accessories relating to the products and the setting What Is in This Chapte...

Страница 140: ...Interface 1 x Profibus DP master with NVRAM PFXZPBPHMC2 Cellular module GPRS GSM and antenna Drives PFXZPBHDD502 Hard disk drive 500 GB blank PFXZPBHDD1002 Hard disk drive 1 TB blank PFXZPESSD81 SSD...

Страница 141: ...Do not use this product in hazardous locations Failure to follow these instructions will result in death or serious injury NOTICE ELECTROSTATIC DISCHARGE Take the necessary protective measures against...

Страница 142: ...main board of the Slim Panel CN1 Clear CMOS CN12 SATA signal connector CN13 SATA power connector SW2 COM2 RS 232 422 485 mode setting SW3 Termination resistors select 5 Replace the rear cover and fast...

Страница 143: ...Do not exert more than 0 5 Nm 4 5 lb in of torque when tightening the installation fastener enclosure accessory or terminal block screws Tightening the screws with excessive force can damage the inst...

Страница 144: ...stance transmission or device matching The default setting is bit 1 off and bit 2 off DATA and RX SATA Connectors The table describes the SATA signal connector RS 422 slave mode RS 485 mode Position S...

Страница 145: ...m Model User Manual 145 The table describes the SATA power connector Pin Signal Description CN13 1 V3 3 SATA SATA power output 3 3 V 1 A 2 V5 SATA SATA power output 5 V 1 A 3 V12 SATA SATA power outpu...

Страница 146: ...Accessories and Setting 146...

Страница 147: ...0 Series Slim Panel Type Atom Model User Manual After sales Service After sales Service Appendix B After sales Service After sales Service Information For details on after sales service refer to Pro f...

Страница 148: ...After sales Service 148...

Отзывы: