background image

 20  Printing from a PC

A. Using BarTender®

Primera Special Edition BarTender UltraLite is included with the LX2000e.  However, other 

programs can be used to print.  
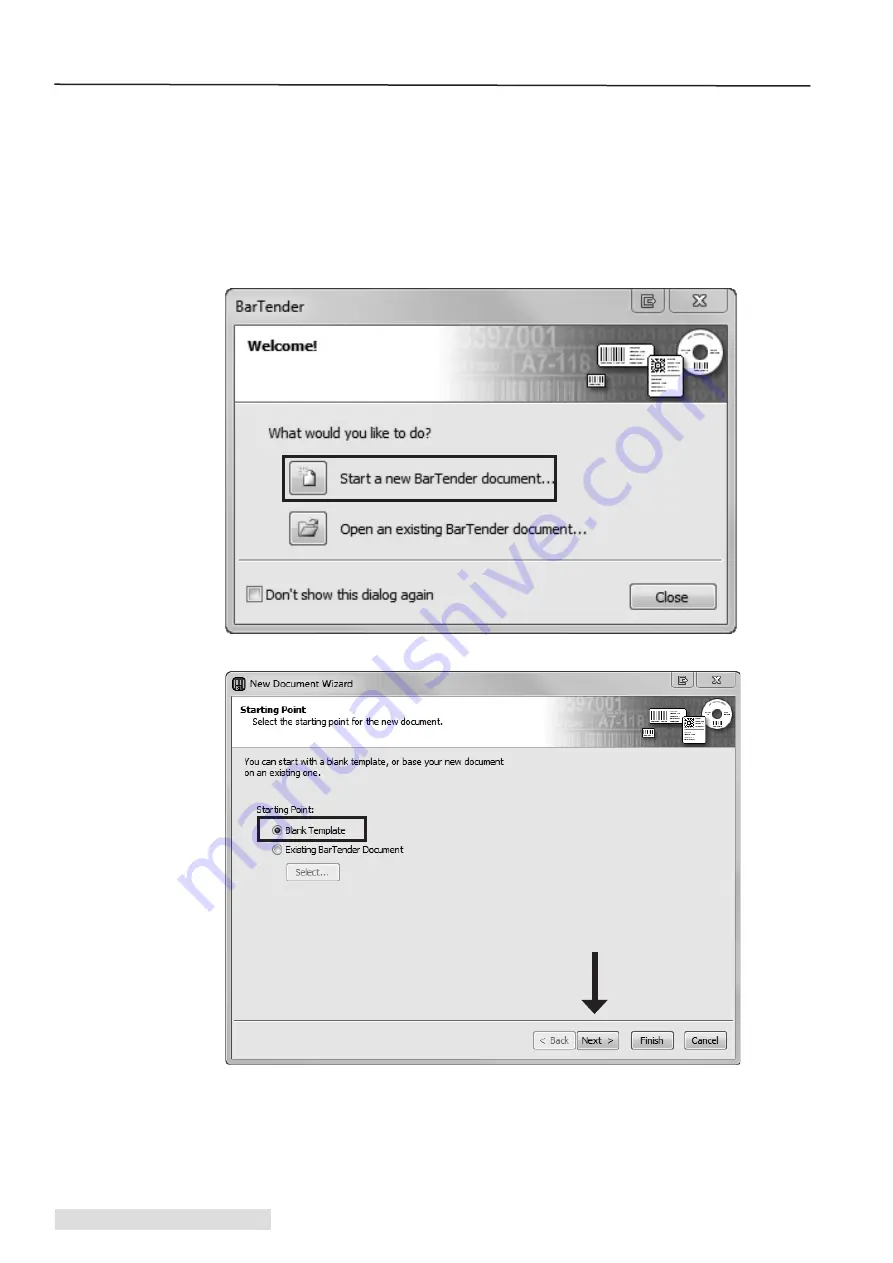
When you open BarTender you will be given the choice to select an existing label or create 

a new one using a wizard.  Use the following instructions as a guide through the wizard 

setup process. These instructions are based on using the included sample labels.  More 

complex labels will require additional/different options to be selected.
1.  Choose "Start a new BarTender document..."

2.  Select "Blank Template."  Click "Next."

Section 4: Printing from a PC

Содержание LX2000e

Страница 1: ...2015 All rights reserved For the most recent version of this manual please visit http primeralabel eu europe manuals html Operator s Guide...

Страница 2: ...ss A digital device pursuant to Part 15 of the FCC Rules In a domestic environment this product may cause radio interference in which case the user may be required to take adequate measures This equip...

Страница 3: ...k Cartridges Low Ink Warning 16 E Alignment Print 18 Section 4 Printing from a PC 20 A Using BarTender 20 B Add Text Barcodes and Graphics to a BarTender Label 26 C Printing from BarTender 27 D Adjust...

Страница 4: ...iv LX2000e Color Label Printer...

Страница 5: ...cut labels or connecting to a rewinder the printer should sit close to edge of a table so that the printed labels hang from the front of the printer and fall to the floor or an empty box This will pre...

Страница 6: ...eed Pause Unload Cancel Control Panel Top Cover Viewport Cover Handle Pinch Rollers Sensor Adjustment Slide Bar Maintenance Station Encoder Strip Ink Cartridges Control Panel Ink Display Print Head Te...

Страница 7: ...tarted 3 Interior Label Loading Area Back Roll Arm Roll Stop Roll Guide Auxilary Port Fixed Throat Guide Moveable Throat Guide Power Port Ethernet Port Power Switch USB Port External Paper Source Fanf...

Страница 8: ...om Primera Note See table on the next page for Max and Min values in inches and mm Section 2 Label Stock Label Width Liner Width Distance from edge of Media to edge of Label Width of Opening Black Mar...

Страница 9: ...ximum There are two factors that determine whether the printer will accept any particular stock thickness 1 The ability for the printer to pull the paper through the print area 2 The ability for the s...

Страница 10: ...applicator For example most applicators will apply the side of the label first so you will want to print the labels sideways B Installing Label Stock The following steps will guide you through loading...

Страница 11: ...stock on the Roll Arm and push it inward until it touches the Roll Stop 5 Flip up the Roll Guide and slide it inward until it touches the label stock The Roll Guide will automatically pull back sligh...

Страница 12: ...rough the printer If the printer fails to feed the label stock press the Load Feed button on the front panel while continuing to guide the label stock into the printer If the printer does not automati...

Страница 13: ...This means that the maximum diameter circular label that can be printed is 4 6 inches 116 8mm For circular labels larger than 4 6 inches in diameter you must have a black mark printed on the back of...

Страница 14: ...look similar to the graphic use this setting regardless of the size of the label Also use this setting for thru hole label material where a hole is punched through each label or a notch is cut in the...

Страница 15: ...abled If the cutter is disabled the label present options will be available If the Cutter is enabled the present options are are no longer available but cut options become available Cutter Options Cut...

Страница 16: ...Present after specified number of labels This option will present after the number of labels specified in the Cut Present After___ Labels setting above Change the value and then click Set to send it...

Страница 17: ...the Status Monitor consist of four tabs that are arranged on the left side of the window Each tab opens a screen that has various similar functions The tabs will only be displayed if the printer is i...

Страница 18: ...atus will also be displayed on the top bar In the Ready mode the ink percentages and Print Head life will be displayed along with four tabs and the Print Counter The tabs will only be displayed if the...

Страница 19: ...st printed label cost is displayed For reference the print file and date of last print is displayed at the top of the window Adjust the cartridge costs according to the actual price paid for them The...

Страница 20: ...isplay continuously at 20 or less When the cartridge is empty you will be prompted to change the cartridge At the empty point there is no way to ignore the warning You must change the cartridge To cha...

Страница 21: ...tly Pull out the cartridge 4 Install the new cartridge by pushing the cartridge in as far as you can and then letting go 5 Close the cover The printer will prime the new ink cartridge s and then conti...

Страница 22: ...y run an alignment print to improve print quality Follow these instructions 1 Open PTStatus 2000 Click on the Cartridge Tab Second Tab Click the Align Print Head button 2 Tear off any printed labels C...

Страница 23: ...d 8 5 x 11 sheet used for most office printers The size is actually A4 which is 8 27 11 69 or 210mm 297mm If you do not have the alignment paper you can cut a 25 strip off of a standard size sheet to...

Страница 24: ...n the choice to select an existing label or create a new one using a wizard Use the following instructions as a guide through the wizard setup process These instructions are based on using the include...

Страница 25: ...Printing from a PC 21 3 Select Color Label 2000 Click Next 4 Select Specify Custom Settings Click Next...

Страница 26: ...22 Printing from a PC 5 Set Items Per Page to Single item per page Click Next 6 Set Side Edges to No it does not Click Next...

Страница 27: ...Printing from a PC 23 7 Set Printed Item Shape to Rounded Rectangle Click Next 8 Set the page size width and height to match the labels installed in the printer Click Next...

Страница 28: ...Finish the remaining default wizard options will be set and no picture will be added 10 Select Embedded Picture Click the File Button to browse to the location of your photo graphic file Set the Size...

Страница 29: ...e label setup summary If it is correct click Finish Your blank label will be displayed You can edit any of these settings by going to the File Menu and selecting Page Setup Basic and advanced settings...

Страница 30: ...t printing Add Graphic Click the Image button Now click anywhere on your label An Image icon will appear Double click it to open up image settings and browse to the image graphic that you would like t...

Страница 31: ...le Menu and select Print The Print Dialog window will appear 2 Select the Color Label 2000 3 Set the number of copies 4 To adjust Quality Settings click on Document Properties Choose the Paper Quality...

Страница 32: ...n or toward the printer Subtract from the current value to move the printed label up or away from the printer After adjusting the value click the Set button to send the value to the printer Tear off P...

Страница 33: ...ere is a 03 inch over bleed on both left and right sides Some additional adjustment may be necessary if the label was not perfectly aligned to begin with See Section 4D TOF Decrease the Top of form by...

Страница 34: ...ces are saved with the label To change these preferences you will have to change printer preferences through BarTender File Menu Printer Settings To find Driver Settings Click the Start button choose...

Страница 35: ...es from what you see on the screen so it is printing horizontally select landscape as your orientation Remember this does not change the width and height Paper Size It is only a tool for viewing a lab...

Страница 36: ...Paper Card Stock Plain Paper Quality Settings Paper Quality Tab There are three options for quality Draft Normal Best which work together with the media type to affect the quality of the printed labe...

Страница 37: ...aximum label sizes Print in Max DPI Advanced Button You can set the printer to print at the highest quality possible by changing this setting to Yes It dramatically slows printing speed and is only av...

Страница 38: ...the back to show where the label begins You will need to change the Stock Sensor Mode in the Status Monitor 3 Insufficient Label Gap Distance See Section 2A for label specifications 4 Page Size is Big...

Страница 39: ...nt ing may not be sufficient for many photos or graphics The highest quality setting may cause ink to bleed on certain graphics in combination with certain label stock Increasing the quality increases...

Страница 40: ...ut do not allow the ink to soak into the surface of the media 9 Source File Image Mode The image mode of the source file may be set to RGB instead of CMYK This can cause the color matching to be off C...

Страница 41: ...by other programs We recommend TIF and BMP files for graphics These formats are uncompressed JPG files also work well for graphics that include photographs All three formats can be imported into the B...

Страница 42: ...op E Cleaning the Printer and Replacing Ink Pads Over time ink overspray may gather at the base of the printer The printer uses a vacuum system to gather most of this ink on a series of saturation pad...

Страница 43: ...ed below 1 Open PTStatus2000 2 Click Clean Print Head on the Cartridge Utilities Tab second tab You may need to repeat this process up to 4 times depending on how clogged the Print Head is Only repeat...

Страница 44: ...oubleshooting before sending a replacement cartridge or Print Head Notes on Ink Cartridge Print Head Replacement All replacements for defective cartridges or Print Heads must be processed through Tech...

Страница 45: ...ter Important If it does not move to the center as shown do NOT attempt to remove the Print Head It can only be removed when in the position shown below 3 Locate the white Print Head locking latch Unl...

Страница 46: ...42 Troubleshooting and Maintenance 4 Remove the Print Head by pulling outward and slightly upward 5 Locate a new Print Head Install it as shown 6 Lower the latch on your new Print Head...

Страница 47: ...s current label in LOAD BUTTON CUT MODE SYSTEM PAUSED Unpauses system SYSTEM BUSY PRINTING Pauses system ERRORS PRESENT Retries to correct error or just clears error state PAUSE UNLOAD BUTTON Printer...

Страница 48: ...from 6 pin mini din RESUME FEED LED and PAUSE UNLOAD Cover is open LED alternately flash ALL LEDs flash in chase mode Printer is powering up I Technical Support If you have difficulties in operating...

Страница 49: ...idth 19 1mm to 209 6mm 0 75 to 8 25 Electrical rating 12 VDC 5 0 A Power requirements 100 240VAC 50 60 Hz 1 7A Speed 6 in sec in Draft Mode Agency certifications UL UL C CE FCC Class A Weight 20 4 kg...

Страница 50: ...in Offset 5 28 29 35 Load Feed Button 8 Low Ink Warning 16 Media Type 32 37 Movable Throat Guide 8 Orientation 6 31 Output Mode 13 28 33 Print Alignment 13 28 33 34 Print Counter 13 14 Print Quality 3...

Страница 51: ......

Страница 52: ...P N 511341 051415...

Отзывы: