background image

Interpreting the Publisher’s Indicator Lights  47

Section 5: Interpreting the 

Publisher's Indicator Lights

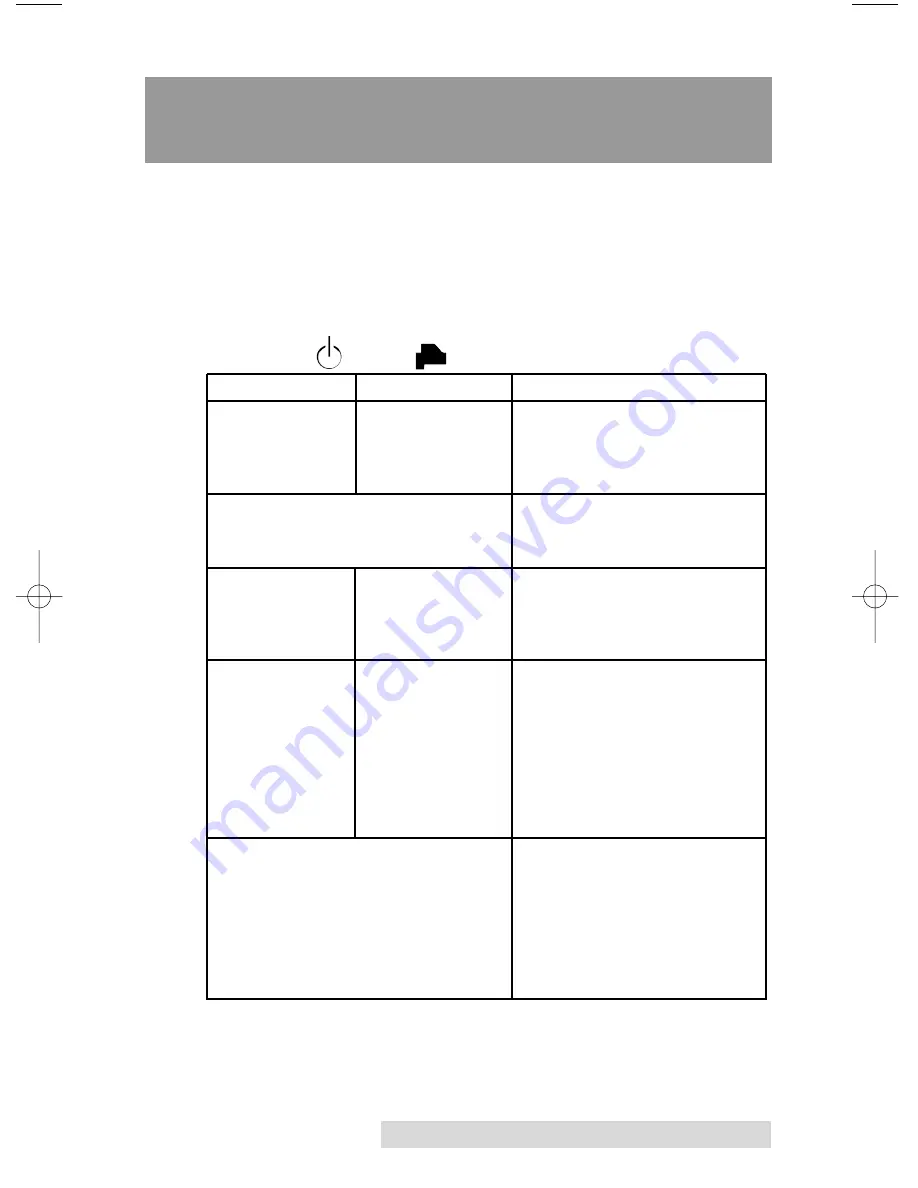
The Power and Busy LED indicator lights located on the top of

the Publisher can tell you a lot about what is happening inside

the Publisher. To accurately interpret what it means when these

lights are on, off, or flashing, please refer to the following:

Ink Cartridge 

Power LED

LED

Publisher

on solid

off

Is ready to receive job

on solid

on solid

Has received a job and is

waiting for the Robotic 

Disc Transporter to load 

a disc

both lights are blinking 

Waiting for a cartridge to

alternately with one another

be installed and the lid to

be closed. (See section 2-C).

on solid

flashing rapidly

The printer tray or ink

cartridge carrier has 

stalled. Press the Ink button

to retry the operation.

flashing rapidly

on solid

The Publisher has a 

cartridge problem. Check 

to make certain that the 

cartridges are installed 

correctly and that the bar 

code labels on the 

underside of the cartridge 

are not damaged. 

repeating pattern of both lights 

This indicates low ink warning.

flashing in unison, then one 

If the left light stays solid after 

light momentarily on solid.

the flash, the Color cartridge is

low. If the right light stays on

after the flash, the Black 

Monochrome cartridge should 

be replaced.

510873.qxd  1/25/2007  3:21 PM  Page 47

Содержание Bravo II

Страница 1: ...USER S MANUAL For Macintosh and PC 2008 All rights reserved 020608 510873 10 Automated Optical Disc Duplication Printing System DISC PUBLISHER Automated Optical Disc Duplication Printing System ...

Страница 2: ...ill not occur in a particular installation If this equipment does cause harmful interference to radio or television reception which can be determined by turning the equipment off and on the user is encouraged to try to correct the interference by one or more of the following measures Re orient or relocate the receiving antenna Increase the separation between the equipment and receiver Connect the ...

Страница 3: ...Tutorial Copy a CD or DVD 14 B Using PTPublisher 19 C Creating a Print Label Using SureThing 21 D Advanced Printer Driver Functions 22 E Using Other Graphics Programs 29 F Using Kiosk Mode 30 Section 4 Creating Discs on a MAC 31 A Tutorial Copy a CD or DVD 31 B Using Discribe 5 3 34 C Printed Label Format Requirements 38 D Advanced Printer Driver Functions 39 Section 5 Interpreting the Publisher s...

Страница 4: ...ting finger icon appears Click on the line with the icon and the document will jump to that page If you want to return to the Table of Contents move the icon to the top of the page and click on the arrow marked TOC Navigating through the Index is similar Place the icon on one of the listings or page numbers click on it and it will move to that page The text relating to the Index listing will appea...

Страница 5: ...under Primo s Help Menu and on the MAC in the Disc Publisher folder in the applications directory NOTE ON TERMS AND CONVENTIONS From this point forward the following terms and conventions will apply The Bravo Disc Publisher will be abbreviated simply as the Publisher Optical discs which can include many different types of discs including CD Rs CD RWs DVD Rs and more are all referred to as CDs or d...

Страница 6: ...y Card This Operator s Manual Quick Start Guide and Other Printed Information Save the carton and packing materials They will come in handy later if you ever need to transport the Publisher and or any of its parts and accessories C IDENTIFYING THE PARTS Front Panel and Top This illustration shows the Publisher its Control Panel Buttons LED indicator lights Input and Output Bins and other component...

Страница 7: ...itions The Power Button turns the Publisher s power ON and OFF When the front cover is opened the Ink Cartridge Button is used to position the Cartridge Carrier for easy ink cartridge replacement When the front cover is closed pressing the Ink Cartridge button will open or close the Printer Tray The Input Output Bins are situated under the top cover of the Publisher The bins will hold up to 25 dis...

Страница 8: ...cessor running Windows 2000 XP or Vista 512 MB or greater RAM Free hard drive space of at least 10 GB Available USB 2 0 Port If your PC does not have at least these minimum system requirements system performance may not be acceptable E MAC SYSTEM REQUIREMENTS Before getting started it is important for you to verify that your computer meets the recommended system requirements Here s what you need i...

Страница 9: ...uous duty publishing of discs The following is a description of the complete process of duplicating and printing a CD DVD job on your Publisher 1 Up to 25 blank discs may be loaded at one time into the Input Bin 2 The Publisher s integrated Robotic Disc Transporter will first check your recorder drive for a disc by attempting to pick from the recorder Then the Robotic Disc Transporter will pick a ...

Страница 10: ...minutes Most jobs don t fill the entire disc so recording time is usually less than this After recording the Recorder Tray opens automatically The Robotic Disc Transporter will lift the disc out of the Recorder Tray The Recorder Tray will close and the Printer Tray will open The Robotic Disc Transporter will lower the disc into the Printer Tray and the Printer Tray will then automatically close 6 ...

Страница 11: ...the Publisher s Printer Disc Tray opens automatically The Robotic Disc Transporter moves the finished disc to the Output Bin 9 The process starts over and repeats until all blank discs are gone or the number you have specified via software are copied and printed 10 Now that you understand the order of operation it is time to set up your Publisher Getting Started 7 ...

Страница 12: ...he appropriate CD drive containing the Software Installer disc Double click Installer exe 2 In the Installer Application click the Standard Install button The Installer will guide you step by step through the installation process As you complete each step click Next Steps 1 4 are shown in section C below as well as on the monitor You may follow either to complete the setup B INSTALLING THE MAC SOF...

Страница 13: ...applying power Step 1 Applying Power Locate the power adapter supplied with your Publisher Place one end of the adapter cord into the power port on the rear panel of the Publisher Unit will initialize for approximately 30 seconds or so Step 2 Loading Media Discs NOTE Your Publisher can print directly onto virtually any brand of printable surface CD DVD media However different brands of discs have ...

Страница 14: ...nt cover of the Publisher The Publisher will automatically position the cartridge carrier and Robotic Disc Transporter to the center position allowing for easy access to the bins Load the Input Bin the bin located on the right hand side of the Publisher with 25 blank discs and place the bins on the mounting pegs ...

Страница 15: ...ng careful to avoid damaging the barcode label on the underside of the cartridge DO NOT TOUCH THE COPPER AREA Insert the ink cartridges into the carrier copper end first and snap the cartridge cover in place Insert the color in the left holder monochrome black in the right cartridge holder Close the Publisher s front cover Step 4 Connecting the USB 2 0 Cable Installing the Printer Driver Connect t...

Страница 16: ...select Install the software automatically and click Next or if you are using Windows Vista click Locate and install driver software You will see a notice like the one shown below depending on which operating system you are using Click Continue Anyway or Install this driver software anyway to continue installing the printer driver for your Publisher Windows XP Windows Vista Windows XP Message Windo...

Страница 17: ...n connecting USB to a Mac it may be necessary to Add the printer via the Printer Setup Utility 1 Open the Printer Setup Utility located in the Applications Utilities folder 2 Click Add Select the Disc Publisher Pro from the list of available printers Click Add again ...

Страница 18: ...in a temporary location on your computer PTPublisher uses this temporary file to make all subsequent copies that are requested The master disc is read only once to create the initial temporary file Recommended for All CD or DVD types Audio CD Data CD Software Install Disc Video CD DVD DVD ROM DVD DL etc This is best used for single runs where you will not need to make additional copies of the mast...

Страница 19: ...e are several ways to select a print file See the explainations below for more information For any job type you choose you will be prompted to select a label file to print You may select an existing label create a label or choose to print nothing Simply click the next arrow to print nothing on the disc Otherwise follow the steps below 4A Select a Label 4A1 Click the Select a Label button to open a...

Страница 20: ...s or My Computer Browse Click on the Browse tab to display files in tree view on the left side of the screen Open and close folders by clicking the or next to each folder Click on the folder to view the contents on the right side of the window Find Click on the Find tab to search for print label files Type in all or part of a file name to search for any picture file that matches All JPG BMP GIF PN...

Страница 21: ...e from several text effects or insert a picture Click the down arrow on the button to view all options Once you have designed the label go to the file menu and choose save 4B2 Close the SureThing program A message will appear asking if you would like to use the SureThing file you just created in your project Click Yes to use it in your project Once you choose your label a preview will be displayed...

Страница 22: ...f the printed outer margin or inner diameter You can save your adjusted settings by clicking Save my Media You will be prompted to name your custom media settings This name and the associated settings will now be availabe to choose in the media drop down box 6 Verify information on the summary window choose the number of copies and click Go Click the More Options button to set additional options s...

Страница 23: ...r close this or any panel click on the down or up arrow on the upper right corner of the panel 2 New Project Panel This panel allows you to create any of the project types available for this robot Click on the category to open specific project types This panel is your starting point for any new project 3 Current Projects Panel This panel displays any project that is running or open Once you save y...

Страница 24: ...rrently selected robot 6 Project Detail Window This screen changes depending on the selected panel option It can display project steps such as Adding data and Adding a print file It can also display robot status Finally the support center is displayed here any time you click on the help icon Navigate through the project steps by clicking the next arrow at the bottom right Support Center Help can b...

Страница 25: ...Choose the 120mm DiscTemplate from the window that appears 2 Open the background panel by clicking the arrow on the background button Add your own background to the label by choosing Select Backgound 3A Browse to the location of your background image To avoid skewed or blurry printing make sure your image is 120mm square and of sufficient resolution We recommend 300 dpi 3B Instead of your own back...

Страница 26: ...u can size them appropriately by dragging the corner of the selected graphic 6 When you have completed design work save your label by choosing Save Project in the Actions panel D ADVANCED PRINTER DRIVER FUNCTIONS Once the Publisher software has been successfully installed you will want to take a moment to familiarize yourself with the printer driver settings for your Publisher These settings affec...

Страница 27: ... the same choices and options but in a slightly altered format Some applications do not save your printer driver option changes but instead only use your changes for the current image Paper Size The paper size option will be set to CD for printing onto printable surface CDs and DVDs Resolution Select the appropriate print quality option for your image Keep in mind that Normal 600 provides the lowe...

Страница 28: ... party color matching software Select Algebraic if you would like the printer driver to make very simple color balance adjustments based on an RGB color model This option gives you more natural looking images without actually utilizing any specific color matching software Select PrimaColor to enable color matching profiles written specifically for the Publisher by Candela Color Management System T...

Страница 29: ...er Centering Test Print NOTE Your printer comes from the factory pre calibrated to print the image in the center of the CD You can use this adjustment if you need to fine tune this location If you ever wish to verify your factory calibrated Vertical and Horizontal calibration settings you can run a simple calibration procedure to assure that your images will be centered when printed on a CD To do ...

Страница 30: ...the Horizontal axis 6 Select the OK button Your images should now be centered when printed on a disc After your selections have been made close out of the printer setup window You are now ready to go to an application program and print All printer driver selections will stay the same until you change them 5 4 3 2 1 0 1 2 3 4 5 5 4 3 2 1 0 1 2 3 4 5 Horizontal Calibration Find and enter the number ...

Страница 31: ...tions for cleaning and changing cartridges Select Clean button to send a simple test pattern to the printer Be sure to have a disc in the Bravo s input bin and the front cover closed The test pattern shown below purges ink through nozzles of your ink cartridge to clear any blockages The test pattern will show if the nozzles require any further cleaning Clogged Head Needs Cleaning Clean Head Functi...

Страница 32: ...cessary for the printer to accurately keep track of ink cartridge ink levels Select the Details button for information on the drivers firmware alignment and number of discs printed with your Publisher Disc Output Location This can be set either Normal Left Bin acts as output or Kiosk finished discs deposited out the Front Exit The default is Normal Left Bin Note that this will only have an effect ...

Страница 33: ...button then click Yes The print will look like this E USING OTHER GRAPHICS PROGRAMS While SureThing will handle most labeling needs some people prefer to use other graphic programs Because of this we offer the flexibility to create print files PRN from any application Your Publisher will support two types of print files in PrimoDVD 2 1 STD SureThing CD Labeler PRN Print files created through the P...

Страница 34: ...orts This will enable the driver to print to a PRN file from any application Note You must change the port back to the USB port before you can print F USING KIOSK MODE Kiosk Mode allows you to use both of Bravo s Bins as input doubling your disc capacity from 25 discs to 50 discs In this mode the finished discs will be deposited out through the front reject area of the Bravo In Kiosk mode all disc...

Страница 35: ...ouble click the Discribe Icon to launch the program You will see a splash screen followed by Discribe s Quick Start Menu 2 Click the Copy a CD DVD button 3 Place your master disc in the Publisher Drive Important You must place your master disc in the drive AFTER you open the Discribe software ...

Страница 36: ...number of discs recording options and more 7 Click the Print Image on Discs button to enable printing This will enable other buttons in this pane 8 Press the Choose Image button to select an image to print This will allow you to select any file type Apple s Preview supports including JPEG TIFF PICT PDF GIF BMP and more Refer to Section 4 C for label format requirements Labels can be created in any...

Страница 37: ...he type of disc you are using 10 Print Settings will launch the Printer Driver settings when clicked These settings are described in detail in Section 4 D of this manual 11 Select the Number of discs requested for this job 12 Once you have selected your image and chosen your preferred settings in the Robot Write Pane click Start to begin recording your job ...

Страница 38: ...on on any project type please consult the software users manual that is stored on your computer in the Applications Disc Publisher folder Once you choose a new project type you will be prompted to save the original project Click No Add data to any project by dragging the data files to this window or by clicking the Data button browse to specific data files or folders Other popular project types ar...

Страница 39: ...py project Create images by using the Utilities Write Physical Image command shown in the next section Note Only Discribe images will be accepted Images created through other software or the Macintosh Disc Utility will not be recognized by Discribe B 2 Utilities and other Menus Preferences utilities and support are available through the menu that appears at the top of the screen when Discribe is a...

Страница 40: ...rn button If you have not yet saved your project you will be prompted to do so at this time The Robot Write Window described in section 4B 5 will be displayed Once you choose your print file and burn settings click OK The Job Queue list window will be displayed Here you can manage and edit the jobs that are in queue To start the jobs click Start Jobs ...

Страница 41: ...rint quality settings and choose the number of copies in a project Print settings are explained in more detail in section 4D Other settings on this screen can usually be left at their default values Important Note For any project you must always click Page Setup Now set Format for to Disc Publisher II and Paper Size to CD DVD ...

Страница 42: ... Label Format Requirements 4 72 x 4 72 120mm Square Image No Circular Images To Print and burn simultaneously through the Discribe program the image will need to be in one of the following supported file formats JPEGs TIFFs PICTs PDFs GIFs BMP JPEG 2000 MacPaint Photoshop PNG QuickTime Images SGI TGA and more In order to help you design your label included on the installation disc are templates in...

Страница 43: ...NCED PRINTER DRIVER FUNCTIONS The following section will examine the printer driver settings that affect the print quality of your discs To access print settings from Discribe click the Print Settings button on the Robot Write screen ...

Страница 44: ...etting will be overridden by the Kiosk Mode setting in Discribe s Robot Write or Job Details Pane Print Quality There are four options for image quality Keep in mind that Normal 600 provides the fastest print at lower quality while Ultra Photo 4800 delivers the best quality at a slower print speed PrimaColor Click on this Check box to enable PrimaColor color matching The PrimaColor profiles were w...

Страница 45: ...the type of disc you are using Enable Low Ink Warning The Low Ink Warning basically keeps you from printing discs if one ore more of the colors in your ink cartridge are running out Your Bravo monitors the amount of ink used when printing and will stop printing if one or more of your colors is within 10 of being empty and the LEDs on the top will flash in unison If you press the Cartridge button o...

Страница 46: ... Click the Finder 2 Click the Applications Icon Open the Utilities folder 3 Scroll to Print Center Printer Setup Utility in OS X v 10 4 4 Highlight the Disc Publisher and click the Configure Utility in OS X v 10 4 Icon You can also launch the Configuration Utility from the Disc Publisher printer settings in any printing application by clicking File then Print and selecting Publisher Settings In Pu...

Страница 47: ...e than one cleaning to fully clear all nozzles If the nozzles are not fully clear after a few cleaning prints it may be necessary to remove the cartridge and actually clean the print head by gently wiping the nozzles with a moist cloth or paper towel and replace it in the Bravo If this fails the cartridge may be empty and in need of replacement Change Cartridge If you need to change cartridges it ...

Страница 48: ...g pattern Follow the on screen instructions and enter the numbers as indicated For instance in the example shown you would choose a value of 10 for the A setting and 6 for the B setting It is highly recommended that you perform this calibration whenever you change cartridges if using the Black and Color ink cartridge setting in the printer driver Image Alignment The Image Alignment button will all...

Страница 49: ...n ready and the Bravo will pick the disc and print another scale of numbers The disc should look like this Find the number whose lines touch Vertical Calibration Find the number whose lines touch 5 4 3 2 1 0 1 2 3 4 5 5 4 3 2 1 0 1 2 3 4 5 Horizontal Calibration 5 4 3 2 1 0 1 2 3 4 5 5 4 3 2 1 0 1 2 3 4 5 Vertical Calibration Find the number whose lines touch Find the number whose lines touch Hori...

Страница 50: ... to print the test print you will simply see the alignment dialog box and can enter values to move the image The unit of measure is roughly 0 1mm Making the Horizontal Calibration number smaller or more negative will move the image slightly to the left Making the Horizontal Calibration a larger value or more positive will move the image to the right If the Vertical Calibration number is made small...

Страница 51: ... are blinking Waiting for a cartridge to alternately with one another be installed and the lid to be closed See section 2 C on solid flashing rapidly The printer tray or ink cartridge carrier has stalled Press the Ink button to retry the operation flashing rapidly on solid The Publisher has a cartridge problem Check to make certain that the cartridges are installed correctly and that the bar code ...

Страница 52: ...e NOT recommended because they may damage the paint and plastic materials from which the parts are manufactured Always disconnect your Publisher s power cords before cleaning Resume operation only after the surfaces are completely dry B PERFORMING A ROBOTIC SELF TEST To ensure that everything is working properly a Self Test feature is built in to your Publisher In this mode the Robotic Disc Transp...

Страница 53: ...g unit Please read all instructions carefully or contact tech support for assistance Instructions for each of the functions are available by hovering your mouse over the buttons and reading the tool tips that appear To open the utility follow these instructions 1 Open PTPublisher 2 Click on More Info under the Robot Status Panel The following screen will appear 3 Click the Printer Properties butto...

Страница 54: ...is will confirm that the hardware software and your computer are all communicating properly To perform a software test please do the following 1 Launch Discribe 2 Click one of the options from the quick launch menu i e Data CD 3 Click the Robotics button 4 Click the Test Robotics button 5 You can select where you want discs to go during the test and the number of times to repeat the test Click Sta...

Страница 55: ... CLEARING A MEDIA JAM If a disc should become jammed inside the printing area of the Publisher with the lid closed press the Cartridge Button This will eject the Printer Tray Then open the lid The Cartridge Carrier will move to the center position automatically WAIT FOR THE CARTRIDGE CARRIER TO STOP MOVING Then carefully move the cartridge carrier assembly to the left to gain access to the printer...

Страница 56: ...rint width 4 724 120mm Minimum PC System Intel Processor III IV 750 MHz or higher 256MB RAM minimum 512 MB recommended available PCI slot one free USB 2 0 port Minimum MAC System G4 PowerPC 700MHz or higher running Mac OS Version 10 2 or higher 256MB RAM minimum 2GB free hard disk space 6GB for DVD Disc Capacity 25 disc input 25 disc output default 50 disc input 50 disc output Kiosk Mode Recordabl...

Страница 57: ...face USB 2 0 port Power Requirement 100 240 VAC 50 60 Hz 60 watts Weight 18 lbs 8 2kg Dimensions 17 8 W x 7 25 H x 16 D 455mmW x 184mmH x406mmD Certifications Emissions FCC Class B CE Safety UL UL C CE Warranty One year return to depot ...

Страница 58: ...ow Warning 27 Identifying the Parts 2 Ink Levels and Cartridge Maintenance 27 Ink Saturation 24 Input Bin 3 Inner Diameter 18 25 41 LED Status Lights 3 Output Bin 3 Overview of Operation 5 Paper Size 23 Power Input 4 PrimoDVD Software 51 Print Files 29 Printer Driver Software 30 PRN Files 30 Reject Area 3 6 30 Resolution 23 Specifications 52 STD File 29 System Requirements 4 Technical Support 51 T...

Страница 59: ......

Страница 60: ...Printed in the United States of America P N 510873 ...

Отзывы: