PrimaLuceLab EAGLE4 Скачать руководство пользователя страница 43

P r i m a L u c e L a b   S . p . A .


E AG L E 4   U s e r   M a n u a l

Now click on the HOST button to connect EAGLE to the previously set network. A popup window will appear asking you if 
you want to confirm. You can press OK button if you want to proceed. 

Now you have to set remote access parameters in Remote Desktop software installed in the device you want to control 
EAGLE from. First of all you need to verify what is the IP address your router assigned to the EAGLE when you activated 
the HOST feature and this may vary based on your network configuration. In order to determine your IP address, in the 
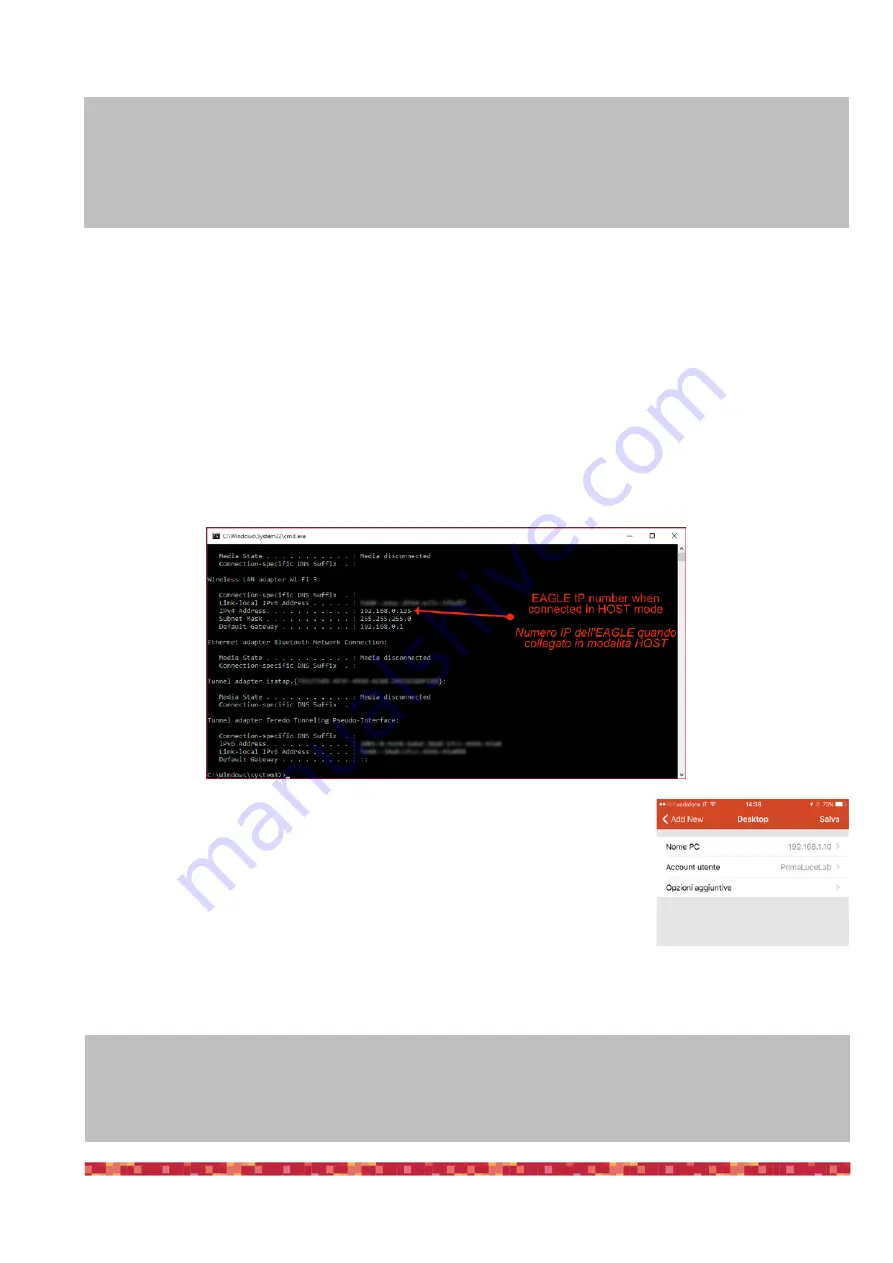
EAGLE please type “cmd” in the “Search Windows” bar (bottom left part of the Window) and press ENTER in the keyboard. 
This will open a new window. Please type “ipconfig” and press ENTER again. You will see a line with the IP number of your 
EAGLE connected to your network (please take a look at the picture below). This is the IP number you have to write in Re-
mote Desktop when you want to connect to EAGLE by using the HOST feature.  

You have to insert this address in the options of “Remote Desktop” software (image 33) 
in the device you use to control the EAGLE from, instead of 192.168.137.1 as previously 
set. Click on Save to save software connection options.   Going back to main page you 
will find a new connection. Connect your computer (or other device) you use to control 
the EAGLE from to the same WiFi network you connected EAGLE to and click on the new 
connection just created in the “Remote Desktop” software to start remote connection. 


p a g e   4 2

Image 33: Remote Desktop con-

nection settings

ATTENTION!

Make sure that you entered the correct network parameters (especially your network password) because, 

if they are wrong, EAGLE will not be able to access your network and at the same time it will not create 

its network in Access Point mode: in this case you won’t be able to connect to EAGLE anymore and you 

will need to click its RESET button to reset the network.

Tip:  if  during  the  use  of  the  EAGLE  you  can  no  longer  access  to  its  WiFi  network,  both  in AP  or  HOST 

mode, press the RESET button on the left of the POWER button on the EAGLE case. This will reset WiFi 

network  in AP  mode.  Then,  in  the  device  you  use  to  control  EAGLE  from,  you  have  to  select  the  WiFi 

created by the EAGLE (EAGLEXXXXX) and restart Remote Desktop.

Содержание EAGLE4

Страница 1: ...p A Italy For any matters relating to the use service and warranty please refer to the addresses given in the relevant documents PrimaLuceLab S p A Via Roveredo 20 B 33170 Pord enone www primalucelab...

Страница 2: ...EAGLE unit is tested by PrimaLuceLab technical experts to verify the correct operation of all components the integrated computer stability and speed of the wireless connection and the power bridge p a...

Страница 3: ...t use turn off EAGLE 30 First use installing EAGLE on the telescope 31 First use powering other instruments connected to the EAGLE 34 First use remotely control devices with EAGLE Manager 36 connect o...

Страница 4: ...escope to observe or photograph the Sun please cover the EYE sensor with the proper cap provided in the box before pointing the Sun NOTICE In case you check any malfunction please contact us immediate...

Страница 5: ...paragraphs below for detailed operation description p a g e 4 Power IN 12V HDMI port for external monitor 3 4 n 2 USB 3 0 ports 5 n 2 USB 3 0 ports 7 On Off switch 8 n 4 12V power OUT 2 Network port...

Страница 6: ...system that can power the entire system for 8 hours for example for the duration of an astronomical night you will need a battery with a capacity of at least 7 2Ah consumption per hour x 8 hours durat...

Страница 7: ...ble with all operating sy stems iOS Android Windows and macOS As an alternative you can also use the Parallels RDP Client that is free and available for different operating systems Install the 2 WiFi...

Страница 8: ...e appropriate socket 1 12V power input you will hear a beep sound and the PW LED light will turn on If you want to power EAGLE from the 110 220V wall plug replace the power cable with the optional 12...

Страница 9: ...n the control device you use so if you do not know how to search for WiFi networks please read the manual of your device and select the network created by EAGLE picture 4 A window will appear where yo...

Страница 10: ...onger need to enter your password your device will connect automatically when you select the network created by EAGLE p a g e 9 Image 6 connection to WiFi network NOT E On Windows operating systems wh...

Страница 11: ...button top right then select Add PC In the window that opens in PC name enter 192 168 137 1 Then select the User Account field and choose Add user account A window will open picture 8 where you can en...

Страница 12: ...smartphones click the central button at the top image 12 and select the hand button the icon next to the house To simulate a single mouse click like pressing the left button of the mouse just tap on t...

Страница 13: ...t connection for example when or if it doesn t have a 4G connection In this case please proceed this way 1 In the iPhone iPad please go to Settings Wi fi and select your EAGLEXXXXXX network Once selec...

Страница 14: ...A EAGLE4 User Ma nu a l p a g e 13 3 With the IPv4 address and DNS settings con fi gured manually the Remote Desktop should work correctly Please launch again the Microsoft Remote Desktop app and sta...

Страница 15: ...utton top right then select Desktop In the window that opens in PC name enter 192 168 137 1 Then select the User Account field and choose Add user account A window will open picture 15 where you can e...

Страница 16: ...rol your telescope NOTE You can also use another Remote Desktop client the Parallels Client you can download from here https www parallels com products ras capabilities rdp client This client has to b...

Страница 17: ...C In the window that opens in PC name enter 192 168 137 1 Then select the User Account field and choose Add user account A window will open picture 20 where you can enter your username and password to...

Страница 18: ...rol your telescope NOTE You can also use another Remote Desktop client the Parallels Client you can download from here https www parallels com products ras capabilities rdp client This client has to b...

Страница 19: ...on and give it a name in the fi eld pro vided 2 Next select the name of the WiFi network of your EAGLE With the network selected click Advanced Click on the TCP IP tab and click on the pulldown menu f...

Страница 20: ...the Remote Desktop connection If you still have the same error this could be related to the access data saved in your Mac memory In order to delete previous saved access data please enter the Keychain...

Страница 21: ...Click the button top right then select Add PC In the window that opens in PC name enter 192 168 137 1 Then select the User name field and choose Add user account A window will open picture 25 where y...

Страница 22: ...age 28 Now you are ready to use the software you prefer to control your telescope NOTE You can also use another Remote Desktop client the Parallels Client you can download from Play Store This client...

Страница 23: ...l IP address for the network of your EAGLE The IP address of your EAGLE s AP interface is 192 168 137 1 An address must be selected in the same network range and it must be uni que This is done by cha...

Страница 24: ...ith the IPv4 address and DNS settings con fi gured manually the Remote Desktop should work correctly Please launch again the Microsoft Remote Desktop app and start the connection If the Certi fi cate...

Страница 25: ...lect and press Next button to proceed p a g e 24 Before installing your devices driver and your astronomy software in the Windows operating system of the EAGLE we suggest you to create a backup copy o...

Страница 26: ...isks of your EAGLE Select the SSD disk of the EAGLE the first line by checking the leftmost box option and click Image This Disk In the next window choose your destination disk the one that will house...

Страница 27: ...imaLuceLab S p A EAGLE4 User Ma nu a l In the next window please leave the options as they are and press Next to continue In the next window please press Finish button finish the backup wizard p a g e...

Страница 28: ...K button to start the backup of your SSD drive Finally Macrium Reflect will begin the cloning process This can take some time depending on the size of your SSD unit and on the speed of the USB pen or...

Страница 29: ...tick This contains a lightweight version of Windows with a full version of Macrium Re fl ect and it allows you to use your SSD backup copy also if Windo ws won t boot In order to to this insert a USB...

Страница 30: ...an integrated CD or DVD reader If you have to install software that comes on CD or DVD you may connect the external CD or DVD reader to the USB port of EAGLE Then insert the CD or DVD of your softwar...

Страница 31: ...ose the Remote Desktop app Then press the power button 7 picture 17 Take a look at the LED to the left of the 4 USB 2 0 ports when the SSD and ON LEDs will be off you can disconnect the power supply p...

Страница 32: ...support rings spaced up to 12cm When using compact refractor telescopes the distance of the support rings is set by the PLUS Vixen or Losmandy style dovetail clamp installed with the telescope In thi...

Страница 33: ...lel But to do so you first need to add a PLUS Vixen or Lo smandy style dovetail bar above PLUS support rings and then connect EAGLE image 19 In order to use the EAGLE with this configuration use a PLU...

Страница 34: ...osmandy style dovetail bar also from different brand Take the PLUS Vixen Losmandy dovetail clamp and using 3 M6 screws f install it in the bottom plate of EAGLE as shown in image 20 This way you can c...

Страница 35: ...ON EAGLE distribute power only at 12V If the instrument you want to use requires a different voltage do NOT connect it to the power ports of EAGLE CAUTION the power output from the OUT port of EAGLE d...

Страница 36: ...power supply or stabilised battery to the IN power port of the EAGLE You can turn on the EAGLE activate the power OUT ports and use the telescope When you want to close the telescope and disconnect p...

Страница 37: ...o EAGLE Manager you can Enable Disable every 12V power out port Check for GPS data Check for EYE sky quality Set the power out voltage of the 3 x 0 12V power out ports Activate DARK mode this turns of...

Страница 38: ...ters area to the right the battery capacity in Ampere and the charge status Then click OK p a g e 37 Image 23 setting the EAGLE power source USB 3 0 ports USB 2 0 ports USB 3 0 ports 0 12V power out p...

Страница 39: ...it the port will become green and it will power the connected device Click with the right mouse button or a 2 finger tap on the screen of tablet or smartphone used for remote control on one of the 12V...

Страница 40: ...right mouse button or a 2 finger tap on the screen of tablet or smartphone used for remote control on one of the power out ports to see advanced options of the selected power out port image 28 Here y...

Страница 41: ...remote control on one of the power out ports to activate it the port will become green and it will connect the device Double click on the NAME label to change its name check for power in voltage and...

Страница 42: ...TERS button to activate the advanced options window Here in the HOST WiFi area Image 32 select the WiFi network that you want EAGLE to connect to and enter the network password Then click OK to confir...

Страница 43: ...ions of Remote Desktop software image 33 in the device you use to control the EAGLE from instead of 192 168 137 1 as previously set Click on Save to save software connection options Going back to main...

Страница 44: ...refer for the POWER button of the EAGLE Manager software In order to switch off the EAGLE when you press the POWER but ton please select the Power off setting You can also select the Standby mode usef...

Страница 45: ...work name created by your EAGLE AP WiFi You can modify the password field with the password you prefer and click OK to con firm image 36 NOTE The password has to be 8 characters long it may contain bo...

Страница 46: ...e in DD MM YY or MM DD YY ALTITUDE format in m meters or ft feet Here you can also modify the Set GPS time op tion If it s set to ENABLE default EAGLE Mana ger will automatically write UTC time to Wid...

Страница 47: ...please select your This way every time you will turn on the EAGLE and GPS sensor will detect EAGLE s position and time Windows time will be automatically updated If you want to manually set your time...

Страница 48: ...he part of the sky where your telescope is really pointed at This way the EAGLE EYE won t be influenced for example by clouds that may be present in other parts of the sky For the same reason the prox...

Страница 49: ...E s DARK mode The small amount of internal heat generated by the EAGLE s processor reduces the possibility of dew formation on the small lens During storage please remember to close the EYE lens with...

Страница 50: ...ge 44 EAGLE Switch ASCOM driver this allows third party softwares that supports power switches control to take control of the EAGLE s power and USB 2 0 ports A B C and D in order to automate ports man...

Страница 51: ...on the Configuration before shutdown field allows you to set the status of the ports when EAGLE turns off Image 46 To enable this feature click on the Configuration after startup or Configuration bef...

Страница 52: ...ces If you want to remotely control the EAGLE in a different way than the one here described please contact us and we will help you customize your system The simplest way of remote control is the wire...

Страница 53: ...es IP address 192 168 100 100 Subnet mask 255 255 255 0 Then click OK to confirm Also the computer you want to use to control EA GLE must have a static IP then in this computer repeat the steps above...

Страница 54: ...switch on EAGLE with a network cable connection you will need to set up a new connection to the Microsoft Remote Desktop software on your computer to control it In this example we will see how to set...

Страница 55: ...ample EAGLE Wired to activate the remote connection Image 53 p a g e 54 Immagine 52 set the Remote Desktop for wired connection Image 53 start wired remote connection Tip if using EAGLE Manager and yo...

Страница 56: ...net cable it has to be connected to an HDMI monitor and with a USB keyboard and mouse connected to the USB ports of the EAGLE this allows you to use it as a standard computer Turn on your EAGLE and op...

Страница 57: ...er failure change it from Stay off to Power on Now press F10 on the keyboard to save then press YES to confirm This will reboot your EAGLE Now every time you connect EAGLE to the power it will automat...

Страница 58: ...his you need to have 1 a computerized mount 2 installed the ASCOM driver of the computerized mount into the EAGLE the ASCOM platform is pre installed in the EAGLE Please follow this easy steps in orde...

Страница 59: ...elescope then Control panel This will open a new window ASCOM interface Click on Select and this will open a new window ASCOM Telescope Chooser Now based on the way you connect the mount to the EAGLE...

Страница 60: ...es du Ciel planetarium software The EQMOD creates a vir tual COM port you need to know the number In order to do that go to Windows Control Panel then select System and then Device Manager In the wind...

Страница 61: ...right number port in Port field and then press OK to close the window 5 Press OK in the ASCOM Telescope Chooser window and then press the Connect button in the ASCOM interface window The red button w...

Страница 62: ...you can select the object make a right mouse click select Telescope and then Slew The mount will move to the selected object 7 If after automatic pointing of the mount you see that the object is not...

Страница 63: ...object centering and center the object in the telescope field of view in your eyepiece or in the camera 9 When done select the object you re pointed in in this example Vega star make a right mouse cl...

Страница 64: ...be synchronized and the sky chart position will be set to the object 11 When you want to disconnect the planetarium software from the mount select Telescope then Control panel and then Discon nect Yo...

Страница 65: ...allel to the main one or to an off axis guider the autoguide ca mera generates the guide star image that is analyzed by a special software the autoguide software that automatically sends tracking corr...

Страница 66: ...egrates an ST4 autoguide port Press Connect and then press Close This will close the Connect Equipment window 4 Now select a proper exposition time for the guide camera usually 1 or 2 seconds and pres...

Страница 67: ...that are too short usually 1 to 2 se conds are fine 5 Now even if the software does not strictly require it it is advisable to match the X and Y camera axes columns and rows of the sen sor with the a...

Страница 68: ...third button on the left the one with the green icon PHD2 Guiding will automatically start the calibration process that allows the software to understand which direction to move the guide star when a...

Страница 69: ...lly guiding 9 To check for guide quality you can see the graph in the lower part of the PHD2 Guiding window This guide allows you to easily start guiding but PHD2 Guiding also has many advanced option...

Страница 70: ...scope is balanced and ready for guiding Try to get your mount s polar axis roughly aligned by using your mount s polar alignment scope if it has one Otherwise make sure the mount s polar axis is point...

Страница 71: ...Pr imaLuceLab S p A EAGLE4 User Ma nu a l Azimuth Alignment Open the Drift Align Tool You will see a window like this p a g e 70...

Страница 72: ...e for the Azimuth axis adjustment Point near the Meridian and the celestial equator You can either click the Slew button or move the mount manually Your scope should now be pointing something like thi...

Страница 73: ...the Dec trend line will be jumping up and down but soon the noise should average out and the slope of the line will become somewhat stable When that happens you are ready to adjust the mount s Azimuth...

Страница 74: ...and moving the guide star towards the magenta cir cle The magenta circle shows how far the guide star needs to move The magenta circle is larger when the Dec slope is steeper and it may initially be...

Страница 75: ...ting you will have another Dec trend line Did it get better closer to horizontal or worse away from horizontal Make a note to yourself in the Azimuth adjustment notes area of describing how you adjust...

Страница 76: ...Altitude Alignment Now you will need to repeat the process for the mount s Altitude adjustment Click the Altitude button the Drift tool will now look like this Click Slew or manually slew your mount t...

Страница 77: ...ircle Again the goal is to get the dec drift line to be horizontal Note about ASCOM The instructions and screenshots above correspond to what you see in PHD2 with an ASCOM connection to the mount Ther...

Страница 78: ...remote control Since the version of the operating system does not imply real changes in the functionality of the telescopes that indeed depend on the astronomy software installed we advise you not to...

Страница 79: ...nd reported slightly differen tly than other capacities in computing The drive capacity is reported on the assumption that 1GB is 1 000 000 000 bytes A 480GB SSD is in other words actually 480 000 000...

Страница 80: ...ts with indexes from 1 to 4 and label value Example result OK status 1 label mount http localhost 1380 getregout idx 5 replies with the voltage set in the RCA ports the ones for dew heaters with index...

Страница 81: ...80 setpwrhub idx 3 label Mount Set label of USB 2 0 C port to Mount Reply result OK http localhost 1380 getecco Asks for actual state of the ECCO module Reply 1 result OK ecco Not connected Reply 2 re...

Страница 82: ...t the parameter t is a number set the time in seconds to freeze the EAGLE Manager interface For example When a user start the control of the EAGLE ports from third party software you have to send the...

Страница 83: ...r to fix this please con nect a USB mouse and keyboard to the EAGLE and click on Windows search field Here type netplwiz then press EN TER in the keyboard This will open a new window and you have to d...

Страница 84: ...table If you still experience WiFi disconnections please move to point C C Update WiFi card driver in Windows please select START button select Control Panel and then Device Manager Here you will find...

Страница 85: ...he EA GLE you device won t be automatically recognized and it will be marked with a yellow sign this means that the device can t be used until the driver is pro perly loaded 3 Install in the EAGLE the...

Страница 86: ...you have a problem on one of the power out cables so test all of them with a multimeter tester and when you find the not working cable change or fix it if you want to fix it and you have no expe rien...

Страница 87: ...n t start you may have a bad power source try connecting the EAGLE to a different power unit If with a different power unit the EAGLE starts you have an issue on the previous power unit If it still do...

Страница 88: ...to the factory settings in a very easy way Restoring won t affect your personal files but most likely will automatically solve your problem with Windows In order to make a system restore please 1 go...

Страница 89: ...return it to the reseller upon the purchase of a new type of equivalent equipment one by one Properly differentiated collection for the subsequent start of dismantled equipment for recycling treatmen...

Страница 90: ...wear 4 THE GUARANTEE DOES NOT APPLY IN THE FOLLOWING CASES Repair by anyone not authorised by PrimaLuceLab Invasive interventions or tampering with internal and or external parts Missing of the invoic...

Отзывы: