background image

Controls and Instruments 

4-15 

!


If  the  vehicle  ahead  slows  below  your 

cruise  control’s  set  speed, 

but  then 

accelerates  away,  and  the  ACB  system  did 

not  need  to  use  the  service  brakes  as  it 

managed  the  intervention,  the  coach  will 

automatically  accelerate  back  to  the  original 

cruise control set speed, and again maintain 

a  set  following  distance  behind  the  forward 

vehicle. 

Driver warnings 

Before  using  the  ACB,  the  driver  should  fully 

understand  all  the  audible  and  visual  warnings 

that  the  system  provides.  Any  audible  warning 

(beeping or tone) means that your vehicle is too 

close from the vehicle ahead. 

DASHBOARD TELLTALE 

When  ACB  is  turned  on  and  a  cruise  speed  is 

set,  if  the  forward  vehicle  is  detected  (in  range) 

by  the  radar,  the  FORWARD  VEHICLE 

DETECTED  telltale  light  on  the  dashboard  will 

illuminate. This is an indication to the driver that 

the  forward  vehicle  is  being  tracked,  that  the 

ACB is actively managing the distance between 

the  coach  and  the  vehicle  ahead  and  that  the 

ACB  system  may  automatically  intervene  to 

maintain the set following distance. 


FORWARD VEHICLE DETECTED telltale light 

There are three types of warnings with this 

telltale light: 

• Green: The forward vehicle is detected (in 

range). 

Flashing  red:  Collision  alert.  The  forward 

vehicle  is  to  close  to  follow  safely  or  a 

metallic  stationary  object  such  as  a  stopped 

or  stalled  vehicle  in  your  lane  of  travel  is 

detected. The driver must intervene to avoid 

a collision. 

• Solid red: ACB system malfunction. The ACB 

system  and  the  alert  functions  are  not 

available. 

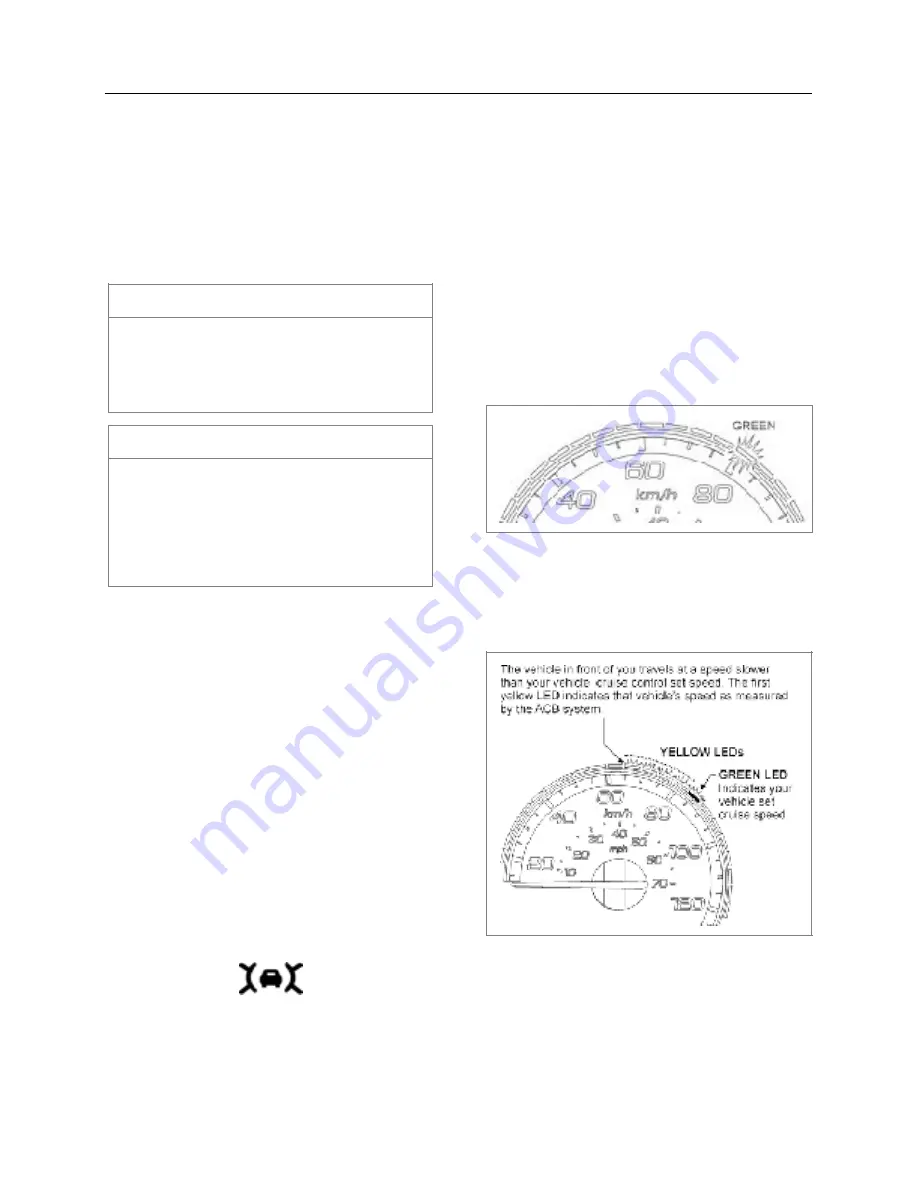
SPEEDOMETER LEDs 

With  the  cruise  control  engaged  and  a  cruise 

speed  set,  a  green  LED  illuminates  above  the 

cruise control set speed on the speedometer. 

THE CRUISE SET SPEED IS 80 km/h 

With  a  cruise  speed  set,  the  vehicle  ahead  

slows moderately. The system will display to the 

driver  the  approximate  speed  of  the  vehicle 

a h e a d  w i t h  y e l l o w  L E D s  a b o v e  t h e 

speedometer. 

EXAMPLE OF THE SPEEDOMETER LED DISPLAY WHEN 
THE  FORWARD  VEHICLE  IS  SLOWER  WHILE  THE 
COACH  TRAVELS  WITH  THE  ACB  CRUISE  CONTROL 
ON AND SET 

06729_3 

FOLLOWING DISTANCE ALERT (FDA) 

Following  Distance  Alert  provides  both  audible 

and  visual  warnings  whenever  the  distance 

between the coach and the forward vehicle is 

19T

NOTE

The maximum radar range is approximately 

500  feet  (150  meters).  Rain,  snow,  fog,  ice 

and  other  severe  weather  conditions  may 

affect  the  performance  of  the ACB    system 

and shorten radar range.

T

19

NOTE

As  part  of  your  pre-trip  vehicle  inspection, 

check to see that there is no mud, snow, ice 

build-up  or  other  obstruction  in  front  of  the 

radar  sensor.  You  should  inspect  the  radar 

s e n s o r  m o u n t i n g  a n d  r e m o v e  a n y 

obstruction  that  may  impair  the  sensor 

functioning.

!

!

Содержание X3-45 COACH

Страница 1: ...OPERATOR S MANUAL X3 45 COACH ...

Страница 2: ......

Страница 3: ...COACH MANUFACTURER OPERATOR S MANUAL X3 45 COACH PA1609 December 2015 ...

Страница 4: ...09 Featuring New engine door design STORM First edition September 2014 Model year 2014 starting from vehicle F 5760 REV EFFECTIVE DESCRIPTION DATE 1 First Release 2 G 6019 New Engine Brake Sep 2014 Dec 2015 ...

Страница 5: ...f this manual to promptly notify Prevost of any change ofaddress or transfer of ownership This will ensure we provide fast and reliable coach service to all coach operators Note Illustrations in this manual are used for reference only and may differ slightly from the actual vehicle however key components addressed in the manual are represented as accurately as possible DANGER WARNING CAUTION and N...

Страница 6: ...e In order to maintain the certified rolling resistance of the tires which optimize fuel economy the maintenance procedures provide by the tire manufacturer must be followed EVENT DATA RECORDING DEVICES This PREVOST vehicle is equipped with a device generally referred to as an event data recorder or EDR Please note that while the term event data recorder is typically used throughout the motor vehi...

Страница 7: ...ND STOPPING PROCEDURE 6 1 SAFETY FEATURES AND EQUIPMENT 7 1 CARE AND MAINTENANCE 8 1 TECHNICAL INFORMATION 9 1 ABBREVIATIONS APPENDIX A SERVICE LITERATURE APPENDIX B TROUBLESHOOTING GUIDE FOR MULTIPLEX VEHICLES APPENDIX C ALLISON DIAGNOSTIC TROUBLESHOOTING CODES APPENDIX D SPHEROS PREHEATER FLASH CODES APPENDIX E TPMS TROUBLESHOOTING GUIDE ...

Страница 8: ......

Страница 9: ...Safety Precautions 1 1 SAFE OPERATING PRACTICES 2 DEFENSIVE DRIVING PRACTICES 2 OTHER PRECAUTIONS 3 ...

Страница 10: ...engine before refueling adding oil performing maintenance or servicing tasks unless stated otherwise Fuel is highly flammable and explosive Do not smoke when refueling Keep away from open flames or sparks Do not run the engine or HVAC system with access doors left open Close compartment doors before operating any equipment Do not remove the surge tank filler cap or the cooling system pressure cap ...

Страница 11: ...energized except for the MCM Master Chassis Module the battery equalizer the preheater system and some electronic modules which are energized during 15 minutes after the ignition has been set to the OFF position Prior to working on one of these electrical components set the battery master switch in the main power compartment to the OFF position If the vehicle will not be operated for a long period...

Страница 12: ... reproductive harm Battery posts terminals and other related accessories contain lead and lead compounds chemical known to the State of California to cause cancer and other reproductive harm Batteries also contain other chemicals known to the State of California to cause cancer Wash hands after handling WARNING This vehicle is not standing passengers designe d to carr y ...

Страница 13: ......

Страница 14: ...NSER COMPARTMENT A C 6 EVAPORATOR COMPARTMENT 7 COOLANT HEATER 7 FRONT ELECTRICAL AND SERVICE COMPARTMENT 8 BAGGAGE COMPARTMENTS 8 SPARE WHEEL COMPARTMENT 9 FUEL AND DIESEL EXHAUST FLUID DEF FILLER DOOR 9 ENTRANCE DOOR 10 DOOR OPERATION LOGIC 11 EMERGENCY ENTRANCE DOOR OPENING 11 WHEELCHAIR LIFT ACCESS DOORS 11 REAR VIEW MIRRORS 11 BACK UP CAMERA 13 110 120 VOLTS CONNECTOR 13 HUBODOMETER 13 TRAILE...

Страница 15: ...6 Condenser compartment 7 Entrance door control switch 8 Entrance door 9 Engine compartment rear door 10 Rear view mirrors 11 Spare wheel compartment 12 Front electrical and service compartment 13 Driver s power window 14 Evaporator compartment and coolant heater compartment 15 Radiator door 16 Catalytic converter access door 17 Exhaust aftertreatment system access door ...

Страница 16: ...sembly 2 Transmission fluid dipstick if equipped with Allison transmission 3 Coolant fluid surge tank filler cap 4 Coolant fluid surge tank sight glass 5 Power steering fluid reservoir 6 Engine oil dipstick 7 Air filter 8 Air filter restriction indicator 9 Radiator fan 10 Radiator fan drive mechanism 11 Alternators 12 Engine oil filler tube 13 Central A C compressor ...

Страница 17: ...can be locked or unlocked using the exterior compartment key or if so equipped by the central door locking system To open push sideways on the small lever located between the marker lights ENGINE COMPARTMENT R H SIDE 18607_1 A telltale light illuminates when one or more compartments are unlocked ENGINE COMPARTMENT REAR DOOR To open the engine compartment rear door open the engine compartment curb ...

Страница 18: ... WARNING Unless otherwise stated do not run the engine when the engine compartment is open ...

Страница 19: ...gages to maintain the door in the full open position To close the door slightly lift up the door and release the catch before firmly shutting down the door To close the door lower the door and push against the release lever spring to latch the door shut REAR DOOR SAFETY CATCH WARNING Unless otherwise specified do not run engine when the engine compartment rear door is open Close the engine compart...

Страница 20: ...Pull the release latch located inside the adjacent baggage compartment to open the condenser door The condenser compartment provides access to the following Diesel Exhaust Fluid DEF Tank Condenser Condenser fans and motors Filter dryer and moisture indicator Receiver tank CONDENSER COMPARTMENT A C 22299 ACCESS TO THE SCR 04023 WARNING External and internal temperatures remain hot long after engine...

Страница 21: ...long with the blowers The evaporator compartment door release latch is located on the right wall of the baggage compartment left of the door Pull the release latch then slide your hand in the opening to depress the secondary lock and swing open EVAPORATOR COMPARTMENT CAUTION Only the strap should be used to pull the condenser fan assembly open Damage to condenser could result if pulling by other m...

Страница 22: ... HEATER The vehicle may be equipped with the optional preheater located aft of the evaporator compartment and accessible under left rear fender LOCATION OF PREHEATER 18607 The water recirculating pump is also located in this location ...

Страница 23: ...FRONT SERVICE COMPARTMENT DOOR 18610 This compartment door can be locked unlocked using the exterior compartment key The light in the front electrical and service compartment turns ON automatically when the door is opened FRONT SERVICE COMPARTMENT 18611 BAGGAGE COMPARTMENTS The baggage compartments of the X3 45 Coach provide 406 ft3 11 5 m3 of storage capacity The compartments can be locked or unl...

Страница 24: ...ing or locking mechanism could result NOTE For added safety open the door until the catch assist in holding the door in the open position Lift lever to release door NOTE The baggage compartment doors can be locked unlocked from the driver s position by the optional central locking system The switch is on the L H control panel Refer to Controls Instruments chapter WARNING To avoid injury keep hands...

Страница 25: ...either open or shut A key is provided for unlocking the door if the option was chosen ...

Страница 26: ...l ground an automatic nozzle will automatically shut off when fuel tank is approximately 95 full NOTE The fuel DEF filler door must be in the unlocked position before closing CAUTION Diesel exhaust fluid DEF will begin to crystallize and freeze at 12 F 11 C and expand by 7 when frozen To allow expansion without damaging the DEF tank do not fill the tank with more than 15 9 gallons 60 liters CAUTIO...

Страница 27: ...k lever is visible the door is unlocked ENTRANCE DOOR EXTERIOR SWITCH 18599 From the inside open the door by pressing the door opening switch L H button on the R H dashboard panel Close by pressing the door closing switch R H button on the dashboard Refer to Controls and Instruments chapter for more information ENTRANCE DOOR 18001 ...

Страница 28: ...access door which is part of the baggage compartment door The lift mechanism access door is located directly below the wheelchair access door A handle at the left of the lift mechanism unlocks and enables opening of the wheelchair access door If the parking brake is not activated a switch in the door will activate the parking brake when it detects the door is open WHEELCHAIR LIFT ACCESS DOORS 1861...

Страница 29: ... for other divers to see your signal when driving too close in rain fog or when in blind spot The mirrors are adjusted using the controls located on the L H control panel Refer to Controls Instruments chapter Manual adjustment is also possible CAUTION Do not attach stick on type convex mirror accessories to the heated mirror glass This could impede uniform heat distribution on the mirror surface a...

Страница 30: ...curb side drive axle wheel hub The odometer calculates the total distance in miles or kilometers depending on model installed traveled by the coach since manufacture including factory road testing HUBODOMETER 13012 TRAILER HITCH 20 000 lb max Gross trailer weight capacity optional Your vehicle may be equipped with a factory installed trailer hitch which has been designed to meet the following rati...

Страница 31: ...ederal Motor Carrier Safety Regulations 393 52 regarding trailer breaking capability 2 The trailer coupling attachments meet the following minimum static test load requirements o Longitudinal tension and compression 1 5 x GVWR of trailer o Transverse thrust 0 5 x GVWR of trailer o Vertical tension and compression 0 5 x GVWR of trailer Loads indicated must be applied without incurring loss of attac...

Страница 32: ... PNEUMATIC ISRI SEAT 4 DRIVER S SEAT USSC 9100ALX 5 SAFETY BELTS 5 MICROPHONE JACKS 6 PASSENGER SEATS 6 SWIVEL SEATS 6 FOLDING TRAYS 6 CARD TABLES 6 QUICK LOUNGE SYSTEM 7 OVERHEAD CONSOLE 7 ADJUSTABLE AIR REGISTERS 7 SERVICE BELL 7 READING LIGHTS 8 WINDOWS 8 PANORAMIC WINDOWS 8 DRIVER S POWER WINDOW 8 VENTILATION HATCH 9 OVERHEAD COMPARTMENTS 9 WASTE CONTAINER 10 GALLEY 10 LAVATORY 10 ...

Страница 33: ...a 12 volt appliance socket UTILITY COMPARTMENTS 18602 STEERING WHEEL ADJUSTMENT Push on the valve button located in the foot operated control housing to unlock the steering wheel for tilt and telescopic adjustment refer to Controls and Instruments chapter TILT AND TELESCOPIC ADJUSTMENT 18670 UTILITY COMPARTMENT IN CONSOLE 18669 NOTE The destination sign must be programmed with a computer connected...

Страница 34: ...rror allows the driver to see in the aisle Adjust mirror manually ADJUSTABLE HVAC REGISTERS The HVAC system has adjustable registers to control air flow around the driver s area Three are located on the dashboard two on the R H ...

Страница 35: ...umatic model is available as an option Both seats are equipped with safety belts Lumbar supports heated cushions and adjustable armrests are optional MECHANICAL ISRI SEAT Adjustment Seat can be adjusted to the desired driving position by following the instructions listed below Coach Interior 3 3 DRIVER S SEAT ADJUSTMENT MECHANICAL 18333 DANGER The driver s seat must be adjusted to allow the driver...

Страница 36: ...applying pressure on the armrest Push the armrest down Repeat procedure until desired position is reached To raise the armrest move it to the desired position and turn control knob clockwise until it stops Backrest Lift lever 2 then adjust backrest to the desired angle 1833 5 Tilt front To lower or raise the seat s front section pull handle 3 up and push or pull the seat cushion 183 36 ...

Страница 37: ...pull the seat cushion 18337 WARNING To avoid pinching the fingers between buckle and controls lower safety belt buckle before adjusting seat height DANGER For best protection position headrest behind your head not behind your neck Up and Down Pull both handles 3 and 4 up to adjust height of the seat 183 38 Fore and Aft To adjust distance between driver and dashboard pull handle 5 up and slide the ...

Страница 38: ...le to 50 mm 2 inch length Fore and aft 3 Pull handle up and slide seat forwards or backwards to adjust distance between seat and dashboard Isolator 4 Reduces horizontal vibration ensuring smooth ride Backrest 5 Lift lever to select proper angle of backrest F o r m a x i m u m m e c h a n i c a l suspension performance rotate handwheel 6 until your body weight in pounds is shown on the indicator Th...

Страница 39: ...ting If seat belt operation becomes defective report to maintenance personnel immediately Coach Interior 3 5 FASTENING SEATBELT 18028 To unfasten belt press the red button in centerof buckle and allow belt to retract If the belt does not fully retract pull it out and check for kinks or twists Make sure that it remains untwisted as it retracts DANGER The driver s seat must be adjusted to allow the ...

Страница 40: ...l outlet under the overhead storage compartment at the rear of the coach PASSENGER SEATS Passenger seats may be equipped with grip handles ashtrays newspaper holders trays cup holders and footrests PASSENGER SEAT EQUIPMENT 18121A All seats are track mounted so that the seating configuration can be changed Each set is mounted on rectangular aluminum bases to make cleaning between the base and side ...

Страница 41: ...s reading lights air vents and an optional service bell are controlled from this panel OVERHEAD CONSOLE 23137 ADJUSTABLE AIR REGISTERS Manually adjustable registers located on the overhead console provide air flow to the passengers Air flow can be directed passengers can orient individual registers by rotating the nozzle To adjust air flow passengers must open or close the flaps Activation of the ...

Страница 42: ...dows are bonded to the structure and form an integral part of the body of the vehicle helping reduce vibration and noise Fixed windows cannot be opened Emergency Windows These windows can be opened from inside the vehicle as emergency exits A decal on window sills indicates the location of the emergency windows To open an emergency window lift the window release bar sill and push the window open f...

Страница 43: ... pull down to close The ventilation hatch can be completely opened for emergency egress Refer to Safety Features and Equipment chapter Coach Interior 3 9 VENTILATION HATCH OVERHEAD COMPARTMENTS Passenger carry on baggage is stored in overhead compartments on each side of the coach A first aid kit is located in the first front curb side overhead storage compartment An optional video cassette player...

Страница 44: ...ompartment located over the mirror A liquid soap dispenser and moist towel dispenser areoptional Locking the lavatory door from the inside will illuminate a fluorescent light in the lavatory and two outside signs to indicate occupation One sign is located on the outer wall of the lavatory and another sign is located over the windshield A telltale light on the dashboard will illuminate to inform th...

Страница 45: ...UTSIDE REAR VIEW MIRROR HEAT OPTIONAL U 1 2 T 9 1 2 T U BAGGAGE COMPARTMENTS LOCKING SYSTEMU 1 2 T 9 1 2 T U MIRROR CONTROLS OPTION 3 U 1 2 T 9 1 2 T U TAG AXLE CONTROL VALVE 4 U 1 2 T 10 1 2 T U PARKING BRAKES CONTROL VALVE 5 U 1 2 T 10 1 2 T U COOLANT HEATER TIMER OPTION 6 U 1 2 T 10 1 2 T U LOW BUOY CONTROL VALVE OPTION 7 U 1 2 T 10 1 2 T U CIGARETTE LIGHTER OPTION 8 U 1 2 T 10 1 2 T U ASHTRAY ...

Страница 46: ...U 1 2 T 29 1 2 T U Cooling Mode IndicatorU 1 2 T 29 1 2 T U Fan SpeedU 1 2 T 29 1 2 T U RecirculateU 1 2 T 30 1 2 T U Driver s section temperature settingU 1 2 T 30 1 2 T U Passenger s section temperature settingU 1 2 T 30 1 2 T U Windshield DefoggerU 1 2 T 30 1 2 T U Panel and FootwellU 1 2 T 30 1 2 T U PanelU 1 2 T 30 1 2 T U Temperature Degree SelectorU 1 2 T 30 1 2 T U AUDIO VIDEO SELECTOR FOR...

Страница 47: ...ications and information pictogramsU 1 2 T 45 1 2 T U Status Line PictogramsU 1 2 T 52 1 2 T U VEHICLE CLEARANCE INFORMATIONU 1 2 T 53 1 2 T U STEERING COLUMN CONTROLSU 1 2 T 53 1 2 T U MULTI FUNCTION LEVERU 1 2 T 53 1 2 T U Turn Signal 1 U 1 2 T 53 1 2 T U Lane Change Signal 2 U 1 2 T 53 1 2 T U Headlight Beam Toggle Switch 3 U 1 2 T 53 1 2 T U Courtesy Blinkers 4 U 1 2 T 53 1 2 T U Windshield Wa...

Страница 48: ...RFORMANCE MODEU 1 2 T 61 1 2 T U ECO ROLL MODE FREEWHEEL FUNCTION U 1 2 T 61 1 2 T U LIMP HOME MODEU 1 2 T 61 1 2 T U To Deactivate the Limp Home ModeU 1 2 T 62 1 2 T U STARTING AND STOPPINGU 1 2 T 62 1 2 T U StartingU 1 2 T62 1 2 T U StoppingU 1 2 T 62 1 2 T U STARTING THE VEHICLE UPHILL AND DOWNHILLU 1 2 T 62 1 2 T U DRIVINGU 1 2 T 63 1 2 T U D PositionU 1 2 T 63 1 2 T U M PositionU 1 2 T 63 1 2...

Страница 49: ...ocks the utility compart ments and the utility drawer on the dashboard FUEL FILLER DOOR KEY OPTION Use this key to lock or unlock the fuel filler door LAVATORY DOOR KEY Use this key to lock or unlock the lavatory 3 2 T IGNITION SWITCH POSITIONS2 3 T 06354 Coaches may be equipped with an ignition lever instead of an ignition key Use the ignition switch to activate the electrical circuit by turning ...

Страница 50: ...When the vehicle is parked overnight or for an extended period of time the battery master switch ignition switch should be set to the off ...

Страница 51: ...C position plus the transmission engine and accessories ABS system wipers dashboard cluster gauges and buzzers air horn and air dryer heater are activated when the switch is in this position Do not leave the key in this position unless the engine is running START Turn the key clockwise to the second position and release as soon as the engine starts The key will return to the ON position If the eng...

Страница 52: ...The battery master switch is on when the hazard flashers are activated even if the key is in the off position ...

Страница 53: ...panel 2 Microphone 3 DOT certification plate 4 OBD On Board Diagnostics receptacle 5 Foot operated steering wheel adjustment release knob 6 Driver s utility compartment 7 Dashboard 8 Rear view monitor optional 9 Front view scenic camera optional 10 Front service door unlocking pull rod ...

Страница 54: ... raise the coach to the normal driving height Refer to OTHER FEATURES chapter for more information 06250 Press and hold the rocker switch upwards to raise the front end of the coach 4 inches 100 mm Release the rocker switch to return the coach to the normal driving height LA T 2 3 TERAL CONTROL PANEL2 3 T 06704 1 Transmission control pad 2 Control switches 3 Mirror controls 4 Tag axle control valv...

Страница 55: ... outside mirror similarly but by using the right side control Press this rocker switch to clear fog frost or thin ice from outside mirror 06261 B6BAGGAGE COMPARTMENTS LOCKING SYSTEM 0626 N T 9 1 OTE The parking brakes must be applied to allow the use of the kneeling Close power window when parked or leaving the coach unattended CAUTION N 9 1 OTE Service compartment doors are not linked to the bagg...

Страница 56: ...T h i s syst e m ena b l e s lock i n g a l l bag gag e c o m p a r t m e n t doo r s b y p r e ssin g t h e swit c h f o r war d T o u n l ock p r e s s t h e swit c h rear war d ...

Страница 57: ...to use it will spring out automatically Replace lighter in non activated position The cigarette lighter socket can be used to power 12 volt appliances e g flashlight vacuum cleaner The maximum power consumption allowed for appliances plugged in this socket is 130 watts Make sure the appliances are equipped with suitable plugs that will not damage the socket ASHTRAY OPTION 9 To open the optional as...

Страница 58: ...otection panel displays the current system status The protection panel contains SYSTEM OK fire ALARM and TROUBLE lamps the audio alarm the TEST RESET switch and the ALARM SILENCE switch The SYSTEM OK lamp indicates power is on the system and that there are no trouble conditions present The TROUBLE lamp blinks if there is a fault in the detection circuitry and illuminates solid if there is a fault ...

Страница 59: ...on is released the new cruising speed will be stored in the cruise control memory or 3 When driving with cruise control each time the RES button is momentarily depressed the cruising set speed is raised by 1 mph 2 km h 06701 speed To turn off the system press the rocker switch to the off position Decreasing set speedThe vehicle cruise speed setting can be decreased by one of the following methods ...

Страница 60: ...remove foot from the accelerator pedal This will set the vehicle cruise speed and store it in memory The set speed will appear in the driver information display Increasing set speed The vehicle cruise speed setting can be in creased by one of the following methods 1 Accelerate using the accelerator pedal until the desired cruising speed is reached Press and release the SET button or 3 Slightly app...

Страница 61: ... of the two steering wheel engine brake control buttons is activated engine brake low T 9 1 engine brake high 9 1 T T he transmission retarder maximum braking level is determined by the retarder hand lever position on the steering wheel WARNING Do not use the cruise control when driving speed must be constantly adjusted such as in heavy traffic or on winding icy snow covered or slippery roads or o...

Страница 62: ...hut off and the cruise speed setting is erased from the cruise control memory 1 9 T IMPORTANT NOTE If the engine was stopped and the cruise rocker switch was in the on position the rocker switch must be reset by turning it off then on again in order for the cruise control to be reactivated ...

Страница 63: ...peed although the set time gap remains the same for all set cruise speeds Prevost s default set time gap is 7 seconds With cruise control engaged and a cruise speed set you are maintaining a set following distance between the coach and the forward vehicle If the vehicle in front of the coach slows down below your cruise control set speed the system will progressively intervene as follows in this o...

Страница 64: ...1 9 T NOTE Whenever the service brakes are applied by intervention of the ACB or by the driver normal cruise will automatically be cancelled The driver must resume or set the cruise ...

Страница 65: ...rward vehicle is to close to follow safely or a metallic stationary object such as a stopped or stalled vehicle in your lane of travel is detected The driver must intervene to avoid a collision Solid red ACB system malfunction The ACB system and the alert functions are not available SPEEDOMETER LEDs With the cruise control engaged and a cruise speed set a green LED illuminates above the cruise con...

Страница 66: ...ssued by the ACB system This alert indicates that the driver must take immediate evasive action by applying more braking power and or steering clear of the vehicle ahead to avoid a potential collision The Impact Alert is also applicable to stationary metallic objects such as stopped or stalled vehicles This alert provides a warning given up to 3 0 seconds before a potential collision with a statio...

Страница 67: ...mpact Alerts are always operational when the vehicle is running whether or not ACB is turned on Active interventions of ACB to maintain safe following distance throttle reduction engine brake retarder application service brakes application are only operational when the ACB is engaged with a cruise speed set ...

Страница 68: ...onary metallic object in your lane of travel ACTIONS BY ACB SYSTEM On the dashboard the Forward Vehicle Detected telltale U flashesU in U red Impact Alert pop up message appears on the DID The speedometer LEDs U flashUin U red An audible warning will sound U continuous modulating toneU BRAKE OVERUSE WARNING SITUATION ACB system is using the service brakes excessively to maintain the set following ...

Страница 69: ...E pictogram will appear on the DID status line FORWARD VEHICLE DETECTED telltale light ACB NOT AVAILABLE pictogram For proper functioning of the system the radar must be perfectly aligned and not blocked If a radar fault condition is detected one of the following pop up messages will show in the DID ACB RADAR MISALIGNMENT ACB RADAR FAULT ACB RADAR DATA LINK FAILURE ACB RADAR BLOCKED TIRE PRESSURE ...

Страница 70: ...res as illustrated in this document and there is one reading appearing on each side instead of two as illustrated in this document Start up When turning the ignition switch to ON the screen shown below appears on the TPMS Display Dash lines are displayed meaning that no pressure data have been received by the display Controls and Instruments 4 19 As illustrated the pressure readings will appear re...

Страница 71: ...pressure readings have been received for all running wheels or the pre trip check maximum time has elapsed It was selected to provide ...

Страница 72: ...he pressure temperature readings is not impacted by the acknowledgement and keeps blinking until the error condition disappears The spare tire does not contribute to alarms and so never blinks On the road the TPMS display shows one of the 5 previous screens In the event of a temperature alarm the display switches automatically to temperature readings The driver can also press any of the menu keys ...

Страница 73: ... the status information replaced with the menus The pressure readings are still displayed and updated as new readings are received and the readings are blinking if not within the optimum pressure range From this point the user can scroll through the menus to get more detailed information and inflate deflate the tires to bring them back to their optimum target pressures Scrolling through these menu...

Страница 74: ...nel 2 Instrument Cluster 3 Vehicle Clearance Information 4 R H Dashboard Panel 5 HVAC Control Unit 6 Audio video Selector Panel VSS 05 7 AM FM CD Radio 8 Air Vents 9 Brightness Control 10 Diver Information Display DID 11 Ignition Switch 12 Tire Pressure Monitoring System TPMS Display ...

Страница 75: ...ANEL The L H dashboard panel includes controls for the operation of the coach it also includes the ignition switch and an adjustable air vent 3 2 T L H DASHBOARD PANEL3 2 T 06762_1 06254 7 B Headlights and Exterior Lighting Off position Daytime running lights only Press this rocker switch to turn on the following lights First position Front parking lights clearance lights tail lights license plate...

Страница 76: ...shield defrosting is automatically activated when the outside temperature is lower than 39 F 4 C the driver s side HVAC control unit is turned on and fan speed is higher than zero After automatic activation of the upper windshield defrosting the upper defroster unit can be turned off by cycling this switch to the ON position and then to the OFF position 06268 Left and Right Sunshades Two independe...

Страница 77: ...Do not attempt to raise or lower these shades manually Damage to the electric motor or roller mechanism could result ...

Страница 78: ...ff 06268 Wheelchair Lift Optional Activate the optional wheelchair lift by pressing down on the rocker switch Refer to Other Features section and to wheelchair lift system s Operator s Manual for operating instructions 06264 Fast Idle For extended idling periods run the engine at fast idle Press down the rocker switch to engage fast idle This increases the engine speed to approximately 1 000 rpm R...

Страница 79: ... Transmission Retarder Engine Brake in OTHER FEATURES chapter 06265 Engine Stop Override with Automatic Fire Detection and Suppression System Press the Engine Stop Override switch on the dashboard or the Delay Engine Stop switch on the AFSS protection panel to delay the engine shutdown and extinguisher discharge by an additional 15 seconds This switch is functional only if the vehicle is equipped ...

Страница 80: ... R H dashboard panel 3 2 T R H DASHBOARD PANEL3 2 T 06724 06464 Entrance Door Operating Buttons Press and hold the L H button to open the door and the R H button to close the door Releasing the button at any time will immediately stop door movement 06244 O Do not engage during downhill operation WAR NING The door mechanis m has no automatic safety protection to avoid injury to bystander s The driv...

Страница 81: ...Driver s Area Lighting Press the rocker switch to illuminate the ceiling lights in the driver s area as needed ...

Страница 82: ...OFF gradually 06240 Reading Lights This switch powers the reading light circuit enabling passengers to operate their personal reading lights Refer to Coach Interior chapter Turning the key or ignition lever to the accessory position ACC when the reading lights are on will activate the lights to full intensity providing a clear view over the entire cabin area 06245 06243 06262 To avoid running down...

Страница 83: ...he optional air conditioning in the overhead compartments activating the fans also engages the dedicated A C compressor Stop Service Chime Optional Press this switch to enable the stop service chime When depressed the service buttons illuminate even when the chime circuit is not enabled Destination Sign Optional Press the rocker switch to illuminate the destination sign Brightness Control ...

Страница 84: ...park at least 4 feet 1 5 m from other vehicles or buildings to allow sufficient air flow through the condenser 1 T 1 9 The outside temperature is above 32 T 9 1 F 0 C 2 The passenger s area temperature has reached 7 F 4 C under the set point All parameters set before turning the system OFF will be kept in memory for the next power ON The HVAC module performs a self diagnosis every time it is turne...

Страница 85: ...Fan Speed The driver s fan has six speeds Increase speed by pressing on the upper portion of the button decrease by pressing on the lower portion 22135 ...

Страница 86: ...atureset point press on the sign Temperature to the lower windshield when activated The footwell damper is range is between 60 F and 82 F 16 C to 28 C On the driver s side only asking for a temperature set point above 82 F 28 C will keep 22139 closed also but the fan speed can be reduced or increased 22132 the coolant valve open and FUL will be displayed In case of interior temperature sender unit...

Страница 87: ... in the passenger s area press on the or the sign Pressing these buttons will flash the displayed set point and the word SET will highlight Temperature range is between 60 F and 82 F 16 C to 28 C In case of interior temperature sender unit failure the coolant valve will remain open and three lines will be displayed AUDIO VIDEO SELECTOR FOR THE PASSENGER S AREA The VSS 05 Video and Sound Selector e...

Страница 88: ...rent audio video source OPERATION OF THE OPTIONAL AUDIO VIDEO MODESTY PANEL On some vehicles it is possible to connect and display on the main monitor a laptop or other audio video equipment DVD player gaming console from an optional audio video modesty panel located behind the driver s seat To do so connect the laptop to the modesty DB9 connector 9 pins blue connector select Video IN on the Video...

Страница 89: ...microphone level 3 Press G MIC button again to turn off the guide microphone BACKGROUND VOLUME ADJUSTMENT the unit automatically saves the setting and exits this mode 9 N 1 T OTE T T 1 9 he driver and guide microphones can be turned on only by turning the switch on the microphone to on 1 9 T If both the driver and guide microphone are activated the driver microphone has priority and the guide micr...

Страница 90: ...lect the relevant audio or audio video source 1 9 P T 1 ress and hold AUDIO button then While maintaining the service bell gong active the gong sound heard upon activation of the microphones can be disabled To do so 1 Press1 T 9 and hold audio button then press G MIC button 9 T 1 The lcd panel will show GONG MIC ON or GONG MIC OFFf 2 1 9 TTur n t h e v o l u m e kno b cloc k w i s e t o acti v a t...

Страница 91: ...o s a v e t h e setti n g I f n o butt o n i s p r e s s e d with in 8 s e c ond s t h e unit a u t o m atic ally s a v e s t h e sett i n g and exit s this m o de GONG SOUND LEVEL A19T gong will sound in the passenger s area upon activating of the microphone This gong will also sound when a passenger activates the service bell The gong sound level can be adjusted as follows ...

Страница 92: ... Press CAM button again to turn off the panoramic view camera 1 P 1 9 T ress and hold AUDIO button then 6 NAV press VIDEO IN button 19T The LCD panel will show GONG PASS 2 T 9 T urn the volume knob to adjust the gong level 3 1 9 T Pre ss any butt on to sav e the sett ing If no butt on is pre sse d with in 8 sec ond s Press NAV button to display the optional gps navigation system guidance screen no...

Страница 93: ...ual tuning up Controls and Instruments 4 33 7 Fast reverse button Radio Seek CD USB Push and release to select previous track CD USB Push and hold for fast reverse Bluetooth Phone Reject incoming call or hang up en option iPod Push and hold to enter the iPod menu option 8 CD slot Insert Remove CD 9 Rotary knob Power button Push Power On and Off Turn Volume adjust and audio value update 10 Informat...

Страница 94: ...lect and play audio files stored on the iPod via the radio menus It is not possible to transfer audio from the iPod to the radio solely by the USB port A connection via the AUX port will be necessary Connecting the iPod can be done with two different cable sets 1 A split cable from the iPod 30 pin Dock connector to a USB connector and a 3 5mm audio connector 2 A separate iPod USB cable plus a 3 5m...

Страница 95: ... to the driver the telltale lights and the Driver Information Display DID Indications and warnings are presented according to three levels of attention required 1 THE TELLTALE LIGHTS The highest level of attention The telltale lights are temporary and exceptional they present information critical to safety or vehicle integrity 2 POP UP MESSAGES The second level of attention Pop up messages appear ...

Страница 96: ... paragraph TURBO BOOST PRESSURE PSI Indicates the turbo boost pressure in psi This pressure should be the same at a given engine temperature speed and load An unusual reading could indicate an engine failure ENGINE COOLANT TEMPERATURE F Indicates the operating temperature of the engine coolant in f The normal reading should be between 170 f and 222 f 80 c to 106 c The temperature limit is dependen...

Страница 97: ...CTOGRAM Front Brake Air Pressure Psi Secondary System 06737 Indicates the front brake air system pressure in psi The normal operating pressure is from 122 to 140 psi 841 and 965 kPa A low air pressure indicator LED illuminates when the front air system pressure drops below 75 psi 517 kPa If the air pressure drops further the STOP telltale light will turn on an audible alarm will sound and a messag...

Страница 98: ...e amount of DEF diesel exhaust fluid remaining in the DEF tank The DEF tank is considered as being full when it contains 16 gallons 60 liters of DEF DEF consumption will be approximately 2 of the diesel fuel consumed 06736 3 2 T Fuel Level Indicates the amount of fuel remaining in the fuel tank At the beginning of the red area there is approximately 48 gallons 182 liters left in the tank Do not dr...

Страница 99: ... cruise speed set and the forward vehicle is in range the FORWARD VEHICLE DETECTED telltale light illuminates indicating the ACB sys tem is actively tracking the forward vehicle GREEN The vehicle ahead of you is detected by the radar FLASHING RED Impact alert The vehicle ahead of you is to close The driver must take immediate evasive action by applying more braking power and or steering clear of t...

Страница 100: ...LFUNCTION INDICATOR LAMP Indicates a failure of an emission control device May illuminates at the same time as the CHECK amber warning light The lamp will go out after 3 completed ignition on ride ignition off cycles Vehicle can be driven to end of shift Call for service 1 6 B CRUISE CONTROL Indicates that the cruise control is enabled 1 7 B CRUISE CONTROL SET SPEED Indicates that a cruising speed...

Страница 101: ... 0 B ALTERNATORS INDICATES AN ALTERNATOR PROBLEM ONE OF THE ALTERNATORS IS NOT 06740_D CHARGING 1 9 T NOTE To identify which alternator is defective 1 lower alternator 2 upper alternator perform a system diagnostic using the Driver Information Display DIAGNOSTICS menu Select VIEW ACTIVE FAULTS and then ELECTRICAL SYSTEM Scroll through the active faults The electrical system active faults will appe...

Страница 102: ...tem Flashes slowly when TCS s Mud Snow mode is turned on using the Mud Snow switch Flashes quickly when ESC or TCS intervenes to reduce risk of loss of control 06740_K 2 7 B HIGH BEAM Illuminates when the high beams are selected High and low beams are selected with the multi function lever Refer to Steering Column Controls paragraph in this chapter STOP CHECK AND INFORMATION TELLTALE LIGHTS STOP C...

Страница 103: ...be switched off immediately In some cases preventive action may be taken by the engine ECU to protect the engine For further details refer to Engine Protection Sys tem in Starting and Stopping Procedures WARNING Failure to stop and take necessary action when the stop telltale light is on can result in automatic engine derate and shutdown ...

Страница 104: ... messages are dis played again when the ignition key is turned to the START position or they can be read in the DID menu Refer to Other Features for more information on the DID menus DRIVER INFORMATION DISPLAY The DID Driver Information Display is located in the center of the instrument cluster It displays digital gauges main menus and sub menus that provide necessary and important information to ...

Страница 105: ...ble only if the steering wheel buttons are faulty To enable the alternate mode 1 Apply the parking brake 2 Depress and hold the service brake pedal 14069_3 To select a menu 1 Press the ENTER or ESCAPE button to display the list of available menus 2 Use the UP DOWN button to scroll up or down through the menus M T 2 3 ULTI FUNCTION LEVER 3 Use the ENTER button to open a menu 4 Use the ESCAPE button...

Страница 106: ...In alternate mode use the multi function lever as follows Move the lever up UP Move the lever down DOWN Push the lever away from you ENTER Pull the lever towards you ESCAPE ...

Страница 107: ...h both the 12 volt and 24 volt electrical system current voltage value When the engine is running the 24 volt electrical system voltage value should be between 26 5 et 28 0 volts Accessories air pressure Normal pressure should be between 122 and 140 psi 841 and 965 kPa A C A c compressor pressure This pictogram is displayed with A C compressor suction pressure value low side and discharge pressure...

Страница 108: ...ne brake VEB operation High transmission oil temperature This pictogram indicates that the transmission oil temperature is too high Turn the transmission retarder off to allow the oil to cool down Allison transmission oil or filter replacement required This pictogram may be displayed with many different messages Pay attention to the displayed message which can advise that the transmission oil or f...

Страница 109: ... system pressure low This pictogram indicates that the A C system pressure is too low If the A C pressure is too low the compressor clutch disengages and the fan stops Compressor air dryer fault This pictogram indicates that a risk of water in the pneumatic system has been detected due to a compressor or air dryer related problem Possible causes are Desiccant holder needs replacing Compressor is u...

Страница 110: ...en This pictogram indicates that an emergency window is open or unlocked Baggage compartment door ajar This pictogram indicates that one or more baggage bay doors are ajar To prevent discharge of the batteries when the engine in not running some If the battery equalizer indicator illuminates make sure that the battery equalizer circuit breakers are reset before requesting breakdown assistance Wait...

Страница 111: ...only when the engine is shut down in order to advise the driver of the presence of a passenger in the lavatory compartment during a stop Lavatory compartment emergency call If the vehicle is moving this pictogram indicates that a passenger has activated the lavatory compartment emergency call button Differential lock option This pictogram indicates that the differential action is locked Freezing c...

Страница 112: ...uel consumption This pictogram is displayed with the value for the fuel consumption for the current leg Trip data Function of the DID s Time Distance menu Refer to Driver Information Display Menus in Other Features chapter Estimated time of arrival Function of the DID s Time Distance menu Refer to Driver Information Display Menus in Other Features chapter Fuel filter water separator Indicates that...

Страница 113: ...vehicle is on the road An audible alarm informs the driver when a fire is detected In case of fire detection when parked parking brake applied engine running or not the electric horn is activated to alert the driver Refer to Safety Features And Equipment Chapter It is possible to cancel an alarm while on the road To do so stop the vehicle perform this ignition switch key sequence From the ON posit...

Страница 114: ...ates that at least one baggage compartment door is unlocked ADAPTIVE CRUISE BRAKING ACB NOT AVAILABLE Indicates that the adaptive cruise braking system is disabled ENGINE BRAKE Engine brake is disabled OFF mode ENGINE BRAKE Indicates that the engine brake is in the AUTO mode When using this mode the engine brake is activated when pressing on the brake pedal The engine brake is by default set to AU...

Страница 115: ...ed The lever will spring back into the OFF position once released Headlight Beam Toggle Switch 3 Toggle between high and low beams by pulling the lever up towards you To flash the head lights pull the lever up halfway The lever will spring back into normal position once released Courtesy Blinkers 4 Clearance and parking lights can be flashed by pressing the button located on the lever tip Windshie...

Страница 116: ... in this chapter 3 CANCEL CRUISE CONTROL For the cruise control operating instructions refer to cruise control paragraph in this chapter 4 RESUME CRUISE CONTROL For the cruise control operating instructions refer to cruise control paragraph in this chapter 5 12 LEFT SUNSHADE RIGHT SUNSHADE Press and hold the button to lower the left or right sunshade Press twice rapidly and hold the button to rais...

Страница 117: ...ne brake to AUTO mode On vehicles so equipped an engine brake switch located in the dashboard can be used to cancel completely OFF mode the engine brake 11 RETARDER ENGINE BRAKE HIGH If your vehicle is equipped with a transmission retarder this button has the same effect than the retarder engine brake LOW button On vehicles equipped with engine brake pressing this button will permit full applicati...

Страница 118: ...ion depressing the brake pedal will engage both the service brake and the transmission retarder This is referred to as retarder brake blending The further the pedal is depressed the more total braking power is provided Refer to OTHER FEATURES chapter for further information about the transmission retarder FOOT OPERATED CONTROLS RETARDER HAND LEVER 07043 With the retarder enabled and the accelerato...

Страница 119: ...system becomes a modulated emergency system if a pressure drop occurs in the primary brake system Service brakes are applied by depressing the brake pedal Braking increases with the amount of pressure applied to the foot pedal Refer to Other Features chapter under Antilock Braking System When the brake pedal is depressed the brake lights turn ON automatically Initial Varies with brake pedal 16 33 ...

Страница 120: ...transmis sion control module TCM detects a serious problem in the transmission the CHECK telltale lights on the dashboard ALLISON PUSHBUTTON SHIFT SELECTOR 07142 PUSHBUTTON SHIFT SELECTOR The pushbutton shift selector has the following elements R Press to select Reverse gear N Press to select Neutral D Press to select Drive The highest forward range available will appear in the digital display win...

Страница 121: ...only if selected by the driver using the MODE button When the secondary mode is activated MODE illuminates on the display TRANSMISSION SERVICE INDICATOR This indicator will be illuminated upon the detection of a service issue relating to clutch filter or fluid life The appearance of the indicator lit steadily flashing etc varies for each of the conditions monitored by the system Refer to appendix ...

Страница 122: ...button shift selector automatically select N Neutral when the ignition switch is turned ON 1 9 T NOTE The automatic transmission does not have a park P position Select N Neutral and apply parking brake when the vehicle is left unattended An audible alert will sound if the engine is stopped and the parking brake is not applied WARNING Before leaving driver s seat always put the transmission in NEUT...

Страница 123: ...This range also provides maxi mum driving torque and engine braking power or retarder braking effect In the lower ranges 1 2 3 and 4 the transmission will not upshift above the highest gear selected unless engine overspeed is detected WARNING Service brake should not be used to control the speed of vehicle on long steep descents Instead lower transmission ranges should be used in conjunction with ...

Страница 124: ...nd When slowing the transmission will automatically downshift to first range Low ranges provide progressively greater engine and retarder brak ing power the lower the range the greater the engine and retarder braking effect 3 4 Third and fourth ranges Select these ranges when driving on moderate grades or when load and traffic conditions limit speed ...

Страница 125: ... selector has four gear positions R N D and M R Reverse N Neutral D Drive M Manual program It is not possible to shift neither directly from R position to D or M position nor from D or M position to R position N position must be selected first If the driver executes such gear shifts the transmission will shift automatically to N position DISPLAY Status of the I Shift transmission is shown on the D...

Страница 126: ...edal or the accelerator pedal is depressed but it remains available To disable Eco Roll set the dashboard Engine Brake switch to the OFF position Eco Roll is not available when the Engine Brake Low or Engine Brake High modes are selected When Eco Roll is enabled it activates automatically but only when the following conditions exist Accelerator pedal is released Service brake is released Engine br...

Страница 127: ...th When the vehicle is stopped 1 Apply the parking brake 2 Select the N position on the pushbutton shift selector 3 Turn off the engine STARTING THE VEHICLE UPHILL AND DOWNHILL Hilly Operating Conditions When starting the vehicle on an uphill slope 1 Press the brake pedal 2 Select the D position on pushbutton shift selector The driver can use the button to select a lower start gear if wanted 3 Qui...

Страница 128: ...e desired vehicle speed for the current driving conditions At starting of the vehicle the gearbox selects between gear 1 6 the most suitable start gear with respect to weight and road s gradient The driver can select a pulling away gear different than the one selected by using the and buttons When the vehicle is moving in automatic drive mode the driver can intervene manually while maintaining the...

Страница 129: ...ect R1 as reverse gear manually using the button During reverse it is possible to shift between gear R1 and R2 using the and buttons TOWING When towing the vehicle the transmission output shaft must not be allowed to spin or turn If the vehicle is towed with the drive wheels still in contact with the road surface the vehicle axle shafts or driveline must be removed or disconnected Do not attempt t...

Страница 130: ...SPLAY DID MENUS 10 DRIVING MODE MENUS 11 GAUGES 11 FUEL DATA 12 TIME DISTANCE 13 PREVOST LIAISON OPTION 14 VEHICLE MESSAGES 14 NON DRIVING STATIONARY MODE MENUS 15 DISPLAY SETTINGS 15 DIAGNOSTICS 16 PRE TRIP ASSISTANT OPTION 17 DATA LOG 19 AFTERTREATMENT 20 PASSWORD 21 TRANSMISSION RETARDER 22 ENGINE BRAKE 22 VOLVO ENGINE BRAKE VEB 22 CRUISE CONTROL AND ENGINE BRAKE 23 ANTILOCK BRAKING SYSTEM ABS ...

Страница 131: ... Aim of Acoustic Sensor Beam 32 Adjust Acoustic Sensor Timing 32 EMERGENCY OPERATION 32 To manually deploy the platform 32 To manually raise the platform 33 To manually lower the platform 33 To manually stow the platform 33 To manually stow the lift fromground level 34 WHEELCHAIR LIFT REMOVAL FOR STORING OR MAINTENANCE PURPOSES 34 WHEELCHAIR LIFT INSTALLATION 35 INTERIOR APPOINTMENTS 35 WHEELCHAIR...

Страница 132: ...ion is necessary when the engine internal combustion process alone does not generate enough heat A dosing system injects a mist of diesel fuel into the exhaust system to increase and maintain the aftertreatment system temperature Exhaust temperature must be above 572 F 300 C to initiate the oxidation catalyst which in turn oxidizes the injected diesel fuel molecules to achieve up to 1200 F 650 C e...

Страница 133: ...n that situation engine performance is limited Perform a parked regeneration IMMEDIATELY to avoid further derate and prevent from entering into Level 4 LEVEL 4 ATD SERVICE REQUIRED ENGINE SHUTDOWN ACTIVE A serious engine problem has occurred The DPF may be over its maximum capacity If a stationary regeneration is still not initiated a standard Engine Protection Shutdown sequence will occur All of ...

Страница 134: ...r a short while or drive the vehicle until engine temperature increases sufficiently WARNING Do not initiate a stationary regeneration in a closed area like a garage Stationary regenerations must be undertaken outdoors only WARNING During stationary regeneration exhaust temperature may reach up to 1200 F 650 C at the particulate filter Before initiating stationary regeneration make sure that the D...

Страница 135: ...t all time To do so set the ignition key to the OFF position or get to the DID s Aftertreatment menu select Cancel REGEN and press ENTER button to confirm You can stop regeneration simply by releasing the parking brake Use this procedure in order to move the vehicle in a safe area If regeneration is interrupted it is very important to reinitiate the regeneration as soon aspossible SELECTIVE CATALY...

Страница 136: ... off the excess and rinse with water Spilled DEF solution can form concentrated white crystals on the vehicle Rinse off these crystals with water Diesel Exhaust Fluid DEF Consumption DEF consumption is related to fuel consumption In order to meet EPA2010 requirements DEF tanks are sized so one refill will be necessary every two refill of the fuel tank SELECTIVE CATALYTIC REDUCTION DRIVER WARNING A...

Страница 137: ...ne torque reduction of 25 ENGINE IN DERATE 4 DEF tank empty and one 1 hour of operation in engine derate mode Engine torque reduction of 40 5 DEF tank empty and either 1 Diesel fuel refueling done with a fuel level sensor reading increase of 15 or more REFILL DEF TANK VEHICLE SPEED LIMITED TO 5 MPH 8 KM H Vehicle road l i m i t e d RSL mph 8 km h spee d to 5 2 Vehicle stationary speed 0 for 20 min...

Страница 138: ...ted 40 5 mph 8km h limit after next 20 min vehicle stop 5 Poor DEF quality detected SERVICE DEF Service DEF Vehicle road speed limited RSL to 5 mph 8 km h Note The vehicle has to be stationary before 5 mph 8 km h road speed limit becomes active Diesel fuel refueling done with a fuel level sensor increase of 15 or more solid VEHICLE SPEED LIMITED TO 5 MPH 8 KM H or Vehicle stationary speed 0 for 20...

Страница 139: ...duction of 25 4 Reached four 4 hours of operation with active S C R s y s t e m t a m p e r i n g d i a g n o s t i c troubleshooting code confirmed SCR SYSTEM FAULT REPAIR NEEDED Engine torque reduction of 40 5 MPH 8KM H LIMIT NEXT 20MIN VEHICLE STOP 5 Diesel fuel refueling done with a fuel level sensor increase of 15 or more SCR SYSTEM FAULT Vehicle road speed limited RSL to 5 mph 8 km h solid V...

Страница 140: ... Of Charge Display Settings 1 Language 2 Units 3 Time Date 4 Favorite Display Setting 5 Display Light 6 Change Password Fuel Data 1 Fuel Flow ECO 2 Trip Fuel Used 3 Distance to Empty Diagnostics 1 View Active Faults 2 View Inactive Faults 3 Cluster Self Test 4 Part Number 5 Reset Inactive Faults 6 Vehicle Tests Time Distance 1 Time and Date 2 Alarm Clock 3 Trip Odometer 1 and 2 4 Average Trip Spee...

Страница 141: ...ates the current gear position selected on the I Shift transmission D drive N neutral R reverse M manual 2 Outside Temperature 3 Engine Oil Temperature Selecting this gauge will display the engine oil temperature 4 Transmission Fluid Temperature 5 Prevost Liaison Compass 6 Accessories Air Pressure 7 Battery Voltage Displays current 12 volts and 24 volts system voltage DRIVING MODE MENUS GAUGES ...

Страница 142: ...much fuel is remaining before refueling the vehicle 1 Fuel Flow gph The lower numerical value indicates the instantaneous fuel consumption In this menu you can reset the upper numerical value which is the average fuel consumption To reset hold ENTER button for 1 second When equipped with PRIME option the percentage of trip made on regenerated electricity is also displayed 2 Trip Fuel Used Indicate...

Страница 143: ...s off after 60 seconds or if the ESCAPE button is depressed 3 Trip Odometer 1 and 2 Allows the operator to see the distance travelled since the last reset You can reset the trip odometer 1 or 2 in this menu To reset depress ENTER button use UP DOWN button to select between odometer 1 or 2 and then hold ENTER button for 1 second 4 Average Trip Speed This function displays the average speed for the ...

Страница 144: ...econd resets the functions listed below This function will permit to the system to calculate new value from the point of resetting Trip Fuel Used Average Trip Speed The Prevost Liaison system provides cellular communication between the driver and the fleet operator The driver can send and receive short text messages which are visible through the Driver Information Display The following menus are a...

Страница 145: ... default gauges On vehicles provided with the I Shift transmission Favorite Display Gauge 3 cannot be edited as it is kept for display of the transmission status Example You whish to display the engine oil temperature at the Gauge 1 position 1 Use UP DOWN button until Gauge 1 position is selected 2 Press ENTER button to confirm Use UP DOWN button to scroll through the available gauges When the eng...

Страница 146: ... to choose a dark background with light text and images or a light background with dark text and images Press ENTER button to toggle between Night and Day 6 Change Password Use this menu to change the current password This menu is only accessible if the correct password is entered The default password is 0000 1 Mark which password is to be changed with the display UP DOWN button 2 Confirm with ENT...

Страница 147: ...SCAPE button select STOP TEST submenu and then press ENTER button twice TEST will disappear from the DID status line For further information concerning these functions refer to section 06 Electrical under Troubleshooting And Testing The Multiplex Vehicles paragraph of the Maintenance Manual The Pre Trip Assistance option is a tool to assist the driver in completing the pre trip inspection of the v...

Страница 148: ...rakesystem Before starting the test through the DID complete the following a Start the engine and check that the brake systems air pressure is greater than 100 psi b Turn engine off c Release the brakes and allow the system to settle air gauge needle stops moving d Press the ENTER button to start the test e If the air tanks pressure is too low to perform the test pressure must be greater than 100 ...

Страница 149: ...pg liter 100km km liter Trip fuel used gallons or liters Trip duration on cruise control hours Trip duration with engine rpm greater than economy rpm hours Trip duration while engine rpm is greater than the desire maximum rpm RPM Limit set in Fleet Limits sub menu hours Trip fuel used with engine rpm greater than the economy rpm gallons liters Trip average speed mph km h Trip duration with speed g...

Страница 150: ...out the conditions required for performing regeneration The status can be OK regeneration allowed CHECK regeneration not allowed or N A not applicable When ATS Status is selected the following sub menus are available Soot Level Gauge From the ATS Status sub menu you can view the soot level for the Aftertreatment system When the soot level is high regeneration is necessary L1 L2 L3 and L4 under the...

Страница 151: ...word protected functions The default password is 0000 1 Password The following menus are password protected and marked with a key symbol in the menus Change Password Fleet ID Reset Trip Data Fault Diagnostics Inactive Faults 3 Cancel REGEN From the Aftertreatment main menu you can cancel a REGEN cycle PASSWORD ...

Страница 152: ...e brake LOW and engine brake HIGH When set to the engine brake LOW mode 50 of the engine brake power will be applied when the driver releases the accelerator pedal Using engine brake HIGH will apply 100 of the braking power It must be noted that since engine brake LOW and engine brake HIGH will reduce vehicle speed upon release of the throttle pedal they may negatively impact fuel consumption if u...

Страница 153: ... ...

Страница 154: ...pproximately 2 Km h 1 25 mph Manually switching to engine brake LOW or HIGH using the steering switches will deactivate the cruise control NOTE When using engine brake LOW or HIGH mode pressing the steering switch OFF button will switch back to the default AUTO mode CRUISE CONTROL SPEED ENGINE BRAKE MODE ENGINE BRAKE FORCE 0 UP TO 100 CRUISE SPEED SET 2 Km h N A N A DRIVER PEDALS ENGINE BRAKE MODE...

Страница 155: ...to maintain vehicle stability and control 100 50 100 ACCELERAT OR PEDAL RELEASED BRAKE PEDAL PUSHED NOTE On vehicles equipped with the Allison transmission if cruise control is enabled the current engine brake mode is saved in the vehicle computer MCM memory and the engine brake mode is set to Auto mode When the cruise control is disabled the engine brake mode changes back to the mode saved in the...

Страница 156: ... controlled according to the available grip In this way the vehicle is brought to a stop in the shortest possible time while remaining stable and under the driver s control TRACTION CONTROL SYSTEM TCS TCS controls wheel spin during vehicle acceleration to improve traction The TCS system will intervene automatically and apply braking pressure to a spinning wheel transferring engine power to the oth...

Страница 157: ...to apply less braking pressure than needed or even if you release the brake pedal entirely during an intervention the RSP system will continue to apply the necessary amount of braking pressure automatically to the appropriate wheels to mitigate a potential rollover Yaw Control is a feature that reduces the risk of loss of control If a vehicle s tires start to slide during a turn Yaw Control counte...

Страница 158: ... spinning slipping or losing traction flip the DCDL control switch to the LOCK position while maintaining a constant vehicle speed 2 Let up momentarily on the accelerator to relieve torque on the gearing allowing the DCDL to lock 3 When the DCDL is fully locked the vehicle will have an understeer condition when making turns Proceed cautiously over poor road conditions UNLOCKING THE DCDL When the v...

Страница 159: ...he right lateral console The valve can be switched to either LOW BUOY or NORMAL positions A warning light on the dashboard will indicate that the coach is being lowered Refer to Controls Instruments chapter CAUTION Avoid parking the coach too close to the sidewalk or to other obstacles which could damage the coach during kneeling CAUTION Avoid parking too close to the curb or other obstacles that ...

Страница 160: ...r the tag axle while the coach is moving When the tag axle is in the WHEELS UP position the corresponding indicator light will illuminate The indicator light will start flashing and an audible alarm will sound to warn the driver if the vehicle speed exceeds 12 mph 20 km h with tag axle raised The tag axle can be raised in tight maneuvering areas like in a parking lot or to make it easier to turn a...

Страница 161: ...rect heating surfaces of the heat exchanger The heat exchanger transfers the heat to the Other Features 5 27 coolant water passing through the heat exchanger LOCATION OF PREHEATER 18607 The heater is thermostatically controlled and operates intermittently i e the switched on time of the burner varies depending on the heat requirement The water temperature is controlled by the built in water thermo...

Страница 162: ... The time of day is stored day of week flashes 4 Press 8 or 9 button to set the correct day of week 5 Wait 5 seconds The day of week is stored Viewing the Time Ignition ON Continuous display of current time and day of the week Viewing the Time Ignition OFF Briefly press button 5 to display current time and day for 5 seconds Switching Heater ON Instant Heating With Ignition ON Press button 7 Heater...

Страница 163: ...tenance Manual and to Webasto manual for more information WHEELCHAIR LIFT SYSTEM Read and understand the RICON Service Owner Manual before attempting to use the wheelchair lift The instructions below are a quick reference and serve to complement the information provided by RICON Activate the lift mechanism circuit by pressing down on the wheelchair rocker switch on the dashboard NOTE By repeatedly...

Страница 164: ......

Страница 165: ... other vehicles or large objects Turn on the POWER ENABLE switch and then control each lift motion by pressing an appropriate button The POWER ENABLE switch provides power to the pendant and thereby enables the lift When turned on the power switch and each button illuminate When operating the lift be careful the control wire doesn t bind with the lift mechanism Using the handheld control pendant d...

Страница 166: ...r and passenger when they are located this far from doorway TWS AREA 23371 2 Turn power to lift on LED on TWS module will light steady and indicator light on the control device illuminates If wheelchair and passenger are detected by acoustic sensors the LED will flash the buzzer will sound and the module red light will flash If this occurs it is necessary to adjust aiming of sensors 3 Turn sensor ...

Страница 167: ...ger actuated switch that sets the sensor timing Insert a 1 16 inch diameter wire like object into the access hole and press the plunger inward The LED will flash momentarily while the module establishes the distance and then remain on steady Release the plunger when the LED ceases to flash EMERGENCY OPERATION In the event of electrical power loss manual operation of the lift is possible as explain...

Страница 168: ...ttendant must follow the instructions to ENTER or EXIT the vehicle as previously described To manually lower the platform Slowly pull the pump release valve actuating rod DOWN until th platform begins to lower Allow the platform to reach ground level Push the pump release valve actuating rod back UP until lightly snug Using the rollstop manual control knob and one hand on the rollstop OPEN the rol...

Страница 169: ... stow position the platform frame must be parallel to the side of the lift enclosure If the exact position cannot be obtained slightly low is preferred to slightly high Using the rollstop manual control knob and one hand one the rollstop close the rollstop until it latches ...

Страница 170: ...llstop manual control knob and one hand on the rollstop close the rollstop until it latches Use one person on each side of the lift to prevent mechanical binding With fingers up and palms forward push the platform forcefully to start the lift moving inward As the lift begins to move inward maintain a constant pushing motion until the lift comes to rest completely inside the lift enclosure Push fir...

Страница 171: ...e the two rear telescopic legs onto the platform then turn telescopic leg crank to be able to clear the stops Remove platform completely Lower the platform to minimum height using the telescopic leg cranks before moving it NOTE There are two telescopic legs for each platform side The proper side is indicated onto the telescopic leg WARNING For better stability keep the platform at minimum height w...

Страница 172: ...seats on one side of the coach must be folded and slid away Seats may be folded on both sides of the coach to make room for a second wheelchair POSSIBLE SEATING ARRANGEMENTS 2 3 2 5 9 A n electrical wheelchair or tri wheeler may require sliding back seats from both sides of the coach to allow enough turnaround space FOLDING SEATS 18430 To fold a set of seats raise the seat back then lift up the se...

Страница 173: ...ractors haveattaching pins to secure the occupant s lap belt Theymust be placed at the rear of the wheelchair Each tiedown retractor slots into a mounting floor pocket WHEELCHAIR ANCHORAGE SYSTEMS 23266 To anchor the retractors lift the floor pocket cover push in the retractor anchor then slide it until it locks in place Hook one wheelchair restraint belt to each corner of the wheelchair frame not...

Страница 174: ...on the retractor Unhook the wheelchair and allow the belts to retract Guide the belts in making sure they remain untwisted as they retract Wheelchair Occupant Restraint Secure the wheelchair occupant in the following manner Fasten and adjust the lap belts so it sits snug across the hips Make sure that you place the lap belt buckle on the center aisle side Fasten the shoulder belt by inserting the ...

Страница 175: ...button on the shoulder belt buckle first and then unfasten the lap belt by pressing the red release button on the lap belt buckle CAUTION The safety belt buckle provided with the red release button must always be located on the center aisle side ...

Страница 176: ......

Страница 177: ...ENGINE COMPARTMENT 2 STOPPING THE ENGINE 3 COLD WEATHER STARTING 3 JUMP STARTING 3 ENGINE PROTECTION SYSTEM 5 AUTOMATIC ENGINE SHUTDOWN 5 IDLE SHUTDOWN TIMER 5 ENGINE BLOCK HEATER 5 ENGINE WARM UP 6 ALLISON TRANSMISSION WARM UP 6 I SHIFT TRANSMISSION STARTING THE VEHICLE AT LOW TEMPERATURES 6 STARTING THE VEHICLE AFTER A FIRE ALARM 6 ...

Страница 178: ...MENT Switches to start and stop the engine from inside the engine compartment are mounted on a small panel above the air filter Set the battery master switches ignition and master cut out to the ON position Set the starter selector switch to the REAR START position CAUTION Do not engage starter for more than 15 seconds at a time If engine does not start within 15 seconds release ignition key and l...

Страница 179: ...same length of time as the preheat time Engines not equipped with an intake air preheater may depending on coolant temperature take longer to start If this should happen DO NOT release the ignition key until the engine has started while still observing the 15 second maximum cranking time JUMP STARTING In order to avoid damage to solid state electrical DANGER Do not wear loose clothing when working...

Страница 180: ...nts it is important that jumper booster cables be used correctly and only in emergencies To jump start use another 24 volt DC negative grounded power source Use only jumper cables rated at 500 cranking amperes ...

Страница 181: ...dures are not precisely followed WARNING Before attempting to jump start make sure the parking brake is applied and the transmission is in neutral N Turn off all lights heaters and other electrical accessories WARNING Wear eye protection and remove rings metal jewelry and watches with metal bands CAUTION Choose a booster vehicle which produces comparable amperage as your vehicle DANGER The gases s...

Страница 182: ...everse order given in steps 2 through 5 Install protective cap on the booster block terminal CAUTION Do not let the two vehicles touch Keep a walk through distance between the two vehicles Make sure positive red and negative black jumper cable clamps do not touch CAUTION Never connect the jumper cable to the negative terminal post of the run down battery CAUTION Do not jump start if a maintenance ...

Страница 183: ...e After the automatic engine shutdown sequence the engine may be restarted To do so turn the ignition switch to the OFF position during 7 seconds and then turn it back to ON However it will only operate for 30 seconds unless the problem is resolved IDLE SHUTDOWN TIMER The optional idle shutdown timer is programmed to shut down the engine after a specific engine idling time The idling time cannot b...

Страница 184: ... immediately and have the condition corrected NOTE The engine will reach normal operating temperature shortly after driving Avoid driving at full throttle until engine coolant temperature reaches 140 F 60 C CAUTION Connect only to a 110 120 VAC power source Use only grounded three prongs extension cords with a minimum rated capacity of 15 amps Disconnect the extension cord before starting Before d...

Страница 185: ... I O N STARTING THE VEHICLE AT LOW TEMPERATURES For outside temperatures between 4 F 20 C and 22 F 30 C the transmission will require a warming up phase once the engine is started The engine must be operated for at least 10 minutes with the vehicle at a standstill until the transmission oil has warmed up For outside temperatures below 22 F 30 C warm air must be used to heat the transmission up to ...

Страница 186: ...ATCHET 12 WARNING REFLECTORS 12 JACK TOOLS 12 SPARE PARTS KIT 12 LIMP HOME BELT 12 Lower alternator failure 12 SPARE WHEEL AND TIRE 12 CHANGING A WHEEL 13 SUPER SINGLE TIRE REPLACEMENT 13 JACKING POINTS 14 HYDRAULIC JACK 15 LIFTING AND TOWING 15 Tow eyes as lifting point 15 Front axle as lifting point 16 TOWING WITHOUT LIFTING 16 VOLVO I SHIFT ALTERNATE TOWING MODE 17 DAYTIME RUNNING LIGHTS 18 FOG...

Страница 187: ...the release bar and push the bottom of the window outwards as illustrated below The window is hinged from the top and will not fall out A telltale light on the dashboard illuminates when a window is opened Refer to Controls and Instruments chapter for more information To close the window tilt up the release bar and pull the window back Push down the release bar to lock shut SIDE WINDOW EMERGENCY E...

Страница 188: ...he front service compartment and allows opening the door from the outside To open the door in an emergency situation first turn the unlatch valve in the direction of the arrows and push or pull the door open To close the door after emergency opening return the valve to its initial position open the door using the door cylinder then close the door normally NOTE In the event of ventilation blower mo...

Страница 189: ...INTERIOR UNLATCH AIR VALVE 12164 ...

Страница 190: ...7 4 Safety Features and Equipment UNLATCH AIR VALVE LOCATION 12209 ...

Страница 191: ... a 15 second time delay the engine is automatically shut down The fire extinguisher is discharged simultaneously with engine shutdown AFSS SYSTEM OVERVIEW Operational sequence fire 1 A fire detector or linear thermal detector detects a fire in the engine compartment and sends a signal to the Protection Panel in the driver s area The fire ALARM lamp on the Protection Panel will illuminate solid red...

Страница 192: ...an audible alarm will sound 2 The operator shall bring the vehicle to a safe stop ...

Страница 193: ...A FIRE ALARM The vehicle may be started after a fire alarm without resetting the system Refer to ignition switch sequence below This will not reset the system rather it will instruct the vehicle s multiplex system to ignore vehicle interface outputs from the Protection Panel This feature is intended to be used only in emergency situations that require the vehicle to be restarted and moved a short ...

Страница 194: ... and the vehicle multiplex system This confirms the communication between the TPMS display and CECM Settings Menu Set Wheel ID Learn Wheel ID This menu allows learning new wheel sensors ID The user can learn only one wheel several wheels or all wheels of the vehicle The sequence automatically jumps to the next wheel such that a user can initiate all wheels without having to come back to the displa...

Страница 195: ...ves the axle wheel to the next one in the sequence waiting for another sensor to come up with a pressure change Within one learning session the display remembers which sensor has been assigned and it will not assign it twice The sequence increments to the next wheel on the same axle counting wheels from left to right and then moves to the next axle counting axles from front to rear The display act...

Страница 196: ...elect values outside the valid range Safety Features and Equipment 7 9 Alarm Settings When selecting the Alarm Settings Menu a sub menu containing Pressure Alarm and Temperature Alarm appears When selecting Pressure Alarm the screen pressure alarm shown below appears A similar screen is defined for temperature settings The cursor can be moved to highlight the number beside new value ACCEPT or EXIT...

Страница 197: ...7 10 Safety Features and Equipment Pressing OK when EXIT is highlighted exits without changes Display Settings Units Languages Backlight Intensity Key Sound Turns key press sound ON OFF ...

Страница 198: ...eshooting Guide on Tire Pressure Monitoring System TPMS FIRE EXTINGUISHERS Depending on selected options two fire extinguishers may be located under the first row seats A decal at the bottom of each of the trapezoidal windows in the first row indicates the location of fire extinguishers Instructions for use are found on the extinguishers WARNING Make sure you know how to operate the fire extinguis...

Страница 199: ...r confirms the presence of a fire extinguisher A DECAL INDICATES THAT A FIRE EXTINGUISHER OPTION IS LOCATED IN THIS OVERHEAD COMPARTMENT FIRST AID KIT FIRST CURB SIDE OVERHEAD COMPARTMENT 23141a The optional first aid kit is stored in the first curb side overhead storage compartment A white cross over red background decal identifies the first aid kit location Fire hatchet First aid kit ...

Страница 200: ... LOCATION 23377 SPARE PARTS KIT The vehicle may be equipped with a spare parts kit optional The kit contains parts such as bulbs circuit breakers belts etc The spare parts kit is stored in the first baggage compartment LIMP HOME BELT In case of malfunction of the lower alternator install the limp home belt on the upper alternator The installation of the belt allows the coach to be driven to a repa...

Страница 201: ...RE WHEEL AND TIRE The spare wheel and tire is located in a compartment behind the reclining front bumper In case of a flat tire turn ON the hazard flashers and bring the coach to a stop on the side of the ...

Страница 202: ...to damage the stud threads 5 Screw in the wheel nuts according to the sequence shown in the following figure and tighten slightly more and repeat the sequence a few times to position the wheel correctly Once tightening induces wheel spin lower the coach for final tightening 6 Tighten the nuts progressively in the sequence shown Final tightening should be done using a torque wrench Dry tightening t...

Страница 203: ...NOTE Periodically check the spare s inflation pressure Tire pressure should be the maximum pressure specified in the chart NOTE ...

Страница 204: ...ocation of jacking points JACKING POINTS ON FRAME 18618 FRONT END JACKING POINTS 18592 Periodically check that the spare is securely fastened in its compartment The suspension of the vehicle must be in the normal ride position before jacking WARNING Before driving be sure the flat tire track jack and tools are securely reinstalled in their respective compartments Check that the bumper is securely ...

Страница 205: ...hydraulic jacks can be used Only jack at the specified jacking points Jack must support the following capacities Front axle 20 000 lb 9 100 kg WARNING WARNING Always unload or retract the tag axle before jacking the vehicle from the front and drive axle jacking points to prevent damage to suspension components WARNING The jacking points on the tag axle must be used for raising the tag axle only ...

Страница 206: ...s since no other lifting points are recommended Lifting and towing from any other point are unauthorized as it may cause serious damage to the structure Do not unload or raise the tag axle when lifting and towing to prevent overloading the drive axle 1 Remove both drive axle shafts to prevent damage to the transmission Plug axle tube to prevent oil loss Refer to Rockwell s Maintenance manual no 5 ...

Страница 207: ... point a Use the tow eyes fixed to the vehicle frame between the front axle and the front bumper TOW EYES UNDER VEHICLE 18401 b Install axle forks onto tow bar position axle forks around beam and into tow eyes ADEQUATELY SECURE THE TOW EYES TO THE TOW TRUCK LIFTING ATTACHMENT WITH CHAINS serious damage to the transmission Do not attempt to push or pull start the coach ...

Страница 208: ...smission Plug axle tube to prevent oil loss Refer to Rockwell s Maintenance manual no 5 annexed at the end of Section 11 Rear Axle of the maintenance manual CAUTION Make sure a safe distance is kept between the front of the coach and the tow truck This space ensures that coach does not suffer damages when being towed CAUTION Do not tow the vehicle without external air pressure applied to the emerg...

Страница 209: ...CAUTION Transmission lubrication is inadequate when towing With automatic semi automatic or manual transmission the axle shafts or driveshaft must be disconnected to avoid ...

Страница 210: ...3 HR will be engaged if conditions below are fulfilled in the following sequence A Ignition key must be in the ON position B Engine not running C Adequate air pressure to the gearbox Vehicle must have electrical power D Shift pad must be in neutral E Vehicle must be towed FORWARD only serious damage to the transmission Do not attempt to push or pull start the coach CAUTION Do not tow the vehicle w...

Страница 211: ...ich provides the driver with visual assistance when backing up The monitor may be mounted on the left side pillar It switches ON automatically when the transmission is in the reverse R range BACK UP ALARM The back up alarm alerts pedestrians and other drivers when the vehicle is being backed up Take extra precautions whenever backing up If necessary use a guide to provide directions when backing u...

Страница 212: ...at the ON position on a vehicle with a CAN defective or certain functions will start up by themselves Disconnect the charger before starting the vehicle if not the default functions will not activate If the default mode does not activate try to turn the ignition OFF while ensuring that no charger is connected and then restart the vehicle ...

Страница 213: ......

Страница 214: ... OIL LEVEL 7 POWER STEERING FLUID LEVEL 9 COOLING FAN RIGHT ANGLE GEARBOX OIL LEVEL 9 DRIVE AXLE WHEEL BEARING OIL LEVEL 10 FRONT AND TAG AXLE WHEEL HUBS 10 COOLANT FLUID LEVEL 10 WINDSHIELD WASHER HEADLIGHTS WASHER RESERVOIRS 10 OTHER VERIFICATIONS 11 AIR TANK PURGE 11 FIRE EXTINGUISHERS 11 PRIMARY FUEL FILTER 11 A C COMPRESSOR BELTS 12 FAN AND ALTERNATOR DRIVE BELTS 12 BACK UP CAMERA 12 AIR FILT...

Страница 215: ...8 2 Care and Maintenance EXTERIOR LIGHTING VERIFICATION 16 FIRST SERVICE ON NEW VEHICLE 18 ENGINE OIL 18 COOLANT SYSTEM FILTER 18 GENERAL RECOMMENDATIONS 18 WALK AROUND INSPECTION BEFORE EVERY TRIP 22 ...

Страница 216: ...ic Beverage Stains Remove alcoholic beverage stains by wettingthe stain with water then cleaning following method two Burns Scrape burnt area using a knife or razor blade then clean following method two Consult an upholstery specialist when dealing with extensive burns Cosmetic Stains Remove stains left by cosmetics by following method one then method two Ink Stains Remove ink stains following met...

Страница 217: ...s on laminated surfaces with a household detergent methylated spirits or mineral turps Clean with a mild liquid abrasive and water solution if stain persists CARPET Vacuum carpets regularly to prolong carpet life RUBBER COMPONENTS Use only pure water or glycerin to clean stains on rubber components FLOOR CLEANING Clean vinyl floors with a quality nonionic detergent cleaner Follow the manufacturer ...

Страница 218: ...ly with an alcohol based cleaning solution Clean wiper blades using a sponge or soft cloth LAVATORY MAINTENANCE Flush water in the lavatory is recirculated from the sump tank When the sump tank water is too soiled to be recirculated the driver candump it into a suitable dump location Routine draining and filling of lavatory tanks should be performed by maintenance personnel only and should be done...

Страница 219: ... valve back into closed positon When a thorough tank draining is required clean sump tank by repeating the draining and filling operations several times Close valves and drop in a packet of commercial toilet deodorant Prevost part 900329 in toilet before starting final filling of the sump tank FLUID LEVEL VERIFICATION Periodic inspection of oil and fluids levels is the most economical and easiest ...

Страница 220: ......

Страница 221: ...smission oil level refer to Appendix C under Allison transmission oil level check using the pushbutton shift selector in this manual The transmission fluid level dipstick is accessible through the engine compartment rear door and is located on the left side of the engine To check the transmission fluid level a cold check and a hot check must be performed A cold check must be made when the transmis...

Страница 222: ...g the hot check Run the engine between 1 000 and 1 200 RPM forapproximately one minute to purge air from the system With the engine idling and the parking brake applied shift transmission from forward D to reverse TRANSMISSION FLUID LEVEL DIPSTICK TYPICAL 07049 Replace dipstick and tighten the filler tube cap until the rubber seal is correctly seated I Shift Transmission Oil Level Check the transm...

Страница 223: ...d level 4 Add hydraulic fluid until it reaches the FULL mark on the dipstick 5 Replace and tighten dipstick 6 Place engine rear start switch to NORMAL position Close engine compartment doors ENGINE COMPARTMENT 14059 COOLING FAN RIGHT ANGLE GEARBOX OIL LEVEL Check cooling fan right angle gearbox oil level as follows 1 Stop engine open engine compartment doors and place engine rear start switch to O...

Страница 224: ...type specifications or see the label affixed near the coolant surge tank on the vehicle When the coolant level reaches the coolant surge tank level sensor the STOP telltale light illuminates a beeping tone rings and ENGINE COOLANT LEVEL CRITICALLY LOW message appears in the DID Stop the vehicle in a safe location and add coolant to the cooling system surge tank as soon as possible COOLANT LEVEL SI...

Страница 225: ...e extinguisher if pressureis below normal Check that seal on handle is intact Check that hose nozzle is in good condition and the nozzle is free of obstructions Keep fire extinguishers clean PRIMARY FUEL FILTER A primary fuel filter is installed on the engine This filter may consist of a filter cartridge with a drain valve at the bottom or a filter cartridge a water separation bowl and may have a ...

Страница 226: ...ugh the tensioner adjustment screw B Loosen lock bolt A prior adjustment Tighten lock bolt A to 43 lbf ft once completed Belt tension should be within the following values New belts 90 100 lbs Used belts 75 85 lbs Check belt tension using a belt strand tension gauge Once adjustment completed allow theengine to run for about ten minutes Check belt tension and adjust if needed Do not treat belts wit...

Страница 227: ...R DRIVE BELTS These belts have automatic belt tensioner to keep the correct tension without adjustment BACK UP CAMERA The optional back up camera is located on the rear cap To clean the camera s protective glass spray with soapy water Wipe with a clean damp rag or wiper blade ...

Страница 228: ... a red marker is displayed or after a maximum of two years Reset by pressing on the indicator s extremity The filter restriction indicator is located on the engine air intake duct AIR FILTER RESTRICTION INDICATOR 01052 WARNING To avoid injury do not clean camera with transmission in reverse R Shut off engine and apply parking brake before cleaning CAUTION To prevent scratches to the camera protect...

Страница 229: ...tic cover holding the filter and slide out the air filter DRIVER S AREA AIR FILTER GRILL REMOVAL REMOVING DRIVER S SECTION AIR FILTER PASSENGERS AREA AIR FILTER The central HVAC system s air filter is located in the evaporator compartment on driver s side of the vehicle To access open the evaporator compartment An access panel labeled AIR FILTER is located above the evaporator and heating coils It...

Страница 230: ...s immediately Failure to correct leaks can cause severe damage to the equipment as well as increase operating costs due to lost fluids Treat fuel and oil leaks as an immediate fire hazard Hose Service Life Hoses have a limited service life Thoroughly inspect hoses annually Look for surface damage or indications of twisted worn crimped cracked or leaking lines Replace damaged hoses immediately Hose...

Страница 231: ...h 95 psi 655 kPa before releasing parking brake Driving the vehicle while the parking brake is applied should not be possible EXTERIOR LIGHTING VERIFICATION Exterior Lighting Test Mode This useful function allows quick verification of the vehicle exterior lights Activating the test mode When the vehicle is stationary parking brake applied pull up the multi function lever 3 times within 3 seconds t...

Страница 232: ...r switch in second position and confirm that the headlights illuminate Turn on the high beams and check that the corresponding cluster telltale lightilluminates Once these commands tested activate the test mode to check the exterior lighting by pulling up the multi function lever 3 times within 3 seconds Go to the front of the vehicle and check the lights Left and right directional signals Identif...

Страница 233: ...tic transmission does not have a park P position Place transmission in neutral N position and apply parking brake when the vehicle is stopped A warning buzzer will sound if the engine is stopped and the parking brake has not been applied when foot pressure is removed from the brake pedal Always follow the procedures described in this manual Unless stated otherwise shut OFF the engine before perfor...

Страница 234: ...8 20 Care and Maintenance COMPONENTS IDENTIFICATION COMPONENTS REPRESENTATION MAY DIFFER SLIGHTLY FROM AN ACTUAL VEHICLE ...

Страница 235: ...e tank 8 Steering knuckle pins 28 Coolant filter conditioner 9 Steering damper cylinder 29 Engine air filter restriction indicator 1 0 Secondary air tank 30 Engine air filter 11 Kneeling air tank 31 Engine oil dipstick and filler tube 1 2 Air dryer 32 DEF tank 1 3 Height control valve rear 33 Diesel particulate filter 1 4 Wet air tank 34 SCR catalytic converter 1 5 Primary air tank 35 Diesel fuel ...

Страница 236: ... Check windshield and headlights washer reservoir fluid level and add if necessary Step 2 Front of the Coach Check for damage and clean if dirty Check windshield wiper arms for proper spring tension Check wiper blades for any damage dead rubber and attachment to arm Check to see thst there is no mud snow ice build up or other obstruction in front of the ACB radar sensor if applicable Check clearan...

Страница 237: ...eering reservoir fluid level add if necessary Check coolant surge tank fluid level add if necessary Check air cleaner restriction indicator replace air cleaner when red signallocks in full view Check stop light tail light directional signal light and back up light assembly operating clean and proper color Refer to Exterior Lighting Verification in Care and Maintenance chapter Step 7 Rear Left Side...

Страница 238: ...D TESTING 7 AUTOMATIC TRACTION CONTROL ATC ELECTRONIC STABILITY PROGRAM ESP 7 STEERING 8 ELECTRICAL SYSTEM 8 SUSPENSION 8 I BEAM AXLE FRONT SUSPENSION OPTION 8 INDEPENDENT FRONT SUSPENSION 8 DRIVE AXLE 8 TAG AXLE 8 ALIGNMENT SPECIFICATIONS 9 COOLING SYSTEM 9 FUEL SYSTEM 9 EXHAUST SYSTEM 10 HEATING AND AIR CONDITIONING 10 OIL SPECIFICATIONS 10 ENGINE 10 ALLISON TRANSMISSION 10 I SHIFT TRANSMISSION ...

Страница 239: ...9 2 Technical Information VEHICLE IDENTIFICATION NUMBER VIN 13 COACH FINAL RECORD 13 ...

Страница 240: ...Technical Information 9 3 X3 45 OVERALL DIMENSIONS SIDE ELEVATION 18673_1 ...

Страница 241: ...9 4 Technical Information X3 45 OVERALL DIMENSIONS TOP FRONT AND REAR VIEWS 18674_1 ...

Страница 242: ... 2 03 m Entrance door opening width 30 762 mm Front overhang 70 1 80 m Rear overhang 107 1 2 2 73 m Front track 85 9 2 18 m Drive track 76 7 1 95 m Rear track Tag axle 83 6 2 12 m Turning circle radius I Beam Axle 47 3 14 4 m Turning circle radius independent suspension 43 9 13 3 m Curb weight 36 000 lb 16 327 kg Gross Vehicle Weight Rating G V W R 49 600 lb 22 498 kg Front axle Gross Axle Weight ...

Страница 243: ...sidered as Volvo or Prevost s responsibility However Volvo engines are certified to comply with U S EPA and California emissions standards based upon the use of test fuels with specifications established by these regulatory agencies Cooling system 18 7 U S gal 71 l Allison Automatic Transmission does not include external circuit 6 U S gallons 23 l 6 9 U S gallons 26 l with retarder I Shift Transmi...

Страница 244: ... 55 R22 5 load range L RECOMMENDED TIRE INFLATION PRESSURE AT MAXIMUM COLD LOAD The recommended tire inflation pressures are given in the applicable documents supplied with the vehicle In addition minimum cold tire inflation pressures are listed on the Department of Transport DOT certification plate affixed on the left wall near the driver s seat Vehicle equipped with TPMS The TPMS target pressure...

Страница 245: ...wer maximum allowable speed limit even below posted speed limit For maximum safety check with tire manufacturer Use Model Qty Cooling fan drive belt Multi V 14 Rib 14PK2665 1 A C system Bitzer 4NFCY compressor V Belt BX71 2 Alternator twin Bosch Multi V 8 Rib 8PK1575 1 Alternator emergency Multi V 8 Rib 8PK1512 1 Coolant pump Multi V 10 Rib 10PK1512 1 NOTE Belts specifications may vary For proper ...

Страница 246: ...ar driven water cooled and engine oil lubricated air compressor ANTILOCK BRAKING SYSTEM ABS The antilock braking system has one Electronic Control Unit ECU controlling a four channel system A wheel slip sensor is mounted at each front axle and drive axle wheel The Tag axle wheels are slave to the drive axle wheels The Electronic Control Module ECM is maintenance free Its operating voltage is 24 6 ...

Страница 247: ...tenance free batteries connected in series parallel Cold cranking capacity is 1900 amps with a reserve capacity of 195 minutes 100 amp battery equalizer SUSPENSION Goodyear rolling lobe type air springs bellows are used throughout I BEAM AXLE FRONT SUSPENSION OPTION 2 Bellows 12 for a G A W R of 16 500 lb 2 Shock absorbers 4 Radius rods 1 Transverse radius rod 1 Height control valve 1 sway bar 1 d...

Страница 248: ... 0 12 5 0 375 Right caster 2 0 2 75 3 5 Left caster 2 0 2 75 3 5 Total toe 0 04 0 06 0 08 INDEPENDENT FRONT SUSPENSION Minimu m value Nomin al value Maximu m value Right camber 0 0 0 150 0 3 0 Left camber 0 0 0 150 0 3 0 Right caster 2 35 2 6 2 8 5 Left caster 2 35 2 6 2 8 5 Total toe 0 04 0 06 0 0 8 DRIVE AXLE MERITOR Minimu m value Nomin al value Maximu m value Thrust angle 0 1 1 Total toe 0 18 ...

Страница 249: ...ers fuel tank centrally located Equipped with Anti spill device Safety filler cap on right side of coach Pressure relief valve Electric fuel gauge Low level signal at 26 US gallons 98 4 liters Primary filter 25 microns standard Primary fuel filter with electrical water indicator Volvo D13 Fuel pro 382 filter available as an option as a primary filter Secondary filter 3 to 5 microns Shut off valve ...

Страница 250: ...nal overhead compartment A C The large capacity A C provides adequate capacity of conditioned and filtered air for all climatic conditions Fresh air is drawn into the system from the left driver s side of the vehicle Return air is taken from the middle of the vehicle The driver s heater and defogger are controlled separately from the central unit An air mixture selector enables air to be drawn int...

Страница 251: ...al for more information about oils approved by Volvo DIFFERENTIAL Multigrade gear oil meeting MIL PRF 2105E 85W 140 is recommended for use in the Meritor drive axle This lubricant performs well over a broad temperature range providing good gear and bearing protection in a variety of climates If temperature drops below 10 F 12 C 80W 90 should be used and below 15 F 26 C 75W 90 should be used In ext...

Страница 252: ...pter for information on how to use the timer PLATES AND CERTIFICATION The main components of the vehicle such as engine transmission axles and chassis are identified by different serial numbers It may be necessary to locate these numbers for warranty purposes The engine data plate is located on the rocker cover The engine serial and model number and a list of the optional engine equipment are writ...

Страница 253: ...engine data plate certifies that the engine conforms to federal and any state exhaust emissions regulations ALLISON TRANSMISSION 07076 I SHIFT TRANSMISSION 00040 VOLVO D13 ENGINE DATA PLATE 00052 ...

Страница 254: ...stance Certified according to Provincial State and Federal Safety standards Canadian and US BMCSS FMVSS and CMVSS Other applicable certification labels are affixed to the component DOT CERTIFICATION PLATE This certifies that vehicles manufactured by Prevost Car Inc comply with all Federal Motor Vehicle Safety Standards at the time of manufacture Information such as date of manufacture model year g...

Страница 255: ...replacement parts Using the VIN when ordering parts will facilitate processing COACH FINAL RECORD The Coach Final Record is a record of all data pertaining to the assembly of the vehicle This record is shipped to the new customer via a courier company Retain this record in the company records office for reference and safe keeping NOTE Record the VIN in the vehicle documentation and keep with compa...

Страница 256: ......

Страница 257: ...ntrôle de la stabilité E Eco Roll FAP Filtre À Particules Diesel Particulate Filter DPF FDA Following Distance Alert Alerte de distance FED Fluide d Échappement Diesel Diesel exhaust fluid DEF GECU Gear selector Electronic Control Unit Unité de commande électronique du sélecteur de vitesses G MIC Guide Microphone Microphone du guide HVAC Heating Ventilation and Air Conditioning Chauffage Ventilati...

Страница 258: ......

Страница 259: ...TERATURE 2 NOTICE 2 DECLARATION OF THE MANUFACTURING DEFECTS TO THE GOVERNMENT OF THE UNITED STATES 3 DECLARATION OF THE MANUFACTURING DEFECTS TO THECANADIAN GOVERNMENT 3 DECLARATION OF THE MANUFACTURING DEFECTS TO PREVOST 3 ...

Страница 260: ...erature are available on request and at low cost These can be helpful to mechanics and drivers alike Maintenance Manual Operator s Manual Parts Manual Service Center Directory To order call Prevost Parts toll free 1 800 463 8876 or write to PREVOST PARTS INC 2955 A Watt Street Sainte Foy Quebec Canada G1X 3W1 Specify the complete vehicle serial number Allow 30 days for delivery ...

Страница 261: ...contact NHTSA you may either call the Auto Safety Hotline toll free at 1 800 424 9393 or 366 0123 in Washington D C area or write to NHTSA U S Department of transportation Washington D C 20590 You can also obtain other information about motor vehicle safety from the Hotline DECLARATION OF THE MANUFACTURING DEFECTS TO THE CANADIAN GOVERNMENT If you live in Canada and if you believe that your vehicl...

Страница 262: ......

Страница 263: ... connector on module to see if it is powered Engine ECM is not powered 2 Verify that the engine ECM is powered and get the ignition signal a Check reset circuit breaker CB8 Check replace fuse F74 b Check reset circuit breaker CB2 Check replace fuse F78 None of the Multiplexed functions are operating including the basic limp home functions door o p e n i n g f l a s h e r s wipers in speed 1 Three ...

Страница 264: ...4 Try disconnecting the CECM ...

Страница 265: ...tton is still functioning No temperature control in the passenger area Passenger temperature display indicates two dashes P r o b l e m w i t h t h e temperature sensor located i n t h e e v a p o r a t o r compartment air intake or the sensor wiring Instruct the driver to manually control the temperature by playing with the passenger set point Set above 22 C 72 F to heat and below 22 C 72 F to co...

Страница 266: ......

Страница 267: ...ing Electric horn not functioning Module A45 is not powered or is faulty 1 Check the SYSTEM DIAGNOSTIC menu of Driver Information Display DID Select FAULT DIAGNOSTIC and ELECTRICAL SYSTEM The message No Response ModA45 Active indicates a power problem on the module A CAN network problem would show the same message but doesn t produce these symptoms 2 Check reset circuit breaker CB2 3 Check replace...

Страница 268: ......

Страница 269: ... DID Select FAULT DIAGNOSTIC and ELECTRICAL SYSTEM The message No Response ModA52 Active indicates a power problem on the module A CAN network problem would show the same message but doesn t produce this symptom 2 Check reset circuit breaker CB5 3 Check replace fuse F65 4 Probe gray connector on module to see if it is powered Evaporator fan not functioning Circuit breaker CB3 tripped Module A54 is...

Страница 270: ...aulty 1 Check the SYSTEM DIAGNOSTIC menu of Driver Information Display DID Select FAULT DIAGNOSTIC and ELECTRICAL SYSTEM The message No Response ModA54 Active indicates a power problem on the module A CAN network problem would show the same message but doesn t produce this symptom ...

Страница 271: ...ted to indicate a fire in will deactivate the fire alarm function This the engine compartment has to be repeated each time the vehicle but there is no fire is parked A single light a group of LED lights or another function of the vehicle is not functioning The multiplex outputs are protected in current by an internal soft fuse When an output is shorted it turns OFF and stays OFF until the soft fus...

Страница 272: ...4 Press the push button one time to engage the clutch in 1st speed press a second time to engage in 2nd speed press a third time to stop the fan ...

Страница 273: ...io ns press once again to return to 1st speed If the fan clutch does not engage using this procedure then the clutch is faulty or the wiring between the multiplex module and the clutch is faulty Mechanically lock the fan clutch as described in section 05 COOLING SYSTEM of the maintenance manual ...

Страница 274: ...NE START 3 OIL LIFE MONITOR 3 FILTER LIFE MONITOR 4 TRANSMISSION HEALTH MONITOR 5 DIAGNOSTIC TROUBLESHOOTING CODES DTC ALLISON 5TH GENERATION CONTROLS 7 DIAGNOSTIC TROUBLESHOOTING CODES DTC OVERVIEW 7 USING SHIFT SELECTOR FOR ACCESSING DIAGNOSTICS INFORMATION 7 DIAGNOSTIC CODE DISPLAY ANDCLEARING PROCEDURE 7 DIAGNOSTIC TROUBLE CODE RESPONSE 8 DIAGNOSTIC TROUBLESHOOTING CODES DTC LIST ALLISON 5TH G...

Страница 275: ... 220 F 104 C Transmission in N Neutral Transmission output shaft stopped Oil level sensor present and working 8 To exit the Oil Level Display Mode press any range button R N or D at any time If the fluid level check cannot be completed an Invalid for Display fault is reported Refer to table below to review the codes and conditions 7 High fluid level condition with the number of quarts in excess is...

Страница 276: ...6 Low fluid level is displayed as shown The number indicates the number of quarts of fluid the transmission requires ...

Страница 277: ...equency Display The display is a two digit number denoting percentage of the fluid life which remains New fluid is displayed as 99 The TRANSMISSION SERVICE indicator will be illuminated denoting a required change of transmission fluid when the remaining fluid life reaches approximately 1 The indicator will be lit steadily upon each initialization of the TCM and will remain on steady for approximat...

Страница 278: ...lay window An acceptable filter life status is displayed as OIL FILTER OK An unacceptable filter life status is displayed as REPLACE FILTERS Once the programmed threshold for maximum filter pressure drop has been observed and verified the diagnostic code P088A Transmission Filter Maintenance Alert will be recorded to indicate that the filter has reached the end of its designed life At the next ini...

Страница 279: ...aintenance is needed If any of the clutches except lockup reaches a remaining life of approximately 10 or if any of the clutch running clearances exceeds a maximum value then the TRANSMISSION SERVICE indicator is steadily illuminated from just after ignition on until ignition is turned off Thereafter the indicator will be lit upon each initialization of the TCM and will remain on steady during all...

Страница 280: ...d press Filter Life Monitor F M Present life of filter is acceptable OIL FILTER OK Present life of filter is unacceptable REPLACE FILTERS 4th press Transmission Health Monitor T M Shows TRANS HEALTH OK until remaining life of one or more of the clutch es wear enough so that the programming changes TRANS HEALTH OK One or more of the clutches have worn enough to change the program TRANS HEALTH LO 5t...

Страница 281: ...c algorithm Historical codes which are by definition inactive are codes that are no longer failing their algorithm but are retained in the TCM in order to help the technician analyze possible causes and provide them direction if the vehicle is brought in before they are cleared from the queue DTCs can be cleared manually by the operator or they clear automatically from last d5 to first d1 in the q...

Страница 282: ...Diagnostic Mode Exit the diagnostic mode by one of the following methods 1 Press simultaneously the Upshift and Downshift arrow buttons at the same time on the pushbutton shift selector 2 Press any range button D N or R on the pushbutton shiftselector 3 After approximately 10 minutes of inactivity at the pushbutton shift selector the diagnostic mode automatically exits and returns to normal operat...

Страница 283: ...e TCM a neutral condition with no clutches applied DNA Do Not Adapt The TCM stops adaptive shift control while the code is active DT C Descriptio n CHEC K Light Inhibited Operation Description C131 2 Retarder Request Sensor Failed Low No May inhibit retarder operation if not using J1939 datalink C131 3 Retarder Request Sensor Failed High No May inhibit retarder operation if not using J1939 datalin...

Страница 284: ...65 8 Actuator Supply Voltage 1 HSD1 Low Yes DNS SOL OFF hydraulic default P065 9 Actuator Supply Voltage 1 HSD1 High Yes DNS SOL OFF hydraulic default P070 3 Brake Switch Circuit Malfunction No No Neutral to Drive shifts for refuse packer TCM inhibits retarder operation if a TPS code is also active P070 8 Transmission Range Sensor Circuit High Input Yes Ignore defective strip selector inputs ...

Страница 285: ...ut Fault Yes None P072 0 Output Shaft Speed Sensor Circuit Yes DNS Lock in current range P072 1 Output Shaft Speed Sensor Circuit Performance Yes DNS Lock in current range P072 2 Output Speed Sensor Circuit No Signal Yes DNS Lock in current range P072 5 Engine Speed Sensor Circuit No Default to turbine speed P072 6 Engine Speed Sensor Circuit Performance No Default to turbine speed P072 7 Engine S...

Страница 286: ... High Yes None P088 A Transmission Fluid Filter Maintenance Alert No None P088 B Transmission Fluid Filter Maintenance Required No None P088 0 TCM Power Input Signal No None P088 1 TCM Power Input Signal Performance No None P088 2 TCM Power Input Signal Low Yes DNS SOL OFF hydraulic default P088 3 TCM Power Input Signal High No None P089 4 Unexpected Mechanical Gear Disengagement Yes DNS Lock in f...

Страница 287: ...hift Solenoid 2 SS2 Control Circuit High Yes 7 speed Allow 2 through 6 N R P097 A Shift Solenoid 1 SS1 Control Circuit Open Yes Lock in range P097 B Shift Solenoid 2 SS2 Control Circuit Open Yes 7 speed Allow 2 through 6 N R P098 9 Retarder Pressure Sensor Circuit Low No None P099 0 Retarder Pressure Sensor Circuit High No None P173 9 Incorrect Low Gear Ratio Yes Command 2nd and allow shifts 2 thr...

Страница 288: ...ure Control Solenoid 4 PCS4 Control Circuit Open Yes DNS SOL OFF hydraulic default P272 0 Pressure Control Solenoid 4 PCS4 Control Circuit Low Yes DNS SOL OFF hydraulic default P272 1 Pressure Control Solenoid 4 PCS4 Control Circuit High Yes DNS SOL OFF hydraulic default P272 3 Pressure Control Solenoid 1 PCS1 Stuck Off Yes DNS RPR P272 4 Pressure Control Solenoid 1 PCS1 Stuck On Yes DNS RPR P272 ...

Страница 289: ...elector P280 8 Pressure Control Solenoid 6 PCS6 Stuck Off Yes DNS RPR P280 9 Pressure Control Solenoid 6 PCS6 Stuck On Yes DNS RPR P281 2 Pressure Control Solenoid 6 PCS6 Control Circuit Open Yes DNS SOL OFF hydraulic default P281 4 Pressure Control Solenoid 6 PCS6 Control Circuit Low Yes DNS SOL OFF hydraulic default P281 5 Pressure Control Solenoid 6 PCS6 Control Circuit High Yes DNS SOL OFF hyd...

Страница 290: ... Gear Shift Module Shift Selector 1 Yes Maintain range selected observe gear shift direction circuit U059 2 Invalid Data Received From Gear Shift Module Shift Selector 2 Yes Maintain range selected observe gear shift direction circuit ...

Страница 291: ... 05 Flame detector Wiring Defective flame detector Damaged wiring open or short circuit Replace flame detector 6X Flashes F 06 Temperature sensor Wiring Defective temperature sensor Damaged wiring open or short circuit Replace temperature sensor 7X Flashes F 07 Fuel solenoid valve Wiring Defective solenoid valve Damaged or corroded wiring open or short circuit Replace solenoid valve 8X Flashes F 0...

Страница 292: ......

Страница 293: ...a CAN D BUS network problem Antennas power is short circuited or defective Cycle the ignition between the ON and OFF position then check if TPMS telltale indicator illuminates for 3 seconds NO Check TPMS ECU fuse F26 3A YES Disconnect TPMS ECU connector and p r o b e t o c o n f i r m proper 12V power Check CAN D BUS network between TPMS and display Remove a tire to check if the sensor was install...

Страница 294: ...ected using the ANTENNA STATUS menu all that Check 2 Appendix E TPMS Troubleshooting Guide NOT ALL TIRES MONITORED Possible causes Wheels tires h a v e b e e n c h a n g e d a n d sensors ID has not been reprogrammed into the display Wheels have been installed without sensors One of the antennas is defective or not properly connected ...

Отзывы:

Похожие инструкции для X3-45 COACH