Pretorian EnvirON Скачать руководство пользователя страница 6

Of course the above description is simply an example of a typical configuration and yours may 

differ.  However,  provided  you  follow  these  instructions  and  fill  in  the  provided  Configuration 

Chart and Infra-Red Chart (if you’re using the Hub) as you go along, setting up should always be 

straightforward. If you run into any difficulties during set-up, please re-read this manual and if you 

still experience problems, please contact your local dealer or Pretorian for assistance.

Learn Mode allows you to configure some additional settings on your 

EnvirON Remote

. There are 

five settings in all and the default settings will be suitable for most users, meaning that you may 

not need to change any of the settings.

If you do need to make changes to the settings, enter Learn Mode by pressing and holding Pair/

Learn [6] until a warbling tone is heard. The unit is now in Learn Mode and will display the first 

setting on the display [3] and the LED [2] adjacent to the first touch pad will light to indicate which 

setting is being viewed.

To make a change to any setting, press Function [7] until you see the correct setting on the display. 

Once you are happy with the setting, press Pair/Learn to advance to the next setting. The display 

will change to show the next setting and the next LED will light adjacent to the touch buttons.

If you don’t wish to make a change to a particular setting, simply press Pair/Learn to advance to 

the next one. Once all five settings have been viewed, pressing the Pair/Learn button again will 

exit Learn Mode. A warbling tone will confirm that you are leaving Learn Mode and the settings will 

be saved in memory. They are retained even if the battery runs flat.

Learn Mode

Learn Mode 1- Switch Scanning Mode.

LED adjacent to touch sensor 1 lights.

This sets the switch scanning mode and is used 

whenever  the  user  elects  to  control 

EnvirON 

Remote

  using  switch  scanning.  This  setting 

is  ignored  if  the  user  elects  to  make  use  of 

the touch pads. Please refer to the Section on 

Switch Scanning below for more details.

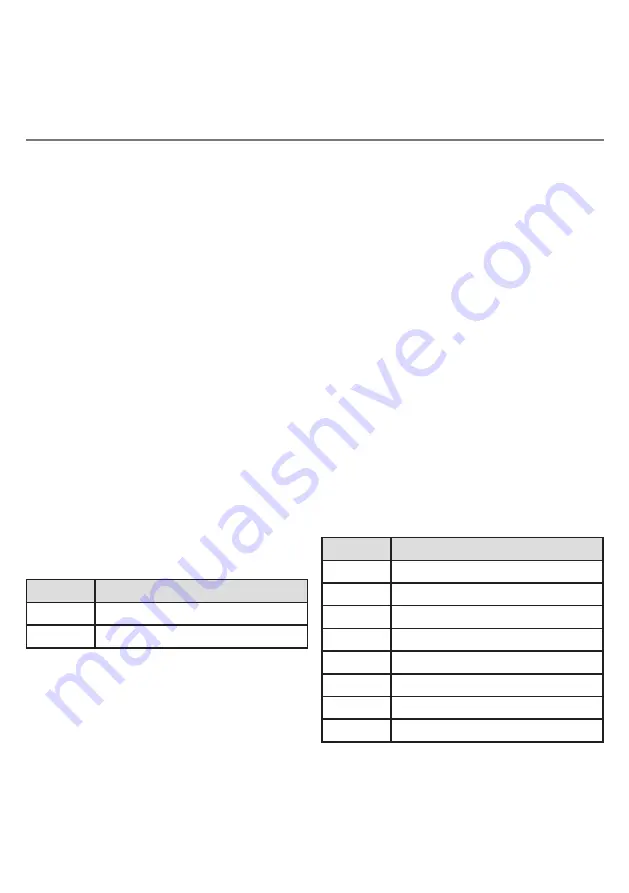
Learn Mode 2- Single-Switch Scanning Period.

LED adjacent to touch sensor 2 lights.

When  single-switch  scanning  is  used,  this 

setting defines the rate at which the scanning 

progresses, i.e. the time between each step.

Once you see the correct setting on the display, 

press Pair/Learn to advance to the next Learn 

Mode:

Once you see the correct setting on the display, 

press Pair/Learn to advance to the next Learn 

Mode:

Display

Setting

1

Single-switch scanning (default)

2

Two-switch scanning

Display

Setting

1

0.8 seconds

2

1 second

3

1.5 seconds (default)

4

2 seconds

5

2.5 seconds

6

3 seconds

7

3.5 seconds

8

4 seconds

Содержание EnvirON

Страница 1: ...for use with a single receiver making programming very straightforward The function of each button may be configured using the built in display For users who may have difficulty using the touch buttons two 3 5mm sockets on the rear of the unit allow one or two switch scanning to be used instead Theunithasabuiltinrechargeablelithium ionbattery to provide several days of use between charges or it ma...

Страница 2: ...Can control wireless and infra red devices Does not need to be in line of sight of infra red devices Single or two switch scanning option Built in rechargeable battery Free standing or mountable Works simultaneously with other EnvirON devices and the EnvirON App Requires EnvirON Hub 3 4 5 by FUNCTION PAIR LEARN 1 2 2 1 10 6 8 9 7 ...

Страница 3: ...he adjacent LED flashing Now press and hold the Pair button 6 on EnvirON Remote and then touch button 1 Once pairing has taken place usually no more than 1 second the flashing LED on iClick lights steadily for a few seconds EnvirON Remote displays P on its display 3 and button 1 LED also lights You may now release both PAIR and the touch button Next begin pairing touch button 2 with iClick socket ...

Страница 4: ...n Connect Allofthesearewirelessdevices When choosing the Function of each touch button you can decide whether the device is on only for the time you touch the button Momentary whetheritchangesfromontooffandviceversa each time the button is touched Latched or whether it turns on for a certain period of time Timed Which of these you choose depends to a large extent on the type of device you are cont...

Страница 5: ...xtinguished to save power Should this occur during programming simply press Function repeatedly to get back to the touch button you wish to configure and continue as described above If you intend to use the unit s touch buttons the unit is now fully configured and ready to use with your chosen devices If you re a switch scanning user or you would like to change any of the other settings please ref...

Страница 6: ...change to show the next setting and the next LED will light adjacent to the touch buttons If you don t wish to make a change to a particular setting simply press Pair Learn to advance to the next one Once all five settings have been viewed pressing the Pair Learn button again will exit Learn Mode A warbling tone will confirm that you are leaving Learn Mode and the settings will be saved in memory ...

Страница 7: ...s generally best to keep the setting at 1 Please note however that the touch sensors do not operate when the unit is in low power mode so it can only be woken by pressing the buttons on the rear of the unit or the scanning switches Low power mode may therefore prove difficult for touch pad users who lack the dexterity to press the buttons on the rear of the unit In this event it may be beneficial ...

Страница 8: ...ng stops to conserve battery life It may be re started at any time by pressing the switch The scanning rate may be changed at Learn Mode 2 to suit individual users To stop scanning at any point simply press the switch To then operate that particular touch pad press the switch again You may operate the touch pad any number of times while its adjacent LED 2 is lit After a period of not operating the...

Страница 9: ...ltageandspecificationtopreventdamagetotheunit Pleasecontactyourlocaldistributor or Pretorian Technologies directly to purchase a replacement In certain circumstances it may be useful to manually power the unit off for example when transporting it To achieve this press and hold the Function switch 7 for 5 seconds As it powers off all the segments of the display light momentarily to show that it is ...

Страница 10: ...leshooting Symptom Possible Cause No power to EnvirON Remote Touch pads do not respond when touched Scan switch in socket 1 doesn t do anything Nothing happens when I press a touch pad Batteryflat Batteryflat Unitgoneintopowersaving mode Unitisinsingle switch scanningmode Touchpadnotpairedwitha receiver Touchpadsettothewrong Function Remedy Plugwalladapterintounitandensure thechargingLEDlights Rec...

Страница 11: ...Notes ...

Страница 12: ...7 Corringham Road Industrial Estate Gainsborough Lincolnshire DN21 1QB UK Tel 44 0 1427 678990 Fax 44 0 1427 678992 EnvirON is a registered trademark of Pretorian Technologies Ltd S040113 Refers to firmware version 82 0 onwards ...

Отзывы: