background image

Page 6 of 16

Insert cams into the Back Panel (C3)

Step 3: 5 Minutes

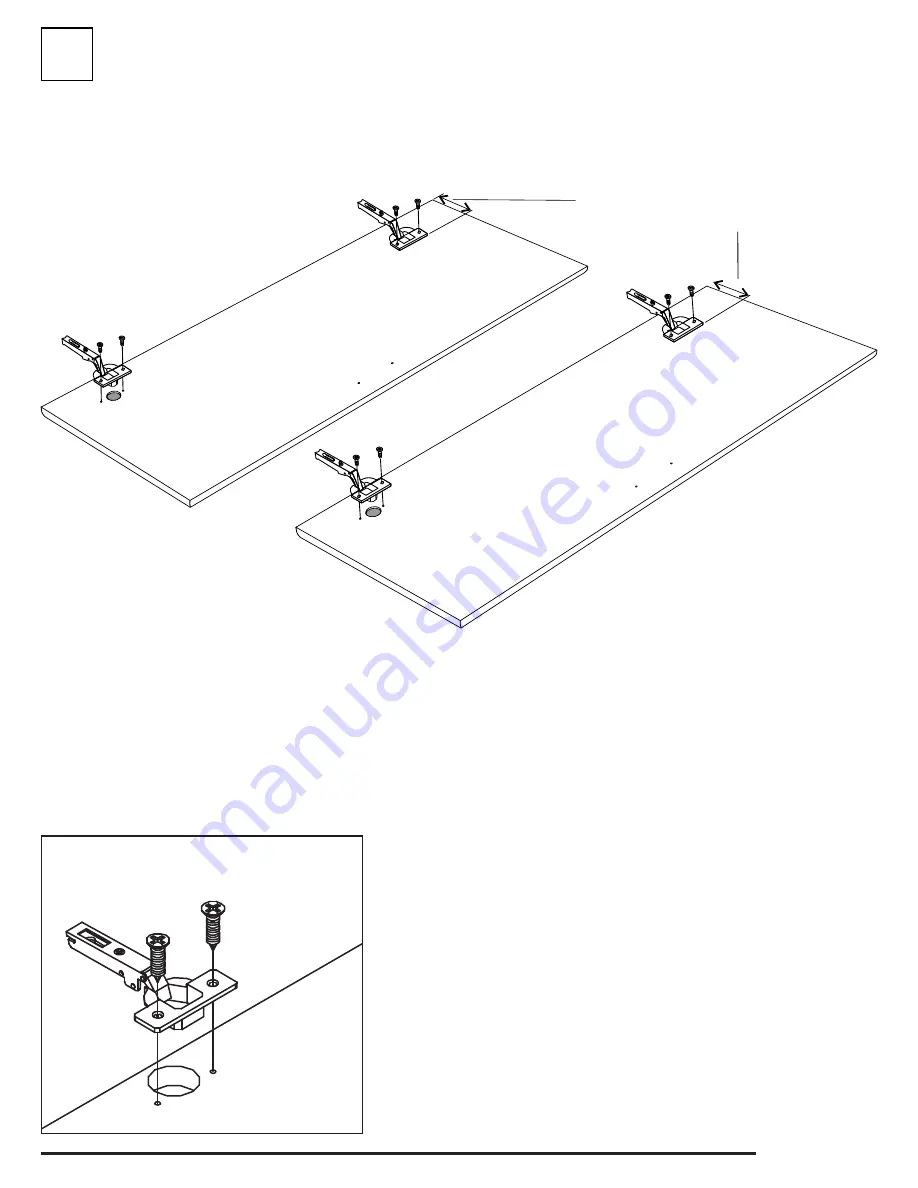
Hinge edge should be 

parallel to door edge

#6 - 5/8” Screw

X2 

NOTE: Depending on your installation, you may want to attach the cabinet to the wall or other cabinets 

before you attach the doors. Refer to the ELITE STORAGE INSTALLATION GUIDE on pages 9-12

REMARQUE : selon le type d’installation choisi, vous pourriez devoir fixer l’armoire au mur ou aux 

autres armoires avant d’installer les portes. Reportez-vous aux pages 9 à 12 du GUIDE D’INSTALLATION 

DES MEUBLES DE RANGEMENT ELITE.

4

Line up the hinges with the large holes on the door 

and secure with screws. Make sure the edge of each 

hinge is parallel to the side of the door. 

Aligner les charnières avec les gros trous sur la porte 

et les fixer à l’aide de vis. S’assurer que l’extrémité de 

chaque charnière est parallèle au côté de la porte.

Содержание BEW-3264

Страница 1: ...roduct model number 3 Review the contents of your shipment to determine what you are missing CONTACT US FIRST Option de service en ligne Compl tez le formulaire Commande de Pi ces de Rechange disponib...

Страница 2: ...limb or hang on drawers doors or shelves Never open more than one drawer at a time OR Do not defeat or remove the drawer interlock system Use of tipover restraints may only reduce but not eliminate th...

Страница 3: ...che SL 10106 B black noir SL 10106 E espresso SL 10106 W white blanc Right Side 1 C t droit SR 10106 B black noir SR 10106 E espresso SR 10106 W white blanc Front Kicker 1 Renforcement avant KR 1108 b...

Страница 4: ...the location of the hinge holes Fixer toutes les pi ces montr es au moyen de vis Confirmat Rep rer l emplacement des trous charni re 1 2 C3 C1 C2 C5 C4 C2 C3 C6 Note Screw hole is not pre drilled Not...

Страница 5: ...Page 5 of 16 3 C7 Front Devant...

Страница 6: ...n choisi vous pourriez devoir fixer l armoire au mur ou aux autres armoires avant d installer les portes Reportez vous aux pages 9 12 du GUIDE D INSTALLATION DES MEUBLES DE RANGEMENT ELITE 4 Line up t...

Страница 7: ...che et droit de la porte Slide the hinges over the hinge plates on the cabinet and tighten the locking screw in the center of each plate These hinges are 6 way adjustable see instructions on page 9 Gl...

Страница 8: ...e t l viseur ou d autre objet lourd sur le dessus de ce produit moins qu il soit sp cifiquement con u pour assurer un soutien adapt Ne jamais laisser d enfant grimper ou s accrocher aux tiroirs portes...

Страница 9: ...t the space between the doors n First loosen the Fixing Screw n To move the doors closer together tighten the Adjustment Screw n To move the doors farther apart loos en the Adjustment Screw Ajuster l...

Страница 10: ...ande de mettre l ancre des meubles dans des maisons o les enfants vivent ou la visite Pour vous prot ger et votre famille le fabricant de ce produit a inclus un facile d installer le dispositif de s c...

Страница 11: ...s peuvent se pr senter en cours d installation La m thode recommand e d installation d armoires murales consiste les fixer des montants de cloison en bois En l absence de montants rendez vous votre qu...

Страница 12: ...inet s Garage Inst allation showing W all Cabinet s both as Toppers and attached directly to the wall Stud Finder Page 9 of 12 Sample Configurations Exemples de configurations 16 Broom Cabinet Armoire...

Страница 13: ...nd the bottom of the wall cabinet Metal dowels are supplied with the wall cabinets Installation de base Armoires de rangement et armoires murales empilables Pour une installation autoportante aligner...

Страница 14: ...ir du point le plus lev du plancher mesurer 89 po 2 660 mm la verticale sur le mur o seront install es les armoires Cette hauteur correspond la hauteur de l armoire murale une fois qu elle sera empil...

Страница 15: ...uds behind the wallboard Mark where the center of each stud is located and make sure you hit the stud with the 3 wood screws as described in steps 4 6 Studs are usually 16 406mm apart from the center...

Страница 16: ...o install these screws just above or below each hinge Cabinets should now be level and plumb Shim where necessary and attach cabinets to the wall with 3 screws as described in step 4 1 6 Installing Ba...

Отзывы: