background image

IMPORTANT

Installer and Users please note:

These instructions should be read carefully and left with the user of
the product for future reference.

BEFORE USE

Inspect the product including its cable and plug for any signs of
damage. If the product is damaged, DO NOT use it, and contact
your supplier immediately.
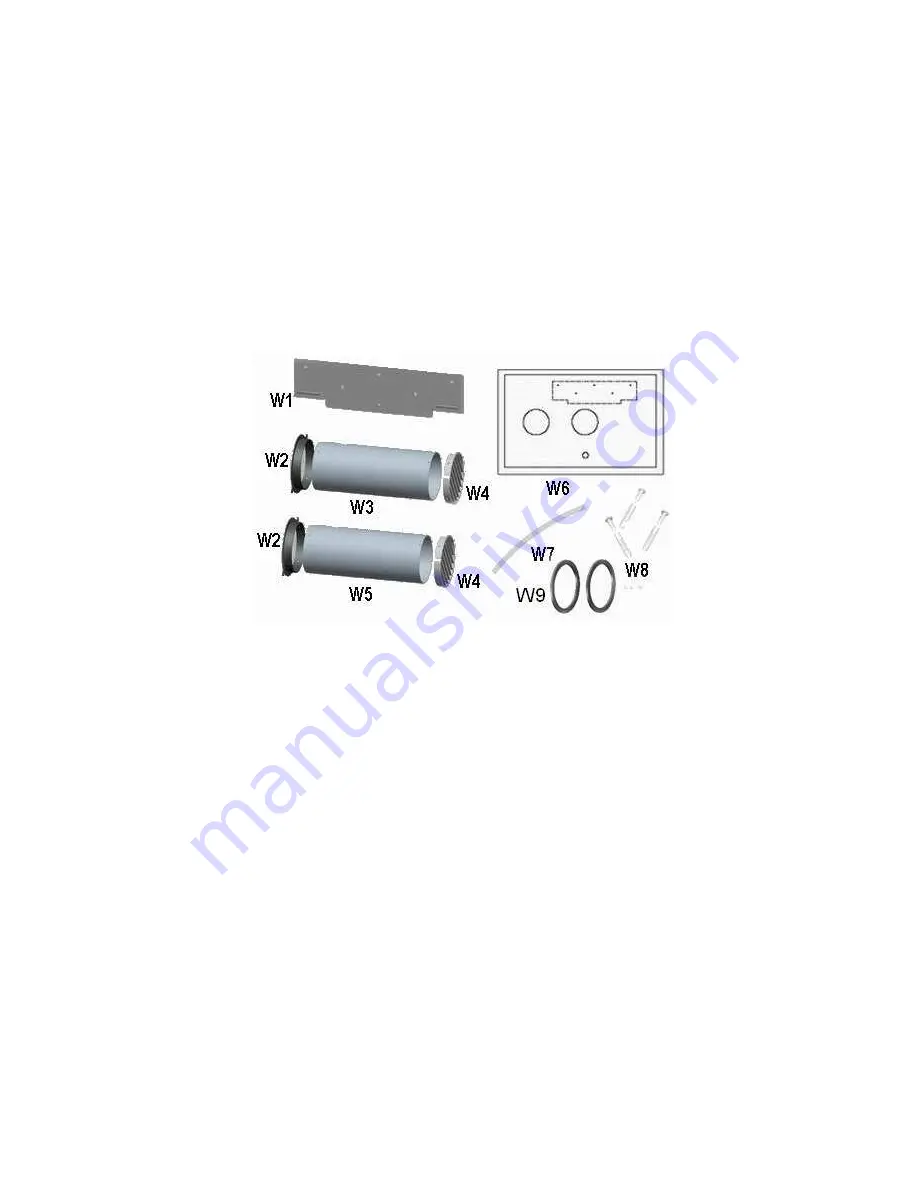
Check that the following items are included:

Wall mounted kit: 
W1.      Wall bracket (1 off)
W2.      Pipe flange (2 off)
W3.      Air intake pipe (diameter 120 mm) (1 off)
W4.      External grille (Pre-installed) (2 off)
W5.      Hot air discharge pipe (diameter130 mm) (1 off)
W6.      Template for wall drilling (1 off)
W7.      Condensate hose extension (1 off)
W8.      Screw kit: 

4×10 mm self-tap screw (4 off) 


5×40 mm self-tap screw (8 off)
5×40 mm wall plug (8 off)

W9.     Rubber grille ring (2 off) 
W10.    Nylon cord 


 Page 2

Содержание EH0533

Страница 1: ...r Climate Control 2 8 kW of cooling 2 9 kW of heating Air Conditioning Efficient heating air source heat pump Cooling Remote control Suitable for low wall installation No external unit required 3 Fan speeds Page 1 ...

Страница 2: ...tact your supplier immediately Check that the following items are included Wall mounted kit W1 Wall bracket 1 off W2 Pipe flange 2 off W3 Air intake pipe diameter 120 mm 1 off W4 External grille Pre installed 2 off W5 Hot air discharge pipe diameter130 mm 1 off W6 Template for wall drilling 1 off W7 Condensate hose extension 1 off W8 Screw kit 4 10 mm self tap screw 4 off 5 40 mm self tap screw 8 ...

Страница 3: ...equired to lift it Transport and store in an upright position Leave the unit in an upright position for at least 3 hours before first use Choose the optimum location for the appliance It must be on an external wall with 2 m free clearance on both inside and outside to allow good airflow and more than 1 m from the ceiling The wall must be able to withstand the weight of the unit The wall must be pe...

Страница 4: ...l the hole for the water drain This MUST have a downward slope of between 3 and 5 to make sure that the water will drain out E Install the grilles into the air intake and exhaust tubes F Cut the air intake and exhaust tubes so that they are 10 mm less then the thickness of the wall G Attach the flanges for the air intake and exhaust tubes to the tubes using the 10 mm screws provided H Then fix the...

Страница 5: ...tely into the hole Note that the intake tube is only 120 mm in diameter make sure that the tube is centred in the hole 5 Attach the cords to the tabs on the interior flange and pull tight I Attach the hanging bracket to the fixing holes using the screws provided J Connect the drain hose provided to the rear drain outlet A further extension pipe with an internal diameter of 16 mm can be fitted if r...

Страница 6: ...epeat this procedure every time the batteries are replaced Press the CLOCK button then using the HR hour and MIN minute buttons set the clock to the correct time Then press the CLOCK button again The remote control handset is now ready for use PAT TESTING When used in an office environment this product must be safety tested yearly by a qualified electrician PAT Tested in order to comply with the E...

Страница 7: ...Do not place on soft surfaces Do not cover This symbol shown on the casing of the appliance means that the appliance should not be covered For indoor use only Not suitable for use in boats caravans or similar locations Do not use in bathrooms or in wet locations Do not place the mains lead beneath a carpet or rug Do not use the appliance in locations where paint petrol or other flammable liquids a...

Страница 8: ...e between 20 C and 25 C The UP and DOWN buttons are inoperative in AUTO mode CO Cooling mode cools if the room temperature is above the selected temperature Then use the UP and DOWN buttons to select the desired room temperature When the temperature reaches the desired temperature the compressor will stop and the fan will continue to run dE Dehumidifying mode removes humidity but does not affect r...

Страница 9: ...umber of hours delay before switching off To select timed turn on press the ON OFF button to put the appliance into STAND BY Then press the TIMER button until the yellow indicator is illuminated Then adjust the time using the UP and DOWN buttons for the number of hours delay before switching on To cancel the timer press either TIMER button again USING THE REMOTE CONTROL The heating cooling dehumid...

Страница 10: ...NG COSTS At time of going to press the average cost of electricity is 0 11 per unit kilowatt hour The amount you are being charged will be shown on your electricity bill At this cost the appliance will cost 11p per hour to run either cooling or heating or 12p per hour when the resistance heater operates To minimise the power used and reduce operating costs Make sure that the filter is kept clean M...

Страница 11: ...liance towards the top Remove the filter and wash with hand hot water with a drop of detergent Dry thoroughly before replacing Using the appliance with a blocked filter will severely reduce its efficiency and using without the filter may lead to a build up of a dust on the heat exchangers which may constitute a fire hazard If the mains lead is damaged it must be replaced by the manufacturer or an ...

Страница 12: ...k that the mains plug is firmly in the socket and that the socket is switched ON When the unit if switched on there will be a delay of about 1 minute before it starts to operate Unit stops running Mains supply is disconnected or has failed Target temperature has been reached Timer has been set In cooling mode no cool air is produced Room temperature is lower than set temperature The unit is defros...

Страница 13: ...ge Drain hole slopes the wrong way Drain tube not fitted correctly Water splashes out of the front of the appliance Appliance has not been installed level FAULT CODES If any error codes appear on the display contact your local service agent E2 Indoor room temperature sensor failure E3 Outdoor temperatue sensor failure E4 Indoor coil sensor failure E5 Failure of upper fan motor Page 13 ...

Страница 14: ...ity resistance heater 1200 W Power supply 230 V Power consumption cooling 1050 W Power consumption heat pump 1080 W Power consumption resistance heater 1200 W Dehumidifying capacity 30 litres day Operating current 4 7 A Operating current resistance heater 5 2 A Air volume 320 m3 hour Noise level 52 dBA Refrigerant R410a 550 g Working temperature range 35 C Page 14 ...

Страница 15: ...d on the appliance or any attempts made to service or modify the appliance then the warranty will be rendered void The product you buy may sometimes differ slightly from illustrations This warranty is in addition to and does not affect your statutory rights If you have any problems with this product please call our Help Desk on 0845 459 4816 Prem i Air Appliances Ltd Lancots Lane Sutton St Helens ...

Отзывы: