Postek G-2108 Скачать руководство пользователя страница 30

G-2108/G-3106 User’s Manual                                                                                                            Chapter 3: Operations and Settings   


                                                                                                                                                                                26 

4.


Click “Apply to Printer” button to apply the setting to printer. 

5.


Perform a Media Sensor Calibration that follows steps from the previous section. 

6.


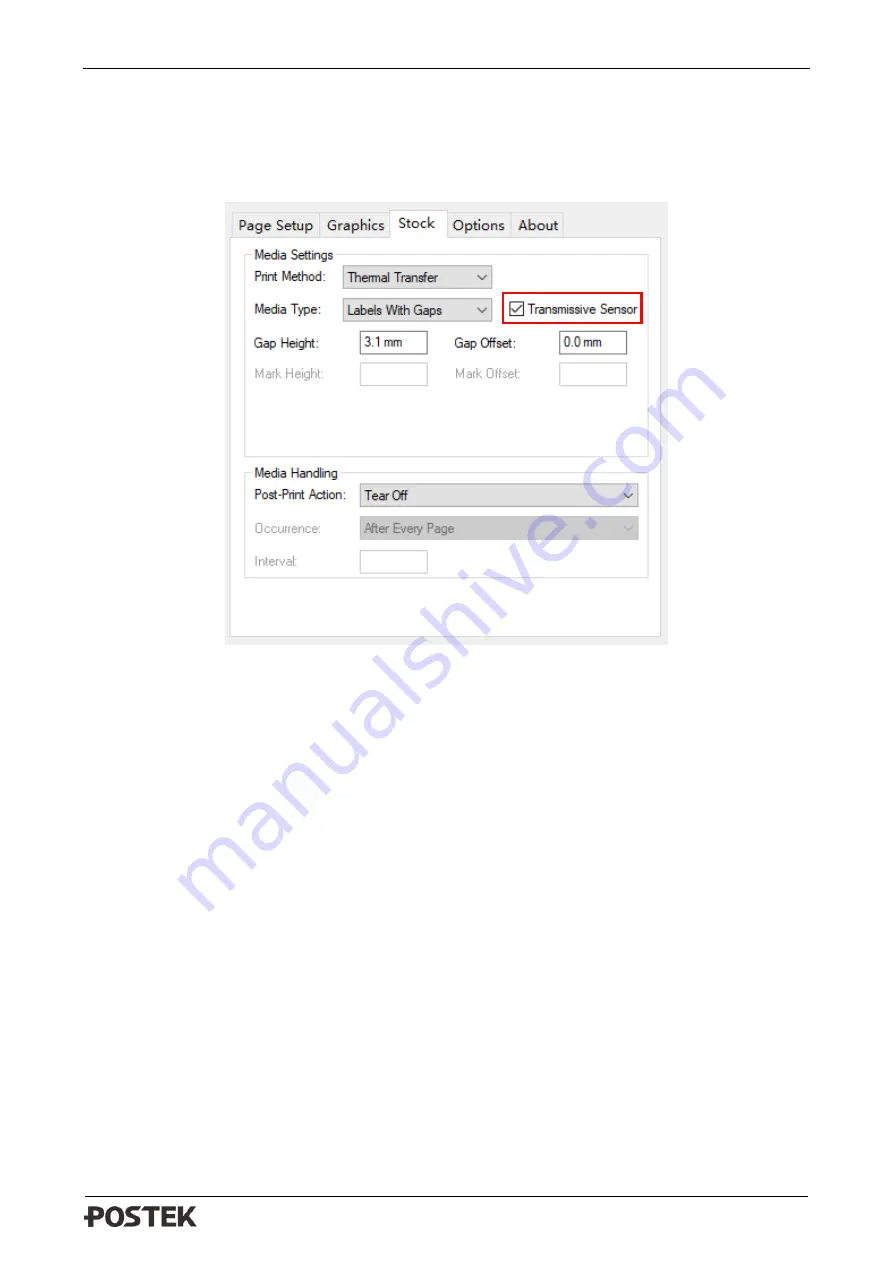
Open the “Advanced setup” from the printer’s driver on your PC, select “Stock” tag, and then 
select the correct media type from the drop-list and uncheck the box of “Transmissive Sensor”, 
see Figure 3-7. 


Figure 3-7 Stock Interface 


7.


Click  “Apply”  to  complete  the  setup;  now  your  printer  is  using  the  Reflective  sensor  for 
detecting media.   


Содержание G-2108

Страница 1: ......

Страница 2: ...FID printers are developed and produced by Postek Electronics Co Ltd hereinafter as POSTEK with the adoption of direct thermal thermal transfer printing and RFID encoding techniques For thermal transf...

Страница 3: ...ert anything into the ventilation slots or openings on the printer The printer and power adapter should never be operated in a location where either one can get wet Personal injury may result The prin...

Страница 4: ...n of Media Sensor 16 Chapter 3 Operations and Settings 19 3 1 Basic Operations 19 3 1 1 Power Switch 19 3 1 2 The Front Panel 19 3 1 3 Advanced Functions 21 3 1 4 Setting Operation Mode 22 3 1 5 Chang...

Страница 5: ...set up and begin using your G 2108 G 3106 printer It also provides detailed information on configuring your printer basic operations care and troubleshooting Please read this manual carefully before...

Страница 6: ...ry default requires ribbon for printing However if you need to print on Direct Thermal materials ribbon is not required please contact your printer supplier or service provider to reduce the printhead...

Страница 7: ...Use only the dedicated cutters to cut through adhesive materials Even so regular cleaning is required to remove the adhesive built up on the blades over time to prevent cutter jam Routine inspection a...

Страница 8: ...ve 2 of 5 UPC A E 2 and 5 add on EAN 13 8 128 UCC 128 etc 2D Barcode MaxiCode PDF417 Data Matrix QR Code etc Interfaces RS 232 Serial 10 100 M Adaptive Ethernet USB DEVICE 2 0 Power Adapter Input AC 1...

Страница 9: ...x Inspect the shipping carton s for possible shipping damage if damage is discovered notify the shipping company to report the nature and extent of the damage Please check the items according to the P...

Страница 10: ...ctures 2 1 1 Front View Figure 2 1 shows the front view of the printer Figure 2 1 Front View Table 2 1 Front View Description Number Description 1 CANCEL Reset Button 2 FEED Calibration Button 3 PAUSE...

Страница 11: ...2 Internal View Table 2 2 Internal View Description Number Description 1 Printhead 2 Printhead Bracket 3 Platen Roller 4 Left Mount_Ribbon supply 5 Ribbon End Sensor 6 Reflective Media Sensor 7 Trans...

Страница 12: ...r View The printer is equipped with multiple interfaces See Figure 2 3 Figure 2 3 Rear View Table 2 3 Rear View Description Number Description 1 RS 232 Serial Port 2 USB Device Port 3 Ethernet Port 4...

Страница 13: ...tion port automatically The default values of printer port can be obtained from the self test report See 3 1 3 Advanced Functions Obtaining Printer Configuration Information Cable configurations for S...

Страница 14: ...the ribbon roll in the middle of the Ribbon Spindle corresponding to the symmetry symbol No need to load the ribbon when printing direct thermal media To install the ribbon 1 Lift the right cover and...

Страница 15: ...ce the spare core onto the other spindle see Figure 2 6 Figure 2 6 Place Ribbon Roll and Spare Core on Ribbon Spindles 5 Pull the Release Knob of the Ribbon Supply compartment outwards and place the r...

Страница 16: ...the ribbon through the Printhead Module and wrap the end of the ribbon around the spare core see Figure 2 8 Figure 2 8 Wrap Ribbon on the Core 7 Pull the Release Knob of the Ribbon Take up compartmen...

Страница 17: ...unt of Ribbon Take up to ensure the ribbon is tight and smooth see Figure 2 10 Figure 2 10 Ribbon Roll loaded To make sure the Ribbon End Sensor works properly please use ribbon rolls which end with r...

Страница 18: ...dels with peeler installed Standard Mode To load media into the G 2108 G 3106 printer while under Standard Mode follow the steps below 1 Load a roll of media labels facing up on the Media Spindle then...

Страница 19: ...Tear off Bar This can be checked with the ruler on the Tear off Bar 6 Press the Printhead Module downward until you hear a click as shown in Figure 2 13 Figure 2 13 Press Down to Lock the Printhead Mo...

Страница 20: ...or to the appropriate position then replace the media sensor cover 4 To adjust the position of the Transmissive Sensor Flip the Toggle Switch to choose center or right position according to the media...

Страница 21: ...media types as shown the sensor shall be placed between the dotted lines a b c Figure 2 15 Media Sensor Position When roll media is produced the media end would be fixed on the media core by duct tape...

Страница 22: ...Mark Tape Tape Tape Tape The tape shall avoid covering the hole The tape shall avoid covering the black mark The position of the tape should be made known to user to avoid positioning Media Sensors ov...

Страница 23: ...Panel of G 2108 G 3106 printer consists of Three LED Indicators MEDIA READY and RIBBON Three multi function buttons PAUSE Self Test FEED Calibration and CANCEL Reset Figure 3 1 Front Panel LED Indica...

Страница 24: ...ators are blinking then the printer detected ribbon out Panel Buttons The three buttons on the front of the printer please refer to Table 3 2 below for details regarding their functionality Table 3 2...

Страница 25: ...all three indicators will blink once and then return to a steady state the printer will print a self test page with detailed information regarding the printer s configuration then return to standby T...

Страница 26: ...Tear off Mode 2 Load consumables referring to operations under Standard Mode 3 Turn on the printer and perform Media Calibration Press and hold the FEED Calibration button hold for around 4 seconds t...

Страница 27: ...and hold the FEED Calibration button hold for around 4 seconds the printer will automatically feed labels and the media calibration is done 4 Create the label template on your PC using the Bartender l...

Страница 28: ...tter Mode 2 Turn on the printer and wait for the printer to boot normally Then reset the cutter Press and hold the CANCEL Reset button for 4 seconds until three indicators start blinking release the C...

Страница 29: ...ective Sensor and Transmissive Sensor You can select the appropriate mode of media sensor to adapt different media type and reduce error of label skipping or offsetting The default mode of media senso...

Страница 30: ...t follows steps from the previous section 6 Open the Advanced setup from the printer s driver on your PC select Stock tag and then select the correct media type from the drop list and uncheck the box...

Страница 31: ...the pressure of the printhead on both sides as shown in Figure 3 8 Figure 3 8 Printhead Pressure Adjustment Follow the steps below to adjust the printhead pressure 1 Press down the Adjusting Knob and...

Страница 32: ...r please scan the QR code on the Quick Start Guide or visit POSTEK website http www postekchina com Each printer also comes with a BarTender UltraLite edition software To access to the software and th...

Страница 33: ...f applicable and media 5 Use a cotton swab dipped in anhydrous isopropyl alcohol Wipe the Printhead from end to end 6 Allow a few seconds for the Printhead dry before using the printer again 4 2 Clean...

Страница 34: ...s dipped into anhydrous isopropyl alcohol and remove any debris 4 4 Cleaning the Sensors Over time dust and debris will accumulate over the sensors and affect their performance to ensure proper detect...

Страница 35: ...an out Install a new roll of media If the printer has not been powered off and the print job has not been finished after clearing the error Press FEED Calibration button the printer would reprint the...

Страница 36: ...Blank Lines Appear Printhead is dirty Clean the Printhead Follow the recommended maintenance guidelines for cleaning the Printhead Data Sent but Not Printing The driver is incorrect Ensure the correc...

Страница 37: ...t bit or 1 stop bit Flow control None If you are using software or drivers under the Windows environment the flow control must be set to hardware Any communications port can transmit data from the hos...

Страница 38: ...L 0 P p 1 SOH XON 1 A Q a q 2 STX 2 B R b r 3 XOFF 3 C S c s 4 4 D T d t 5 NAK 5 E U e u 6 ACK 6 F V f v 7 BEL 7 G W g w 8 BS 8 H X h x 9 9 I Y i y A LF J Z j z B ESC K k C FF L l D CR M m E SO RS N n...

Страница 39: ......

Отзывы: