background image

10

USING THE SANDER

1.

CAUTION: 

Secure work to prevent if from moving during the sanding

operation. Friction between the sanding disc and work will try to spin work
away from sander and may cause bodily injury.

2.

CAUTION: 

WEAR SAFETY GLASSES AND DUST MASK.

3.

Place sander pad in light contact with the work before switching the

motor “ON”.

4.

Grasp sander firmly and move switch to “ON” position.

5.

Move sander in long overlapping strokes. Tipping sander or stopping in

one spot can produce an uneven finish.

6.

When finished, keep pad in contact with work, move switch to “OFF”

position and lift sander from the work. Allow pad rotation to stop completely
before setting sander down.

MAINTENANCE

KEEP TOOL CLEAN

Periodically blow out all air passages with dry, compressed air. Remove
buildup of grime resulting from working with green or sappy wood. All plastic
parts should be cleaned with a soft damp cloth. NEVER use solvents to clean
plastic parts.

CAUTION:

Wear safety glasses while using compressed air.

FAILURE TO START

Should your tool fail to start, check to make sure the prongs on the cord plug
are making good contact in the outlet. Also, check for blown fuses or open
circuit breakers in the line.

BRUSH INSPECTION AND LUBRICATION

At approximately 200 hours of use, take or send your tool to your nearest
Authorized Porter-Cable Service Station to be thoroughly cleaned and
inspected; worn parts replaced, when necessary; relubricated with fresh
lubricant, if required; reassembled with new brushes; and performance
tested.

Any loss of power before the above maintenance check may indicate the
need for immediate servicing of your tool. DO NOT CONTINUE TO OPERATE
TOOL UNDER THIS CONDITION. If proper operating voltage is present,
return your tool to the Service Station for immediate service.

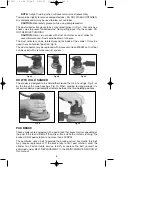
BELT REPLACEMENT

1.

CAUTION: DISCONNECT SANDER FROM POWER SOURCE.

2.

Remove back-up pad (see REVERSIBLE PAD).

3.

Remove the old belt and clean the belt mounting area.

4.

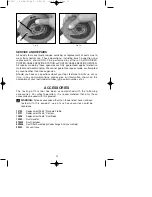
Position the new belt around pulley (A) Fig. 11, and start it onto the

shoulder of the pad support (B).

5.

Rotate the pad support as you “walk” the belt onto it (see Fig. 12).

6.

Reassemble back-up pad (see CHANGING BACK-UP PAD). 

900007 - 02-28-01.QXD  9/26/02  11:46 AM  Page 10

Содержание QUICKSAND 335

Страница 1: ...___________________________________________ Serial No _______________________________________ IMPORTANT Please make certain that the person who is to use this equipment carefully reads and understands...

Страница 2: ...c shock this equipment has a polarized plug one blade is wider than the other This plug will fit in a polarized outlet only one way If the plug does not fit fully in the outlet reverse the plug If it...

Страница 3: ...switch is off when plugging in Keep hands body and clothing clear of blades bits cutters etc when plugging in the tool 17 OUTDOOR USE EXTENSION CORDS When tool is used outdoors use only extension cor...

Страница 4: ...LEAD BASED PAINT SHOULD ONLY BE REMOVED BY A PROFESSIONAL Persons removing paint should follow these guidelines 1 KEEP THE WORK AREA WELL VENTILATED Open the windows and put an exhaust fan in one of t...

Страница 5: ...t on which the voltage is not within correct limits Do not operate tools rated A C only on D C current To do so may seriously damage the tool EXTENSION CORD SELECTION If an extension cord is used make...

Страница 6: ...itch button A Fig 1 is labeled ON and OFF Depress the ON end of the switch button to start motor Depress the OFF end of the switch button to stop motor REVERSIBLE PAD The pad is factory assembled with...

Страница 7: ...ook Loop Abrasive Disc onto sander pad aligning the dust extraction holes in paper with holes in pad CAUTION Do not use PSA Pressure Sensitive Adhesive disc with Hook Loop pad as the disc may be throw...

Страница 8: ...erting firm pressure to seat disc to pad CAUTION Failure to properly seat disc to pad may result in disc being thrown from pad causing personal injury 7 To remove disc peel disc away from pad NOTE Do...

Страница 9: ...so that tool can be used with a remote vacuum system HOW TO HOLD SANDER The sander is designed to be held either around the main housings Fig 9 or by the top of the main housings Fig 10 When sanding...

Страница 10: ...TO START Should your tool fail to start check to make sure the prongs on the cord plug are making good contact in the outlet Also check for blown fuses or open circuit breakers in the line BRUSH INSPE...

Страница 11: ...at any time In any communications please give all information shown on the nameplate of your tool model number type serial number etc ACCESSORIES The testing of this tool has been accomplished with t...

Страница 12: ...e Service Center or Authorized Service Station Proof of purchase may be required This warranty does not apply to repair or replacement required due to misuse abuse normal wear and tear or repairs atte...

Страница 13: ...d usine Porter Cable Delta Si vous n avez acc s aucun de ces centres appeler le 888 848 5175 et on vous dirigera vers le centre de service d usine Porter Cable Delta le plus proche ARIZONA Tempe 8528...

Отзывы: