background image

User Guide for the SoundPoint IP 650 Desktop Phone

1 - 6

Before You Use Your Phone

This section includes information on how to navigate the phone’s menus, how 

to enter data, and how to read the phone’s information status bar. 

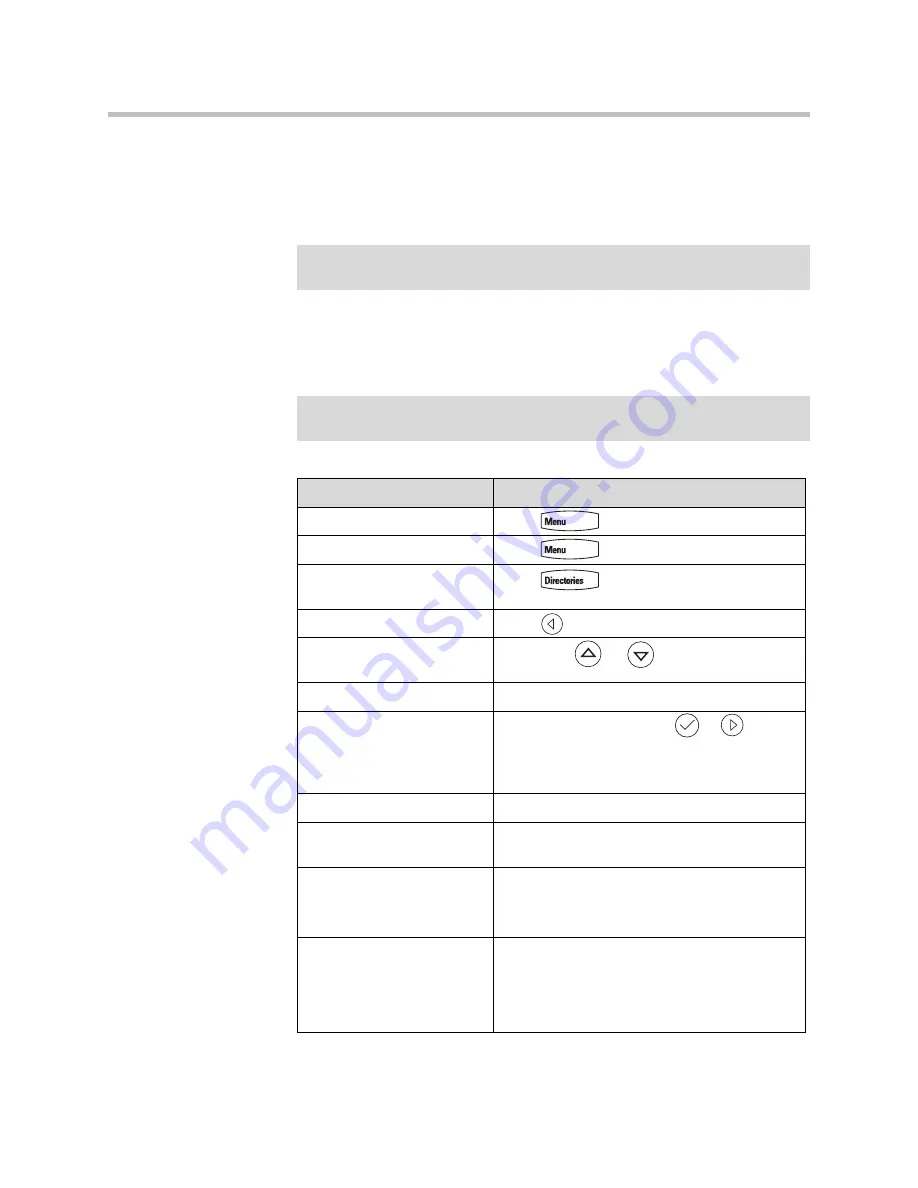
Using the Navigation Keys

To navigate menus and enter data, use these tips:

Note

The background and key colors that appears on your SoundPoint IP 650 phone 
may differ from what appears in this user guide.

Note

After 20 seconds of inactivity, the menu system automatically exits to the idle 
screen unless an edit session is in progress.

If you want to...

Then do this...

Enter the main menu

Press 

Exit a menu to the idle screen

Press 

Exit a directory to the idle 
screen

Press 

Return to the previous menu

Press 


or the 

Back 

soft key

Scroll through lists and 
menus

Press/Hold 


or 


Scroll through pages

Press *


to Page Up and #


to Page Down.

Select a menu Item

Highlight the item and press 


or 

Press the dial pad key that corresponds to the 
number menu list (Press 

2

 for the second menu 

item)

View additional soft keys

Press the 

More 

soft key

Enter numbers

Press the dial pad key with the corresponding 
number.

Enter text

Press the dial pad keys one or more times. 

To enter ‘A’, press 

<1> 

once.

To enter ‘C’, press 

<1> 

three times quickly. 

Enter lower or upper case 
characters, or numbers.

Press the 

1/A/a 

soft key one or more times to 

select upper/lower case alphanumeric mode or 
numeric mode (visible in the status bar). Then 
use the dial pad to enter numbers or text as you 
normally would.

Содержание SoundPoint IP 650

Страница 1: ...UC Software 4 0 1 November 2011 1725 12648 001 Rev F Polycom SoundPoint IP 650 Phone User Guide ...

Страница 2: ...es or the limitation of incidental or consequential damages for certain products supplied to consumers or the limitation of liability for personal injury so the above limitations and exclusions may be limited in their application to you When the implied warranties are not allowed to be excluded in their entirety they will be limited to the duration of the applicable written warranty This warranty ...

Страница 3: ...th Your Phone and Regulatory Notices sections in this guide before you set up and use your SoundPoint IP 650 phone You can also find this information at http www polycom com support voicedocumentation Changes to This Guide The following sections are new for this edition Using the Polycom Web Configuration Utility on page 1 8 Locking and Unlocking Your Phone on page 2 25 Logging Into Phones on page...

Страница 4: ...User Guide for the SoundPoint IP 650 Desktop Phone iv ...

Страница 5: ...e 2 1 Placing Calls 2 2 Answering Calls 2 4 Ending Calls 2 7 Redialing Numbers 2 7 Placing Calls on Hold 2 8 Hosting Conference Calls 2 9 Setting Up Conference Calls 2 9 Managing Conference Calls 2 11 Adding Parties to Conference Calls 2 13 Joining Conferences 2 15 Splitting Conference Calls 2 15 Ending Conference Calls 2 15 Transferring Calls 2 16 Forwarding Calls 2 18 Enabling Do Not Disturb 2 2...

Страница 6: ...g Calls 3 12 Recording Conferences 3 13 Pausing and Resuming Recording 3 14 Playing Back a Recorded Call 3 15 Browsing Recorded Calls 3 16 Playing Back Recorded Calls 3 17 Answering a Call While Playing Back Recorded Calls 3 18 Broadcasting Messages Using Push to Talk and Group Paging 3 19 Push to Talk Mode 3 20 Group Paging Mode 3 26 Accessing Features with Your Login Credentials 3 30 Updating Yo...

Страница 7: ...d 5 9 Changing the Soft Key Label Color 5 11 Muting the Microphone 5 12 Adjusting the Volume 5 12 Managing Call Lists 5 12 Adding Contacts 5 12 Editing Contacts 5 15 Deleting Contacts 5 15 Placing a Call to a Contact 5 16 Searching For a Contact 5 16 Managing Contacts 5 17 Adding Contacts 5 17 Editing Contacts 5 20 Deleting Contacts 5 21 Placing Calls to Contacts 5 22 Searching for Contacts 5 23 M...

Страница 8: ...uide Polycom SoundPoint IP 450 User Guide 450 Phone viii Displays 6 6 Productivity Suite 6 7 Testing Phone Hardware 6 7 Regulatory Notices Regulatory Notices 1 End User License Agreement for Polycom Software ...

Страница 9: ...P Backlit Expansion Modules the SoundPoint IP 650 delivers the advanced call handling capabilities of a high performance attendant console For the package list and instructions on how to assemble your phone refer to the SoundPoint IP 650 Quick Start Guide This chapter contains information on Features of Your Phone Before You Use Your Phone Registering Your Phone Using the Polycom Web Configuration...

Страница 10: ...tures of Your Phone The features of your SoundPoint IP 650 phone are Item Description 1 Message Waiting Indicator Alert for voice and text instant messages 2 Arrow Keys Scroll through displayed information Select a field of displayed data Delete displayed data ...

Страница 11: ...g calls 7 Hands free Microphone Picks up audio during hands free calls Place your phone on a hard flat surface for best results 8 Volume Keys Adjusts the volume of the handset headset speaker and ringer 9 Dial Pad Provides the 10 digits the alphabetic characters and special characters available in context sensitive applications 10 Hold Holds an active call or resumes a held call 11 Speaker For rin...

Страница 12: ...ctivate up to six lines or speed dials that can be assigned to your phone 15 Line Indicators Individual multi color LEDs display the dynamic call state and remote user status busy lamp field BLF and presence The mapping is Solid green An active call is in progress Fast flashing green There is an incoming ringing call Flashing green The call is held by the other party Flashing red The call is on ho...

Страница 13: ...hic display and represent Icon Description Registered line solid Registered shared line Unregistered line outline Voice mail Text messages Speed dial Ringing Call in progress with HD Voice Call in progress Call Forward Held On Hold Line Do Not Disturb Conference Presence Busy Lamp Field BLF ...

Страница 14: ...een Press Exit a directory to the idle screen Press Return to the previous menu Press or the Back soft key Scroll through lists and menus Press Hold or Scroll through pages Press to Page Up and to Page Down Select a menu Item Highlight the item and press or Press the dial pad key that corresponds to the number menu list Press 2 for the second menu item View additional soft keys Press the More soft...

Страница 15: ... beforehand so that once it is set up it will be registered and ready to use Enter special characters Press 1 0 one or more times quickly in alphanumeric mode Press or once or twice quickly in numeric mode To enter a space press 0 three times quickly in alpha mode Enter an IP address or URL Press a dial pad key once for numbers and one to four more times quickly for letters Change the character se...

Страница 16: ...riendly view of your phone s current settings Using the utility you can perform the same updates from your computer that you can perform using your phone s menu system You can access the utility using any compatible Web browser Before you begin you ll need to know the IP address of your phone and the user name and password login credentials of the phone user or the phone administrator To access th...

Страница 17: ... Phone 1 9 4 From the Web Configuration Utility login screen select User and then enter the User password 5 Click Submit The Web Configuration Utility Home screen is displayed Note The factory default password for a User is 123 ...

Страница 18: ...User Guide for the SoundPoint IP 650 Desktop Phone 1 10 ...

Страница 19: ...on your phone The active call is the one that has audio associated with it There may be multiple other calls on hold in an Incoming call or Ringing state This chapter provides basic operating instructions for the SoundPoint IP 650 phone The topics include Placing Calls Answering Calls Ending Calls Redialing Numbers Placing Calls on Hold Hosting Conference Calls Transferring Calls Forwarding Calls ...

Страница 20: ...e to speak to the other party You can also search the call lists the local contact directory or the corporate directory and dial from the search results page For more information refer to Managing Call Lists on page 5 12 and Managing Contacts on page 5 17 You can place a call from your buddy list or privacy list if enabled For more information on buddy and privacy lists see Calling Your Buddies on...

Страница 21: ...sing the SIP URL or IP address To obtain the IP address of your phone press the Menu key and then select Status Platform Phone The IP address is listed together with other phone information The maximum URL or IP address length is 32 characters For example 10 3 0 42 sip jane polycom com Press the URL soft key and enter the URL or IP address Use for and for Then press the Send soft key to complete t...

Страница 22: ...ings if enabled and shows the identification of the caller on the display If a caller s name is too long to fit on the screen such as Alexander Smith Harrington s below it will automatically scroll horizontally across the display When you are not in another call you can answer a call using the handset the speakerphone or the headset if enabled The steps for answering an incoming call when you are ...

Страница 23: ...ndset Note You can ignore incoming calls by pressing the Reject soft key for private lines the Silence soft key for shared lines or the Do Not Disturb key Do Not Disturb mode stays active when the call ends and remains active until you press the Do Not Disturb key again You can forward incoming calls by pressing the Forward soft key For more information refer to Dynamic Forwarding on page 2 20 Whe...

Страница 24: ...ll on hold The incoming call will be displayed at the top of the call screen and the phone will ring Press the Answer soft key or the flashing green line key to answer the call If your phone is configured for a single Line Key per phone line The incoming call will be shown in the call list below the active call Scroll down to the incoming call and press the Answer soft key or the line key to answe...

Страница 25: ...the following Press the End Call soft key Replace the handset if you are using it If you are using a headset press If your are using the speakerphone press Press the of the active call if enabled by your system administrator Redialing Numbers To redial the last call placed from your phone Press A call to your most recently dialed number is attempted To redial an older previously placed call refer ...

Страница 26: ... to retrieve the desired call If more than two calls are on hold on a single Line Key an indication appears on the graphic display for example 2 3 indicating that this is the second call out of three calls If calls are on hold on more than one Line Key you can view the details of the calls on any Line Key by pressing and holding the Line Key for more than two seconds If a Line Key is depressed for...

Страница 27: ...vides the following step by step instructions Setting Up Conference Calls Managing Conference Calls Adding Parties to Conference Calls Joining Conferences Splitting Conference Calls Ending Conference Calls Setting Up Conference Calls To set up a conference call 1 Call the first party Note The conference management feature is an optional feature and may not be supported on your particular system Fo...

Страница 28: ...dd another party to the conference The first and second party are put on hold 6 Call the third party 7 After the third party answers press or the press the More soft key followed by the Confrnc soft key to join all parties in the conference Note If configured for single key press conferences all conference participants hear the dial tone and ringback when the conference host places a call to a new...

Страница 29: ... until you have added all intended parties Managing Conference Calls You are currently in a conference call A screen like the one below is shown on your phone To manage a conference call 1 Press the Manage soft key The Manage Conference page appears Press the More soft key to see the Remove Info and Exit soft keys ...

Страница 30: ...mute a party select the party then press the Far Mute soft key The muted party can hear all parties but no party can hear the muted party If you press instead of the Far Mute soft key all other parties can hear each other but they cannot hear you Press the UnMute soft key to un mute the party Note The Add soft key appears only if you can add more parties to the conference call Your system administ...

Страница 31: ...sses on their phone the party will remain on hold within the conference even if you press the Resume soft key To remove a party from the conference press the Remove soft key The party is removed from the conference To return the party to the conference press the Add soft key refer to the first optional step above Adding Parties to Conference Calls To add a party to a conference call using the Join...

Страница 32: ... other parties in the conference call are placed on hold 2 Press the New Call soft key 3 Place a call to a new party 4 After the new party answers press the Join soft key All parties in the conference call can now hear each other Note If configured for local conference hold the other parties in the conference call can continue to speak with each other while you place the new call ...

Страница 33: ... way conference Splitting Conference Calls To split a conference call From the Active Conference page press the More soft key and then the Split soft key to split the conference All calls are split into individual calls and put on hold Ending Conference Calls To end a conference call From the Active Conference page press the End Call soft key or hang up The other parties my or may not continue to ...

Страница 34: ...sferred after you dial the number of the party to whom you want to transfer the call Refer to Performing a Blind Transfer on page 2 17 Attended transfer The parties are automatically connected to each other after you exit the conference Set up a conference call and then end your participation For more information refer to Hosting Conference Calls on page 2 9 Performing a Consultative Transfer To t...

Страница 35: ...g the call before the transfer is completed If you are using a handset the transfer can be completed by putting the handset on the cradle You can cancel the transfer before the call connects by pressing the Cancel soft key Performing a Blind Transfer To perform a blind transfer 1 During a call press or the Trnsfer soft key 2 Press the Blind soft key 3 Place a call to the desired recipient of the c...

Страница 36: ...rator Static Forwarding To forward all incoming calls to another party 1 From the idle screen press the Forward soft key 2 If multiple lines are configured on your phone select the line to forward from the list using and 3 Scroll to select the forwarding type you want to change and then press the Select soft key The options are Always To forward all incoming calls No Answer To forward unanswered i...

Страница 37: ...g one ring is approximately six seconds A value of 2 is recommended c If you selected Busy enter a number to forward all future incoming calls to when you are already in another call 5 Select the Enable soft key to confirm call forwarding A moving arrow appears on the line label to confirm call forwarding is enabled Note You can also enter the SIP URL or IP address For more information on using a ...

Страница 38: ...s the line indicator Dynamic Forwarding To forward an incoming call to another party 1 When the phone rings press the Forward soft key 2 Enter a number to forward the incoming call to 3 Press the Enable soft key The incoming call is forwarded to the other party If call forwarding is disabled all future calls will not be forwarded and forwarding will remain disabled Enabling Do Not Disturb To preve...

Страница 39: ...iple lines are configured on your phone Do Not Disturb can be set on a line by line basis from the menu using and if enabled by your system administrator When Do Not Disturb is enabled for a particular line a flashing X displays beside the line indicator Assigning Speed Dial Keys You can associate contacts with Line Keys for single touch dialing of frequently used numbers Speed Dial entries are co...

Страница 40: ...t the contact You can also use the key to page up and the key to page down 4 Press the Edit soft key 5 Do one of the following Enter the next available speed dial index Delete the existing speed dial index by using and then enter a new speed dial index Note To quickly access a list of speed dial index numbers press the Up Arrow key from the idle screen To speed dial a contact press the Up Arrow ke...

Страница 41: ...ial Index field The index can be any value between the next available index value and the maximum value of 9999 5 Press the Save soft key to accept your changes 6 Press to return to the idle screen Using Voice Mail You can access voice mail messages from your phone if enabled Your voice mail is saved in a centralized location Polycom recommends that you assign speed dial index values consecutively...

Страница 42: ...alls Allow only authorized people to answer calls Prevent people from viewing or modifying phone displays or information for example menus directory lists call records and speed dial keys When your phone is locked You can only make an outgoing call to a number from a list of configurable authorized numbers You have to enter a password to answer incoming calls All keys and soft keys are disabled ex...

Страница 43: ...om the Advanced screen select Change User Password 4 From the Change User Password screen enter your password information and press the Enter key Locking and Unlocking Your Phone You can choose how you want your phone to handle incoming calls when it is locked You can configure your phone to either allow incoming calls or activate Do Not Disturb when it locks To Lock your Phone 1 Press Settings Ba...

Страница 44: ...d phone anyone can dial the standard emergency number for example 911 and up to five authorized numbers that an administrator can set up You cannot call any other numbers from a locked phone If you set up your phone so you can answer incoming calls when it is locked you can answer calls by first entering your user password To call an authorized number from a locked phone Do one of the following No...

Страница 45: ...r key 2 From the Answer the Call screen enter your password and then press the Enter soft key If you press the Cancel soft key instead the Answer the Call screen disappears and the incoming call window displays again For information on your user password including what to do if your forget it see About Your User Password on page 2 25 The call connects Logging Into Phones If your system administrat...

Страница 46: ... you don t log in you ll see the phone s default phone profile While logged in you ll have full access to your personal phone settings and your contact directory After you log out of the phone you ll no longer be able to view this information on the phone After you use a phone be certain to log out of the phone to prevent access to your personal settings To log in to a phone 1 If the User Login sc...

Страница 47: ... and password are ask your system administrator Default passwords are preset at the factory to the numerals 123 However your system administrator may have changed this for security reasons If your credentials are not accepted the message User login failed is displayed and the User Login screen displays again If you need to confirm your credentials ask your system administrator To log out of a phon...

Страница 48: ... phone may be in the logged out state If a phone requires a user login you may be able to place calls to authorized numbers when the phone is in the logged out state If your system administrator has set up emergency numbers on the phone you can place calls to the standard emergency number for example 911 and up to five other authorized numbers You won t be able to call any other numbers until you ...

Страница 49: ...splays as shown next 3 Enter your old password and your new password twice and then press the Enter soft key The User password changed message displays Your password is changed The next time you log in to a phone you ll need to enter this password Note By default user passwords are factory preset to the numerals 123 Your administrator can change this default password if needed Polycom recommends t...

Страница 50: ...User Guide for the SoundPoint IP 650 Desktop Phone 2 32 ...

Страница 51: ...our Login Credentials Updating Your Phone s Configuration Restarting Your Phone To customize your phone refer to Customizing Your Phone on page 5 1 To read about the phone s basic features refer to Using the Basic Features of Your Phone on page 2 1 If you require additional information or assistance with your new phone contact your system administrator Using Multiple Call Appearances When multiple...

Страница 52: ...igure shows an incoming call from Jack Jones on the same line To answer an incoming call when configured for multiple call appearances Do one of the following Press or the Hold soft key to place the original call on hold Press to access the new call Answer the incoming call This original call is placed on hold and the incoming call becomes the active call ...

Страница 53: ... the graphic display To read text messages 1 Do one of the following steps Press Select Instant Messages Press Select Features Messages Instant Messages Press the InstMsg soft key 2 If multiple lines are configured on your phone select from which line messages are to be retrieved from the list using and The newest messages are displayed first in the list 3 Optional Do one of the following Press th...

Страница 54: ... one of the following Press the Select soft key to choose from various pre scripted short messages Press the Edit soft key to compose a custom message Use dial pad keys to cycle through the character set Use keys 1 0 and to select special characters 7 Press the Send soft key to send the message 8 Press to return to the idle screen Note Screen options may vary with your application Voice Mail may b...

Страница 55: ...005 the behavior of the presence setting and buddy lists is different For more information refer to Integrating With Microsoft Live Communications Server 2005 on page 3 7 If your phone is configured to work with Microsoft Lync Server 2010 the behavior of the presence setting and buddy lists is different For more information refer to Integrating With Microsoft Lync Server 2010 on page 3 8 Updating ...

Страница 56: ...ntact is removed from your buddy list 7 Press the Save soft key to accept your changes 8 Press to return to the idle screen To block or unblock a contact from your buddy list 1 Press 2 Select Contact Directory 3 Scroll to highlight the contact You can also use the key to page up and the key to page down 4 Press the Edit soft key 5 Scroll down to the Block Buddy field 6 Toggle to select Enabled If ...

Страница 57: ...fice Communicator and Windows Messenger Any contacts you add in Microsoft Office Communicator and Windows Messenger will appear in your buddy list To view and change your presence refer to Updating Your Presence Settings on page 3 5 For more information contact your system administrator To add a contact to your buddy list 1 Press 2 Select Features Presence Buddy Status 3 Press the More soft key 4 ...

Страница 58: ...e your presence see Updating Your Presence Settings on page 3 5 For more information on integrating with Microsoft Lync Server 2010 contact your system administrator Adding Buddies To add a contact to your buddy list 1 Do one of the following a Press and select Features Presence Buddy Status b Press the Buddies soft key 2 Do one of the following If the buddy list is empty press the Add key If the ...

Страница 59: ...ss the Dial soft key or lift the handset Calling Your Buddies To place a call from your buddy list 1 Do one of the following a Press and select Features Presence Buddy Status b Select the Buddies soft key 2 Scroll to desired buddy in the list 3 Press the Dial soft key or lift the handset Recording a Call Note Call Recording is an optional feature and may not be supported on your particular system ...

Страница 60: ...he graphic display The Record soft key controls recording and is available When there are one or more calls connected to your phone you may need to press the More soft key to see it During an active call When calls are on hold During a consultative transfer or conference call The Record soft key is not available When there are no connected calls on your phone When you place a new call to transfer ...

Страница 61: ...u finish speaking with party B you return to speaking with party A While speaking with party A again you get another incoming call You put party A on hold and speak with party C When you finish speaking with party C you return to speaking with party A You end your call with party A and recording stops Your conversations with parties A B and C are all recorded in the same wav file as follows To pro...

Страница 62: ...deral state and or local laws to notify some or all called parties when you are recording either one party or all party consent Specific information about US state requirements can be found at http www rcfp org taping Telephone call recording regulations in other countries vary widely Polycom recommends checking with the local government s telecommunications authority and government legal agencies...

Страница 63: ...p and Pause soft keys 4 Stop recording in one of the following ways Press the Stop soft key Hang up or end the active call Recording Conferences You can record conference calls in the same way as other calls with the following exceptions All parties in a conference call are recorded If one of the conference parties presses they are not recorded When all parties in a conference call are put on hold...

Страница 64: ...an pause recording by pressing the Pause soft key When you press the Resume soft key recording continues with the same wav file To pause a recording Press the Pause soft key P appears when you pause recording To resume a recording Press the Resume soft key R appears when you restart recording ...

Страница 65: ...ey If you lift the handset while you are listening through the speaker you will now hear the audio through the handset You cannot start playback while a call is in progress or if you have placed a call The message Active call Action aborted appears in either case If all calls are on hold you can start playback If you press on the selected call or the particular line key for the held call playback ...

Страница 66: ...To browse the recorded files 1 Press 2 Select Features Removable Storage Media Browse Recordings You can rename delete or open and open the selected wav file by pressing the Rename Delete or Open soft keys 3 Press to return to the idle display Polycom recommends that you do not remove the USB flash drive while playing back files There is a small probability that the USB flash drive itself may be d...

Страница 67: ...lay The length of the file in hours minutes and seconds and the size of the file also appear 2 Press the Play soft key Playing appears on the graphic display The position indicator in hours minutes and seconds above the progress bar changes as the file plays back in real time Optional Press the Pause soft key to pause the file playback Optional Press the Resume soft key to resume playback of the f...

Страница 68: ...coming call If you were listening to the file through the phone s speaker press and then press the Answer soft key When the call ends the idle display appears To answer a call using the handset Do one of the following Lift the handset If you were listening to the file through the handset hang up the handset and then pick it up again If you were listening to the file through the handset press the l...

Страница 69: ...er the same channel In this way PTT is a collaborative broadcast mode Your system administrator can define up to 25 Paging Groups for Group Paging mode or Channels for PTT mode Your system administrator may assign a label to each group or channel that easily identifies the phones in the group or channel for example All HR Dept Shipping Staff or Executives Each group or channel will have one of the...

Страница 70: ... PTT Broadcasts To send and receive PTT broadcasts you need to subscribe to certain channels By default you re subscribed to Channels 1 24 the Priority channel and 25 the Emergency channel This means that You can send PTT broadcasts on Channels 1 24 and 25 You ll receive PTT broadcasts sent on Channels 1 24 and 25 When you end a PTT broadcast the channel remains open and enters a waiting period Th...

Страница 71: ...broadcast on as shown next The list displays the default channel the most recent channel you sent a broadcast on and other channels you can broadcast on In the above example the default channel is 1 the recent channel is 1 the Emergency channel is 25 and the Priority chnnael is 24 Note To automatically send a PTT broadcast on the default channel press and hold the Talk soft key and then go to step...

Страница 72: ...nel closes and the braodcast ends After you tap the End PTT soft key you can immediately initiate another broadcast on another channel even if the previous broadcast is still in its waiting period Receiving PTT Broadcasts To receive a broadcast sent on a particular channel you need to be subscribed to that channel To subscribe to a channel see Updating Channel Subscriptions on page 3 25 How you re...

Страница 73: ...dcast displays in the inactive call group as an active broadcast as shown next and immediately plays You ll hear both the original call and the broadcast To listen to only the broadcast hold or end the call If your phone isn t allowed to receive broadcasts during active calls the broadcast displays in the inactive call group as a held broadcast as shown next To listen to the broadcast hold or end ...

Страница 74: ...ume of a non emergency broadcast your phone retains the adjusted volume for all subsequent non emergency broadcasts However even though you can adjust the volume of an Emergency broadcast the adjusted volume won t be retained for subsequent Emergency broadcasts All Emergency broadcasts play at the same volume until you adjust it Changing Where Broadcasts are Played While you send a broadcast you c...

Страница 75: ... the Channels Subscriptions screen use the down arrow key to select a channel to subscribe to then press the Edit soft key 4 Use the left or right arrow keys to select Yes then press the Ok soft key By default you re subscribed to Channels 1 24 and 25 Allowing PTT Broadcasts to Play During Active Calls The Accept While Busy option allows PTT broadcasts to come in as active calls if enabled or held...

Страница 76: ...d group of phones called a Paging Group In Group Paging mode users must subscribe to Paging Groups to send and receive pages Sending and Receiving Pages To send and receive pages you need to subscribe to certain Paging Groups By default you re subscribed to Paging Groups 1 24 and 25 This means that You can send pages to Paging Groups 1 24 and 25 You ll receive pages sent to Paging Groups 1 24 and ...

Страница 77: ...he page press the Page soft key Just before the page starts you ll hear an alert tone and then the page starts as shown next 4 Start talking 5 To end the page press the End Page soft key Receiving Pages To receive a page sent to a particular paging group you need to be subscribed to that group To subscribe to a paging group see Updating Paging Group Subscriptions on page 3 29 How you receive a pag...

Страница 78: ...ly the page hold or end the call If your phone isn t allowed to receive pages during active calls the page displays in the inactive call group as a held page To listen to the page select the page appearance and press Accept soft key The active call will be held If it s a Priority or Emergency page the page displays in the inactive call group as an active page and immediately plays You ll hear both...

Страница 79: ...that you can send pages to and receive pages sent to these groups You can change which groups you are subscribed to However you can t disable your subscriptions to Paging Groups 24 and 25 To update your Paging Group subscriptions 1 Press then select Settings Basic Preferences Paging PTT Configuration Group Paging 2 From the Group Paging Configuration screen use the down arrow key to locate Groups ...

Страница 80: ...g Configuration screen use the down arrow key to locate Accept While Busy then press the Edit soft key 3 From the Accept While Busy screen use the left or right arrow key to select Enabled or Disabled then press the Ok soft key The default setting is Disabled When enabled your phone will accept and play pages while you re in an active call When disabled your phone won t play pages while you re in ...

Страница 81: ... appears on the screen 3 If you still want to update the configuration press the Yes soft key The configuration is updated On occasion your phone may restart depending on which configuration parameters have changed 4 If the phone did not restart press to return to the idle screen Restarting Your Phone In rare cases your system administrator may ask you to restart your phone to assist in troublesho...

Страница 82: ... screen 3 If you still want to restart your phone press the Yes soft key The restart process begins The process ends when the idle screen appears Note Do not restart your phone to upload a new configuration Instead refer to Accessing Features with Your Login Credentials on page 3 30 Note Call lists are automatically cleared when you restart the phone ...

Страница 83: ...vide a productivity enhancing solution for users who manage and monitor multiple simultaneous telephone calls on a daily basis This topics include Connecting the SoundPoint IP Backlit Expansion Module Features of the SoundPoint IP Backlit Expansion Module Adjusting the Display Contrast Adjusting the Backlight Intensity Placing Calls Answering Calls Assigning Speed Dial Keys Using the Busy Lamp Fie...

Страница 84: ...undPoint IP 650 or the SoundPoint IP Backlit Expansion Module 2 Align the SoundPoint IP Backlit Expansion Module at the top of the groove lines on the SoundPoint IP 650 phone and slide it downwards until it clicks into position 3 Connect the base stand by aligning the two protrusions on the stand to the holes on the back of the Backlit Expansion Module and snap it into place For each SoundPoint IP...

Страница 85: ...Description 1 Power Contact Not visible when you connect the SoundPoint IP Backlit Expansion Module to the phone Power automatically transfers from the host phone to the SoundPoint IP Backlit Expansion Module s upon connection You can plug in and unplug the units at any time 2 Line Speed Dial Keys Use these keys to activate up to 47 lines or speed dials that can be assigned to your phone ...

Страница 86: ...cklit Expansion Module to your phone you can place a call using one of the Line Keys 3 Line Indicators Individual multi color LEDs display the dynamic call state and remote user status busy lamp field BLF and presence The mapping is Solid green An active call is in progress Fast flashing green There is an incoming ringing call Flashing green Another party has put you on hold Flashing red The call ...

Страница 87: ...le to your phone you can answer a call using one of the Line Keys To answer a call using a SoundPoint IP Backlit Expansion Module Line Key Press the assigned directly opposite the line with the fast flashing green LED indicator For more information on answering a call refer to Answering Calls on page 2 4 Assigning Speed Dial Keys You can associate contacts with Line Keys on the SoundPoint IP Backl...

Страница 88: ...oft key to select between numeric and upper lower case alphanumeric modes Use the Encoding soft key to access special characters in other languages 5 Enter a contact number The number must be unique not already in the directory 6 Change the Speed Dial Index field It is automatically assigned to the next available index value You may instead enter any unused speed dial number from 1 to 9999 Polycom...

Страница 89: ... monitor the hook status and remote party information of other users through the BLF LED indicators and display on the SoundPoint IP 650 phone with the attached Backlit Expansion Module For more information contact your system administrator The following figure shows the busy status of other users for example Jim Brown and Rob Smith are busy on the phone For more information refer to Quick Tip 373...

Страница 90: ...User Guide for the SoundPoint IP 650 Desktop Phone 4 8 ...

Страница 91: ...nistrator For more information about these customizations refer to System Customizations on page 5 28 If you require additional information or assistance with your new phone contact your system administrator Configuring Basic Settings You can configure basic settings such as appearance of the time and date display contrast backlight intensity headset memory mode headset hookswitch selection ring t...

Страница 92: ...ress 2 Select Settings Basic Preferences Time Date 3 Select from Clock Date Clock Time shown below Clock Order or Enable Disable 4 Scroll through the options under each of these selections 5 Press the Select soft key to confirm your choice 6 Press to return to the idle screen Changing the Display Contrast You may adjust the contrast of the phone display and the idle display separately To adjust th...

Страница 93: ...ntensity separately You can choose a high medium or low intensity or turn the backlight off entirely When you modify the Maximum Intensity you are modifying the entire backlight intensity scale For example if you decrease the Maximum Intensity the low medium and high values for the Backlight On intensity and the Backlight Idle intensity will decrease proportionally If you have attached any expansi...

Страница 94: ...t Backlight On Intensity 4 Scroll to select high default medium low or off and then press the Select soft key Press the Save soft key to accept your changes 5 Select Backlight Idle Intensity 6 Scroll to select high medium low default or off and then press the Select soft key Press the Save soft key to accept your changes 7 Select Maximum Intensity ...

Страница 95: ...hown relative to these values 9 Press the Ok soft key to accept your changes 10 Press to return to the idle screen Changing the Backlight Timeout You can change the length of time your phone is idle before the backlight changes to the Backlight Idle Intensity To change the backlight timeout 1 Press 2 Select Settings Basic Backlight Timeout 3 From the Backlight Timeout screen scroll to the timeout ...

Страница 96: ...ress 2 Select Settings Basic Preferences Headset Analog Headset For information on headsets that provide Polycom supported electronic hookswitch features for placing answering and ending calls refer to Technical Bulletin 37477 SoundPoint IP Family Headset Compatibility List available from http www polycom com support voice soundpoint_ip VoIP_Technical_Bulletins_pu b html For information on headset...

Страница 97: ...h different lines or phones from each other To change the incoming ring type 1 Press 2 Select Settings Basic Ring Type 3 If multiple lines are configured on your phone scroll to the desired line and select it 4 Scroll to select the desired ring type To hear the selected ring type press the Play soft key 5 Press the Select soft key to change to the selected ring type 6 Press to return to the idle s...

Страница 98: ...ss the Select soft key to change to the selected audible ringer 5 Press to return to the idle screen Changing the Language The SoundPoint IP 650 phone supports many languages Note If you configure your SoundPoint IP 650 phone with a silent ring press the flashing Line key or the Answer soft key to answer the call If your handset is off hook the call is routed to the handset If your handset is on h...

Страница 99: ...an Polish Portuguese Russian Slovenian Spanish and Swedish 4 Press the Select soft key to change to the highlighted language Text that appears on the graphic display will change to the language of your choice 5 Press to return to the idle screen Changing the Graphic Display Background You can change the picture or design that appears on the graphic display A default background displays when the ph...

Страница 100: ...nces you may need to make an additional menu selection Select Background to actually select the background If your system administrator has configured the phone s idle browser and you want to view the background and not the idle browser you can turn off the idle browser by doing the following Select Background Prioritize Background Select Enable and press the Select soft key Note When previewing t...

Страница 101: ...or 1 Press 2 Select Settings Basic Preferences Label Color Using the dialpad keys 1 3 7 and 9 change the soft key color to your desired color The Label soft key on the right reflects your changes 3 Press the Save soft key to accept your changes 4 Press to return to the idle screen Note When the color of the label reaches a certain level of whiteness Cannot save this color Text might be unreadable ...

Страница 102: ... receiver volume during a call Pressing these keys in the idle state adjusts the ringer volume Managing Call Lists You can store a large number of contacts in your phone s directory Contact your system administrator for the exact number You can add edit delete dial or search for a contact in this directory Adding Contacts You can add a contact manually or from a call list Note To conform to regula...

Страница 103: ...the 1 A a soft key to select between numeric and upper lower case alphanumeric modes Use the Encoding soft key to access special characters in other languages 6 Enter a contact number This is a required field and it must be unique not already in the directory 7 Change the Speed Dial Index if desired It is automatically assigned to the next available index value For more information refer to Assign...

Страница 104: ...nformation on setting the Auto Reject field refer to Rejecting Calls on page 5 26 10 Press the Save or Cancel soft keys to accept or cancel changes 11 Press or the Exit soft key repeatedly to return to the idle display Adding Contacts From Call Lists To add a contact from a call list 1 Do one of the following steps a Press Select Call Lists Missed Calls Received Calls or Placed Calls as desired b ...

Страница 105: ... and the key to page down 4 Press the Edit soft key 5 Make the desired changes 6 Press the Save or Cancel soft keys to accept or cancel changes 7 Press or the Exit soft key repeatedly to return to the idle display Deleting Contacts To delete a contact 1 Press 2 Select Contact Directory Note You can also edit a contact associated with a speed dial key by pressing and holding that speed dial key and...

Страница 106: ...atedly to return to the idle display Placing a Call to a Contact To place a call to a contact 1 Press 2 Select Contact Directory 3 Scroll to highlight the contact You can also use the key to page up and the key to page down 4 Press the Dial soft key Searching For a Contact To search for a particular contact 1 Press 2 Select Contact Directory 3 Press the More soft key and then the Search soft key 4...

Страница 107: ...lete contacts You may have access to portions of your corporate directory through your phone The contacts that you can see are determined by your system administrator You can place calls to contacts in your corporate directory You may be able to add contacts from the corporate directory to your local contact directory Adding Contacts You can add contacts to your contact directory manually from a c...

Страница 108: ... must be unique not already in the directory 7 Optional Change the Speed Dial Index It is automatically assigned to the next available index value You may instead enter any unused speed dial number from 1 to 9999 For more information refer to Assigning Speed Dial Keys on page 2 21 8 Optional Change the Ring Type and Divert Contact These fields may be left blank For more information on setting the ...

Страница 109: ...the Save soft key to accept your changes 11 Press to return to the idle screen Adding Contacts From Call Lists To add a contact to the local contact directory from a call list 1 Do one of the following a Press and then select Call Lists Missed Calls Received Calls or Placed Calls as desired b Use a or shortcut from the idle menu 2 Scroll to highlight the contact You can also use the key to Page Up...

Страница 110: ...e View soft key The contact s information appears on the graphic display 5 Press the Save soft key to save the contact in the local contact directory Entry saved appears on the graphic display Only the first name last name and phone number are saved 6 Press to return to the idle screen Editing Contacts To edit a contact in the local contact directory 1 Press 2 Select Contact Directory 3 Scroll to ...

Страница 111: ...Press 2 Select Contact Directory 3 Scroll to highlight the contact You can also use the key to page up and the key to page down 4 Press the More soft key followed by the Delete soft key The contact is deleted from the directory 5 Press to return to the idle screen Note You can quickly edit a contact associated with a speed dial key by pressing and holding the contact s speed dial key and then perf...

Страница 112: ...ighlight the contact You can also use the key to page up and the key to page down 4 Press the Dial soft key Placing Calls From the Corporate Directory To place a call to a contact in the corporate directory 1 Press 2 Select Corporate Directory 3 Search for the contact Refer to Searching the Corporate Directory on page 5 23 4 Press the View soft key The contact s information appears on the graphic ...

Страница 113: ... can dial any successful matches from the resulting information on the graphic display Searching the Corporate Directory To search for a contact in the corporate directory if enabled 1 Press 2 Select Corporate Directory Note Your phone can remember and display the person or search you were last viewing every time you open the corporate directory To enable this feature press the Menu key and then s...

Страница 114: ...ine enter the first few characters of the contacts s last name using the dial pad For example to search for Carol Woller enter wo in the search line Press the Submit soft key In this example Carol Woller appears in the search results If no entries in the corporate directory match the search parameters No entries found appears ...

Страница 115: ...n on the graphic display Managing Incoming Calls You can distinguish incoming calls by setting distinctive rings for contacts in your contact directory sending particular calls directly to your voice mail or transferring particular calls to another party Distinguishing Calls You can customize your phone so that you can distinguish different parties by ring type Note This feature is local to the ph...

Страница 116: ...e on page 5 7 To remove a distinctive ring or have no distinctive ring navigate Left to the blank entry 6 Press the Save soft key to accept your changes 7 Press to return to the idle screen Rejecting Calls You can customize your phone so that incoming calls from a particular party are immediately sent to your voice mail To send incoming calls from a contact directly to voice mail 1 Press 2 Select ...

Страница 117: ...ing calls from a particular contact are transferred directly to a third party To divert incoming calls from a particular contact 1 Press 2 Select Contact Directory 3 Scroll to highlight the contact You can also use the key to page up and the key to page down 4 Press the Edit soft key and then scroll down to the Divert Contact field 5 Enter the number of the party to whom you want to divert the cal...

Страница 118: ...t key to accept your changes 9 Press to return to the idle screen System Customizations Support for multiple lines multiple line keys per line or shared lines can be configured by your system administrator See your system administrator for details regarding these customizations ...

Страница 119: ...include Power and Startup Controls Access to Screens and Systems Audio Calling Displays Productivity Suite To obtain more detailed troubleshooting information you can access certain menus on your phone that test your phone hardware For more information see Testing Phone Hardware on page 6 7 If you require additional assistance contact your system administrator Note Before restarting your phone con...

Страница 120: ...r PoE Make sure that the phone isn t plugged into a plug controlled by a light switch that is off If the phone is plugged into a power strip try plugging it directly into a wall outlet instead Try the phone in another room where the electricity is known to be working on a particular outlet Symptom Problem Corrective Action The dial pad does not work The dial pad on the SoundPoint IP 650 phone does...

Страница 121: ...erify that your phone line is registered Contact your system administrator The screen shows Network Link is Down The LAN cable is not properly connected Do one of the following Check termination at the switch or hub furthest end of the cable from the phone Check that the switch or hub is operational flashing link status lights or contact your system administrator Check if the LAN port is active or...

Страница 122: ... the arrow keys select Enabled and then press the Select soft key Contact your system administrator Symptom Problem Corrective Action There is no dial tone Power is not correctly applied to the SoundPoint IP 650 phone Do one of the following Check that the screen is illuminated Make sure the LAN cable is inserted properly at the back of the phone try unplugging and re inserting the cable If using ...

Страница 123: ...ncoming call information Lift the handset Ensure the dial tone is present and place a call to another extension or number Check that the screen changes in response The ringer is in silent mode Do one of the following Change the Ring Tone from Menu Settings Basic Ring Type Service Unavailable appears on the screen The phone call server configuration or organization settings do not support the featu...

Страница 124: ...e of the following Refer to Changing the Display Contrast on page 5 2 Restart the phone to obtain a default level of contrast Use the screen capture feature Contact your system administrator to determine if it is enabled Outbound or inbound calling is unsuccessful Do one of the following Place a call to the phone under investigation Check that the screen indicates incoming call information Lift th...

Страница 125: ...e tests To test your phone hardware Press and then select Status Diagnostics Test Hardware Audio Diagnostics Keypad Diagnostics or Display Diagnostics Symptom Problem Corrective Action You are trying to access one of the following features but it is not available on your phone Corporate Directory Recording and Playback of Audio Calls Managing Conferences The license is not installed on your phone ...

Страница 126: ...User Guide for the SoundPoint IP 650 Desktop Phone 6 8 ...

Страница 127: ...ormat in whole or part without written consent from Polycom Inc Do not remove or allow anybody else to remove any product identification copyright or other notices Limitations of Liability LIMITATION OF LIABILITY TO THE FULL EXTENT ALLOWED BY LAW POLYCOM EXCLUDES FOR ITSELF AND ITS SUPPLIERS ANY LIABILITY WHETHER BASED IN CONTRACT OR TORT INCLUDING NEGLIGENCE FOR INCIDENTAL CONSEQUENTIAL INDIRECT ...

Страница 128: ...com will retain risk of loss or damage until the item is delivered to Customer The product software comes with 90 day software warranty providing for software updates minor releases bug fixes To continue to receive support purchasing a maintenance contract is the most economical solution Exclusions Polycom will not be liable under this limited warranty if its testing and examination disclose that ...

Страница 129: ...orient or relocate the receiving antenna 2 Increase the separation between the equipment and receiver 3 Connect the equipment into an outlet on a circuit different from that to which the receiver is connected 4 Consult the dealer or an experience radio TV technician for help Modifications In accordance with Part 15 of the FCC Rules the user is cautioned that any changes or modifications not expres...

Страница 130: ... of Conformity can be obtained from Polycom Ltd 270 Bath Road Slough Berkshire SL1 4DX UK WARNING Electrical Safety This product is rated 24Vdc 0 5A When used with the optional external power supply the power supply shall be a Listed power supply with a LPS output rated 24V min 500mA Russian Compliance SoundPoint IP 650 Ministry of Information Technologies Communication of the Russian Federation D...

Страница 131: ...gh the PSTN 3 Because of the extensive delay already experienced when calling cellular and international networks some of which is already caused by their use of voice compression technologies Telecom Access Standards will only approve G711 voice technology for use on the PSTN G711 is an Instantaneous Speech encoding Technique whereas G729 and all its variants are considered Near Instantaneous int...

Страница 132: ...User Guide SoundPoint IP Regulatory Notices 6 ...

Страница 133: ...ovided below this License Agreement does not grant you any rights to patents copyrights trade secrets trademarks or any other rights in respect to the Software Product 2 DESCRIPTION OF OTHER RIGHTS AND LIMITATIONS 2 1 Limitations on Reverse Engineering Decompilation and Disassembly You may not reverse engineer decompile or disassemble the Software Product except and only to the extent that such ac...

Страница 134: ...upport Services Polycom may use such information for its business purposes including for product support and development Polycom will not utilize such technical information in a form that personally identifies you 4 TERMINATION Without prejudice to any other rights Polycom may terminate this Agreement if you fail to comply with any of the terms and conditions of this Agreement In such event you mu...

Страница 135: ...TENT PERMITTED BY APPLICABLE LAW IN NO EVENT SHALL POLYCOM OR ITS SUPPLIERS BE LIABLE FOR ANY SPECIAL INCIDENTAL INDIRECT OR CONSEQUENTIAL DAMAGES WHATSOEVER INCLUDING WITHOUT LIMITATION DAMAGES FOR LOSS OF BUSINESS PROFITS BUSINESS INTERRUPTION LOSS OF BUSINESS INFORMATION OR ANY OTHER PECUNIARY LOSS ARISING OUT OF THE USE OR INABILITY TO USE THE SOFTWARE PRODUCT OR THE PROVISION OF OR FAILURE TO...

Страница 136: ...make it enforceable 10 3 Contact If you have any questions concerning this Agreement or if you desire to contact Polycom for any reason please contact the Polycom office serving your country 10 4 U S Government Restricted Rights The software and documentation provided by Polycom pursuant to this Agreement are Commercial Items as the term is defined at 48 C F R 2 101 consisting of Commercial Comput...

Отзывы: