background image

Page 40

I
I
I

Chain replacement -

Most replacement chains will be longer than needed and

will have to be trimmed to size. Remove the old chain by removing the master
link. The master link will have a U shaped spring clip holding the chain’s side
plate on. Pry the clip off with a screwdriver, remove sideplate, and remove
master link from chain. Spread the old chain out straight on the floor and lay
the new chain next to it to determine where to cut the new chain. Mark the
chain at the proper spot. Before cutting the chain, thread it onto the sprockets
and make sure the mark is at the correct spot. It is possible the existing chain
was shortened as it stretched, you don’t want to cut your new chain too short.
With the rear wheel adjusted almost all the way forward, your new chain
should be just long enough. Adjust your cut mark if needed. A special chain
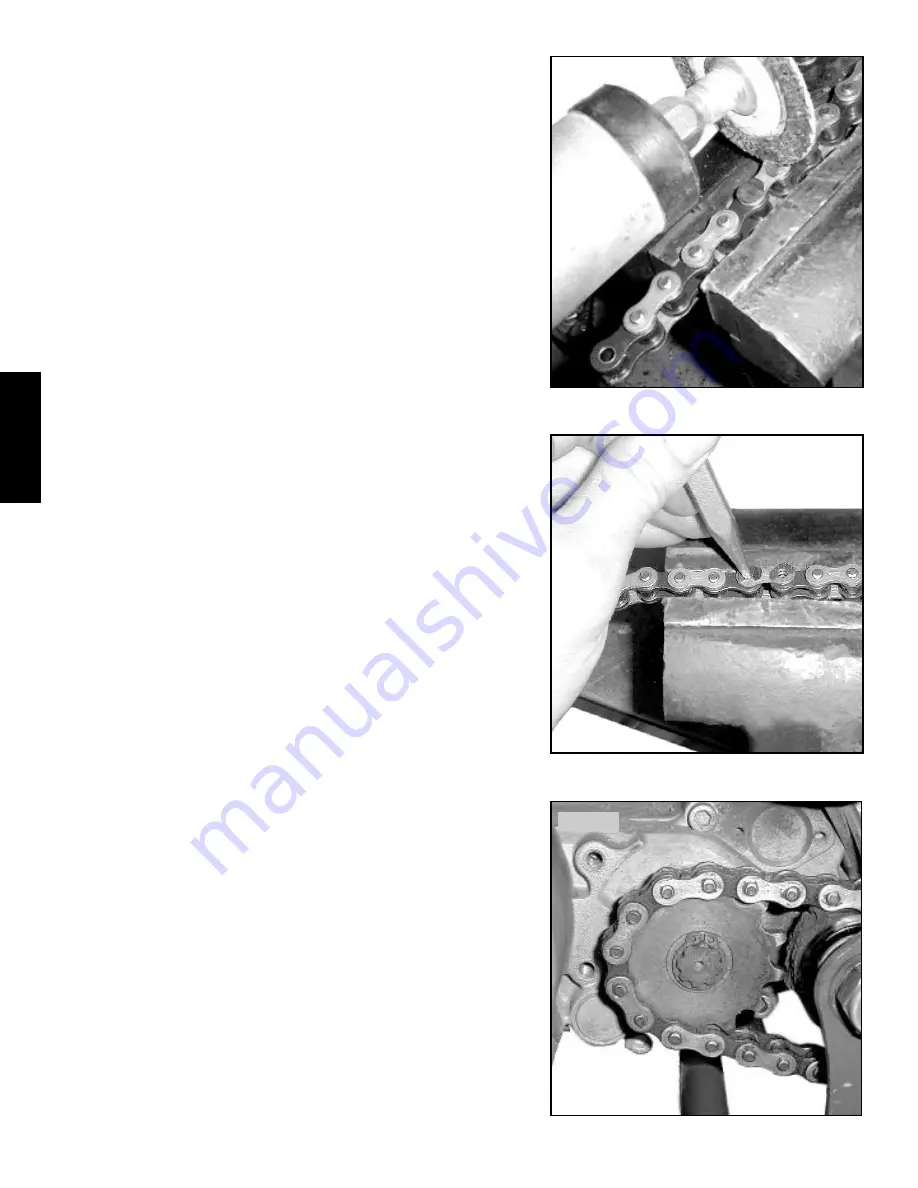
breaker tool is available to cut the chain. If you do not have this tool, you will
have to drill or grind the ends of the rivets flush with the sideplate on the link
you wish to remove. See photo III-71. Then use a punch to drive the rivets
throught the sideplate and separate the link. See photo III-73.

Sprockets & gearing -

Check sprockets frequently for wear and damage. The

sprocket teeth will begin to “hook” when the sprocket is worn out. Do not let
sprocket wear become too bad or chain breakage may result. When changing
rear sprocket, use medium strength (blue) threadlocker on sprocket bolts and
torque to 

XX ft/lbs 

using a 10mm socket. To remove front sproket, remove

chain and use a pair of snap ring pliers to remove snap ring securing sprocket.
Note that the boss on the front sprocket should face inward, towards the motor.
Make sure the snap ring is fully seated in it’s groove when installing front
sprocket. See photo III-74.

Gearing -

The front and rear sprockets can be changed to alter the final gear

ratio of the motorcycle. Using more teeth on the front sprocket raises gearing,
while adding teeth to the rear sprocket lowers gearing. The calculate the actual
gear ratio, divide the number of teeth on the rear sprocket by the teeth on the
front sprocket. For example, with a 12 tooth front and and 42 tooth rear: 42/12
= 3.5 If you add a tooth to the front sprocket: 42/13 = 3.23 If you add a tooth
to the rear sprocket: 43/13 = 3.31 Adding teeth to the front sprocket makes a
roughly 3 times larger change in gearing than adding a tooth to the rear
sprocket. Note that a higher number is a “low” gear ratio, and a smaller num-
ber is a “higher” gear ratio. A higher ratio will increase the motorcycles top
speed, but reduces the responsiveness and acceleration. A lower gear ratio will
increase the responsiveness and acceleration but will lower the top speed. In
general you want to use the lowest gear ratio possible that will still allow the
speed needed for the fastest straightaway on the track. If too low a ratio is used,
the bike will start well (but may wheelie) and will run out of acceleration on
the fastest section of the track, allowing other bikes to pass. Too high of a ratio
will result in slower starts and more difficulty in deep sand or mud. A begin-
ning rider will generally benefit from a higher ratio until they can handle all
the acceleration of the lower ratios (try the 13 or 14 tooth front with the stan-
dard 42 rear). 

Chain rollers, chain guide and wear pads - 

The chain roller and wear pads

on the swing arm and chain guide are important for the proper life and opera-
tion of the chain and sprockets. Check the chain roller periodically to make
sure that it rotates freely. Replace if badly worn or frozen. Inspect the wear
pads on swingarm to make sure they are not worn through. Replace as needed
to prevent damage to chain or swingarm. Check wear pad in chain guide and
replace as needed.

Front sprocket & snap ring. (boss faces inward)

III

III

.74

.74

Grind or drill rivet heads flush.

Use a punch to remove sideplate.

III

III

.72

.72

III

III

.73

.73

Содержание X1R

Страница 1: ...URES 1 Notes warnings 10 2 Maintenance lubrication schedule chart 10 3 Maintenance preparation 10 4 Coolant 11 5 Air cleaner service 11 6 Transmission oil 11 7 Seat removal 12 8 Fuel tank gas filter 1...

Страница 2: ...tion assembly 39 21 Final drive 39 chain adjustment and lubrication 39 Sprockets gearing 40 chain roller wear pads 41 22 Cleaning storage 41 23 Pre post between race maintenance 42 24 Special tools su...

Страница 3: ...ges 4 6 assuming they have the size strength reflexes and maturity to operate a competition motorcycle Make sure your child can confidently ride a bicycle and understand and respond to your instruc ti...

Страница 4: ...ll front number plate by inserting 3 fingers into holes in front fender then insert phillips M5x30 screw using metric spacer 5 5 x 12 x 20 Spread the grey plastic front brake cable guide over cable pu...

Страница 5: ...st gently turn in until it stops then back out counting the turns to the desired setting The fuel metering screw can cause overall jetting to be too rich if it is turned out too far Note that the fuel...

Страница 6: ...t the rear caliper Check the movement of the caliper arm it should be 5 10mm measured at the tip of the arm Adjust caliper as needed using the same procedure as for the front brake caliper see section...

Страница 7: ...x 27oz Engine Ice antifreeze dual radiator models Carburetor model X1 Dell Orto PHBG19 19mm X1 models sleeved to 14mm for AMA compliance X3 21mm sleeved to 19mm X5 XX jet sizes X1 main 88 needle W3 2n...

Страница 8: ...may not provide enough lubrication cause piston rings to stick cause heavy deposits in engine and foul spark plugs or separate from the gasoline The use of Maxima brand K2 premix oil is strongly recom...

Страница 9: ...lider retaining bolt 20 ft lbs 27 1Nm Fuel tank screw snug by hand only Handlebar clamps 18 ft lbs 25 Nm Lower shock nut 33 ft lbs 45 Nm Rear axle nut 37 ft lbs 50 Nm seat bolt snug by hand only Spark...

Страница 10: ...s check for worn or curved teeth each time chain is adjusted Chain roller wear pads check roller for free rotation when checking chain Make sure roller is not bent or damaged Check chain wear strips o...

Страница 11: ...due 2 Next wash your filter twice with dish soap and hot water Rinse a third time Do not stretch or twist the filter Be careful not to dam age or crush the seams at the corners of the filter 3 Let fil...

Страница 12: ...uel filter drain fuel and remove tank Remove two screws attaching fuel valve to bottom of tank using an 8mm socket Pull valve out of tank Clean fuel filter carefully do not attempt to remove filter fr...

Страница 13: ...retaining bolts and torque to XX in lbs Install lever spring and caliper lever and loosely install nut to retain lever Push caliper onto mounting pins and reinstall front wheel Spread pads to insert d...

Страница 14: ...weight of motorcycle A clean bike is easier to inspect and service However be very cautious if using a pressure washer The extremely high pressure water can cause considerable damage to wheel bearing...

Страница 15: ...ting more difficult Always use new rings circlips 2 when replacing piston replacing rod bearing and pin with each new piston is also a good idea Use of a high quality synthetic or semi synthetic premi...

Страница 16: ...ve cylinder nuts Remove 4 nuts on top of cylinder head using a 10mm wrench To pre vent warpage loosen nuts 1 4 turn at a time using a criss cross pattern until finger tight then remove Remove cylinder...

Страница 17: ...ton There should be no noticeable slop Put rod bearing in end of rod and fit piston pin through bearing Lift straight up on pin to check for any play Replace bearing and pin when installing new piston...

Страница 18: ...bustion chamber or cylinder into coolant passages Cylinder ID Iron cylinder 40 0 40 015mm new 40 030mm max Aluminum cylinder 40 180 40 220mm new 40 230mm max Piston to cylinder clearance 030mm min 070...

Страница 19: ...olts to 10 Nm Guide expansion pipe through frame and insert rear of pipe into muffler Lubricate o ring on front of pipe then insert front of pipe into exhaust exten sion and twist pipe back and forth...

Страница 20: ...haft is not free to move Inspect the gears shafts and bearings closely for damage bending or excessive wear Also check the cases for damage or cracks around the bear ing bores and the swingarm pivot b...

Страница 21: ...e hook under the seal lips then pull the shaft of the tool outward to rotate the hook under seal Jerk handle firmly to remove seal See photo III 28 To install seals begin by lubricating both sides of...

Страница 22: ...Regular oil changes and cleaning of the clutch will help prevent problems The Maxima MTL 75 transmission oil has special additives to prolong clutch life and is strongly recommended Three shoe clutch...

Страница 23: ...arating from shoe Check spring washers for signs of abnormal wear or for flattening also examine shoulder bolts for any grooves or wear Check inside of clutch drum for scoring or uneven wear If clutch...

Страница 24: ...hreadlocker on clutch nut Check end of crankshaft for wear Make sure starter gear will slide over end of shaft Remove any burrs as required with a file cov ering clutch and cases with a rag to make su...

Страница 25: ...d a weaker early style kickstarter drive gear and driven gear See photos III 39 III 40 These parts can be upgraded but due to the thicker drive gear the clutch cover case will need to be machined to m...

Страница 26: ...peration Shake float gently to make sure no fuel has entered float If the bike smokes alot and the plug seems fouled with oil the transmission seal behind the clutch assembly may be leaking oil into t...

Страница 27: ...will have to put a piece of tape on the throttle housing by the grip Make a mark on the grip and mark the tape at the closed position Twist the grip fully open and mark the position on the tape Find a...

Страница 28: ...ing the needle Adjust the clip position as needed by removing the small clip and snapping it into another groove The top groove will cause the needle to run leanest the bottom groove will cause the ne...

Страница 29: ...uch float height will cause a lean condition In severe cases fuel can fill up the motor which can cause the piston to lock and create a fire hazard If you suspect the carburetor has overflowed do not...

Страница 30: ...e squeezed together to fit into the center portion of rim so the tire will be loose enough to pry over the edge of the rim Squeezing tire into rim on one side insert a tire iron into tire on the oppos...

Страница 31: ...ition Push the rim to one side and remove the rim from the spokes on the other side then work your way around to completely remove the rim Install the rim starting one one side making sure the angles...

Страница 32: ...the X3 X5 models Lighter riders can try a 7wt oil or mix a 5 and 10wt oil to reduce dampening force Different brands of oil also have slightly different weights for the same specification Oil weight...

Страница 33: ...e a spacer not shown at the top of the spring if the fork was adjusted for a heavier rider Remove the fork spring and invert the fork to drain oil Pump the fork a few times to remove most of the oil T...

Страница 34: ...ing preload Use a spanner wrench to adjust the slotted adjusting nut Use of a screwdriver and hammer to turn nut may damage nut and shock threads Loosen the upper lock nut before adjusting the spring...

Страница 35: ...The shock sag must be adjusted for rider weight and ability To measure sag put motorcycle on stand with rear wheel off the ground Measure from center of rear axle to side panel screw near rear of seat...

Страница 36: ...n and side to side to check for excessive play or binding Loosen and remove the swingarm shaft nut on the left side of bike using a 19mm socket Prevent the bolt from turning by using a wrench or socke...

Страница 37: ...den To install the grips it is best to use grip cement Follow the direc tions on the glue for best results Make sure the glue does not get onto the end of the throttle tube that goes into the housing...

Страница 38: ...en tighten the screws Recheck the 0 measurement and the fir ing measurement and make any final adjustments Check to make sure the flywheel doesn t rub the stator if so insert 3 or 4 shims or feeler ga...

Страница 39: ...or rag to remove heavy deposits of dirt Put the motorcycle on a stand with the rear wheel off the ground or lean the bike against the kickstand to pull the rear wheel off the ground Spray the oil on t...

Страница 40: ...al gear ratio of the motorcycle Using more teeth on the front sprocket raises gearing while adding teeth to the rear sprocket lowers gearing The calculate the actual gear ratio divide the number of te...

Страница 41: ...he next and so on Between moto maintenance Clean the bike as best you can between motos Inspect the bike for damage and repair it the best you can in the time you have In the event of more than minor...

Страница 42: ...contains exploded parts diagrams part numbers main case splitter tool 144 695 001 needed to split main cases clutch puller set 2 3 shoe flywheel 99029 this tool is the most useful puller for the price...

Страница 43: ...or piston Exhaust if power is down check for large dents blown out silencer packing or heavy carbon fouling Engine make sure motor mount bolts are tight Brakes are dragging or not working check for Mu...

Страница 44: ...ed the circlip Consider powder coating parts for protection and appearance Exhaust pipe can be coated with high temperature ceramic coating for durability The piston can be dry film coated for longevi...

Страница 45: ...discount gear www elineaccessories com www factoryconnection com www maximausa com Maxima lubricants www motocrossaction com www moto directory com www oneal com www promotorcyclesafety com neck suppo...

Страница 46: ...ition 3 intake 15 jetting 26 29 kickstarter 25 maintenance schedule 10 muffler 13 needle 28 oil premix 8 oil transmission 11 operating instructions 5 optional parts 42 43 pads 13 parts 43 pipe 10 15 p...

Отзывы: