Polini THOR 190 HF Скачать руководство пользователя страница 15

13

ENGLISH

without accelerating and without using the starter. Now start the 
engine and let it idle until it warms up to normal temperature

4 RUNNING IN

Run your engine in as instructed below to ensure that the engine 
and transmission bed in correctly and to ensure continuous reliability 
in future. Once the engine starts, leave it idling until it warms up to 
normal temperature. We suggest running the engine 15 minutes at 
medium-low engine power output gently accelerating and with diffe-
rent intensity. Now we suggest checking the correct idling calibration. 
During the first flights or for the first 20 litres of petrol we suggest not 
keeping the engine at the maximum rpm for too much time, conside-
ring that the 2-stroke engine doesn’t stand to the constant rpm even 
if of medium power. We suggest varying the engine rpm. Check the 
carburetion after the first landing. Repeat the running in every time 
you change one of the following parts: piston, piston rings, cylinder, 
crankshaft or main bearings.

5 ENGINE SWITCING OFF

Switch the engine off by pressing the button till the complete stop.
If the engine is equipped with the Polini throttle control the switch off 
button is of red colour and you find it in the upper side; otherwise 
refer to the frame/throttle’s manufacturer to find out the switch off 
button.

6 CARBURETION

The carburetion setting must be executed by professional people only. 
It is possible to make a fast analysis of the carburetion by checking the 
spark plug colour. To do it, switch the engine off after having run it for 
some second under charge.
Remove the spark plug unscrewing it with the proper tool and verify 
the colour of the porcelain that must be of light-brown colour with 
tendency to dark. A light colour of the spark plug electrode means a 
lean carburetion; if you use the engine in these conditions may cause 
the engine failure. Do not use the engine in these conditions and apply 
to an authorized retailer to set it up.

IMPORTANT: 

Walbro carburetors have a plastic seal that limits the 

(H) screw regulation to ¼ turn.  This is enough to adjust the engines in 
the different conditions of use. By removing this seal the warranty on 
the engine is no more valid.

7 CLEANING

Clean the engine when it is switched off and cold to avoid burns. 
Clean the engine with a soft cloth soaked with neutral cleansing and 
non-aggressive.

!

WARNING:

 Do not use acids that may damage the engine, paint 

and rubber parts.
 

8 CARRIAGE

!

ATTENTION:

 Carry the engine only when it is cold. Follow the 

frame manufacturer’s instructions for its carriage and how to use the 
fuel tank during its carriage. Be careful of the fuel during the carriage: 
fuel leaks may cause a fire.

The Walbro carburetor is sealed and if you tilt it the fuel does not leak.
For this reason, it is possible to tilt the engine in every position without 
having any leakage of fuel from the carburetor.

9 ORDINARY SERVICING

ATTENTION:

 THE SERVICING OPERATIONS MUST BE DONE BY 

QUALIFIED PEOPLE ONLY. IF THE INSTRUCTIONS MENTIONED BELOW 
WILL RESULT NOT CLEAR, WE SUGGEST ASKING FOR SPECIALISTS BY 
POLINI MOTORI RETAILERS OR WHOLESALERS. FOLLOW CAREFULLY 
WHAT DESCRIBED BELOW.  

Maintenances and servicing necessary for the best set up of your 
engine should be done regularly, or on all occasions before you start 
your engine. All the tasks and adjustments described below can be 
done easily by following the instructions given in this manual. Refer 
to your POLINI MOTORI dealer for scheduled services and repairs, 
and insist that only original spare parts are used to replace worn or 
broken components. Refer to the servicing tables in sections 12 below 
for the frequency with which the various servicing operations must be 
performed.

9.1 REMOVE AND CLEAN THE AIR FILTER

Dirty air filter is one of the most common causes of poor engine 
performance.
Clean the filter periodically or change it. Remove the filter loosening 
the clamps, unscrew the 4 screws using a cross screwdriver, remove the 
filter cover and then the filter. Wash the filtering material with water 
and mild soap. Dry the filter carefully, and then moisten it with oil for 
filters. Clean filter box inside using a cloth and check the presence of 
foreign bodies. Now reassemble all the parts being careful to place 
correctly the 4 bars that maintain the filter in its position and tight 
the 4 screws again. Wash the filter for maximum 2-3 times and then 
replace it with a new one.

!

WARNING

. If the filter becomes clogged with fine dust as well as 

normal dirt, replace it with a new one.

!

WARNING

. Dirty air filter may compromise the correct operation 

of the engine and it causes poor performance. Torn or broken filters 
can allow dirt to enter the engine and cause rapid deterioration of the 
piston rings, piston and barrel.

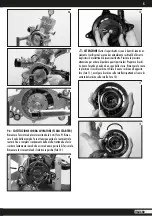
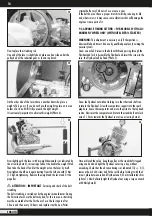
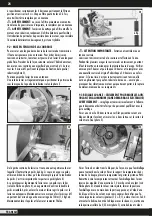
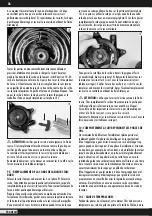
9.2 INSTRUCTIONS TO STRETCH THE TRANSMISSION BELT

In order to grant longer life to the transmission belt a right stretch is 
necessary.
In order to avoid wrong stretches the engine is supplied with a lever 
rod of a fix length.
Proceed as follow: remove the propeller from the engine, unscrew 
counterclockwise of ¼ of turn all the 4 M7 nuts that fix the fixing 
plate of the pulley/gear. (Photo 2)

Содержание THOR 190 HF

Страница 1: ...THOR 190 HF MANUALE D USO E MANUTENZIONE USE AND MAINTENANCE MANUAL NOTICE POUR L UTILISATION ET L ENTRETIEN ...

Страница 2: ... Motori original spare parts The manufacturer has the right to make any modifications that can be useful to improve the features and performance of the products For all the technical details manuals optional please check www polinithor com FRANÇAIS UTILISATION ET ENTRETIEN page 21 Utiliser seulement des pièces d origine Polini Motori Le producteur sera libre d apporter les modifications qu il croi...

Страница 3: ...vita pertanto a leggere attentamente le istruzioni contenute in questo manuale in quanto utili per una maggiore conoscenza del prodotto e padronanza dello stesso e dunque utili a prevenire e misurare eventuali rischi GARANZIA Tutti i motori Polini sono costruiti con materiale di qualità per cui si garantisce che il prodotto acquistato è privo di difetti a condizione che l acquirente acquisti il pr...

Страница 4: ...ilizzo AVVERTENZA il tipo di incrostazioni carboniose depositate sulla testa sulla candela e sullo scarico del cilindro sono informazioni che indicano il tipo di miscelazione del vostro motore Si rammenta che una combustione troppo ricca d olio non allunga la durata del motore ATTENZIONE la benzina è estremamente infiammabile ed esplosiva Eseguire queste operazioni in un luogo ben ventilato e a mo...

Страница 5: ...gra L utilizzo del motore in tali condizioni può facilmente portare alla rottura del motore stesso Non utilizzare il motore in queste condizioni e rivolgersi ad un centro autorizzato per la regolazione NOTA I carburatori Walbro sono dotati di un sigillo di plastica che limita la regolazione della vite del massimo H di di giro Tale rego lazione è sufficiente a tarare i motori nelle varie condizioni...

Страница 6: ...nsionata correttamente in fabbrica Durante i primi utilizzi la cinghia subisce un assestamento pertanto deve essere effettuata la tensionatura dopo la prima ora di utilizzo Verificarla nuovamente dopo 5 ore e successivamente ogni 10 ore e sostituirla con una cinghia nuova originale Polini ogni 50 ore oppure una volta all anno Se la cinghia non è correttamente tensionata avrà uno slittamento che ne...

Страница 7: ...d il relativo coperchio foto 10 09 10 ATTENZIONE Sotto il coperchietto vi sono 2 denti di innesto av viamento verificarne l usura ed eventualmente sostituirli al di sotto degli stessi 2 mollettine di dimensioni ridotte Prestare la massima attenzione per evitare di perdere questi particolari Preparare il cordi no nuovo facendo un nodo ad un capo dello stesso Rimuovere la ruota in plastica e il vecc...

Страница 8: ...e amente il capo non annodato del cordino foto 15 15 Far passare completamente la fune fino a quando il nodo va in battuta Facendo ben attenzione a non mollare il cordino lasciare che la molla ritragga autonomamente il cordino avvolgendolo sulla ruota interna Ora far passare il capo libero del cordino attraverso la maniglia ed effettuare un nodo semplice ben stretto foto 14 Rimon tare l avviatore ...

Страница 9: ...e con l elica e provocarne la rottura 11 1 MOTORE CON AVVIAMENTO ELETTRICO Fissare saldamente la batteria in dotazione che viene consegnata già carica consigliato comunque un ciclo di carica Collegare il relè al telaio Collegare i due cavi rossi al polo positivo della batteria il cavo nero al polo negativo e il cavo giallo verde va collegato ad un interruttore NA Normalmente Aperto verso massa che...

Страница 10: ...sorbente silenziatore Sostituzione pacco lamellare Sostituzione piastra regolazione tensione 928 415 001 e relativi dadi Ogni 300 ore Sostituzione di tutti i cuscinetti e paraoli Sostituzione pistone e fasce elastiche e gabbia a rulli Sostituzione albero motore Sostituzione cilindro TABELLA COPPIE DI SERRAGGIO MINUTERIA MOTORE M N m Kgf m Lbf ft frena filetto Dadi testa 6 12 1 2 8 8 Dadi testa 8 1...

Страница 11: ... motore azionando l avviamento rimontare la candela asciugandola o sostituendola Candela difettosa Sostituirla Candela annerita o bagnata Pulire ed asciugare la candela o sostituirla Cavo di spegnimento a massa Verifica cablaggio Cappuccio candela mal innestato Verifica Il carburatore ha dei problemi Pulizia e verifica del carburatore eventuale sostituzione membrane Non c è scintilla Verifica acce...

Страница 12: ...e Cap Tel Fax Indirizzo Mail Prodotto acquistato il allego copia scontrino fiscale o fattura Firma Acquirente Ai sensi dell art 13 del D lgs 196 2003 relativo al trattamento dei dati personali il sottoscritto presta il proprio consenso al trattamento dei dati personali Vi preghiamo di inviare questo certificato via mail a news polini com al momento dell acquisto per attivare la garanzia ed essere ...

Страница 13: ...this manual since they are helpful for a better knowledge of the products and the use itself and useful to prevent and contain the risks Warranty All the Polini engines are manufactured with high quality materials which grant a product without defects under the conditions that the buyer purchases the products from a Polini authorized dealer Validity of the warranty The warranty is valid for a peri...

Страница 14: ...TION For American customers only The European range of octane is different from the American one e g EU 95 E5 OCTANE US 91 OCTANE EU 98 OCTANE US 93 OCTANE For THOR engines you must use a high octane gasoline not less than US 91 5 ethanol maximum ATTENTION It is important to use 100 LL AVGAS only if you cannot find the fuel abovementioned 3 ENGINE STARTING Make sure that all the bolts and nuts are...

Страница 15: ...ine only when it is cold Follow the frame manufacturer s instructions for its carriage and how to use the fuel tank during its carriage Be careful of the fuel during the carriage fuel leaks may cause a fire The Walbro carburetor is sealed and if you tilt it the fuel does not leak For this reason it is possible to tilt the engine in every position without having any leakage of fuel from the carbure...

Страница 16: ... or once a year If the belt does not have a proper stretch it will slip reducing its life and what is worst it may cause some vibrations that will damage the engine or some parts of it 9 3 ADVANCE TIMING SETTING FOR MODELS WITH ALU MINUM FLYWHEEL ONLY WITHOUT ELECTRIC STARTER WARNING This adjustment is necessary only if the ignition is disassembled and it must be done by qualified people only owni...

Страница 17: ... the new rope in its hole photo 11 wind the rope on the wheel according to the entrance sense of the rope on the wheel Photo 12 Now insert the plastic wheel in its housing again and check through the hole that the internal spring hook is perfectly coupled Photo 13 place the springs the teeth for the starter jaw and screw the cover again using medium thread locker All the parts in movement includin...

Страница 18: ...ns loosen the engine till a descending phase and then gradually accelerate again till achieving a level flight or a glide angle or a rise angle wished In this way you will be sure to maintain firm and efficient the carburation avoiding being over rpm with a minimum valve throttle opening We remind you that two stroke engines do not stand constant range for a long time too much Take care of your en...

Страница 19: ...in 11 3 THROTTLE CONTROL Fix it to the carburetor by using the proper support not supplied After assembling the throttle control check that its travel is enough to reach the carburetor throttle valve opening and check that at the moment of the release it closes completely without hitches in order to avoid the engine staying accelerated Connect the electrical wires of the throttle one on the mass w...

Страница 20: ...g Replace the silencer deadening material Replace the reed valve Replace the tension adjustement plate 928 415 001 and nuts Every 300 hours Replace all the bearings and seals Replace the piston the piston rings and the small end bearing Replace the crankshaft Replace the cylinder TIGHTENING TORQUE VALUE for ENGINE BOLTS and SCREWS M N m Kgf m Lbf ft Locking compound HEAD NUTS 6 12 1 2 8 8 HEAD NUT...

Страница 21: ...uit and replace the petrol Flooded engine Remove the spark plug start the engine dry or replace the spark plug Defective spark plug Replace it Blackened or wet spark plug Clean and dry the spark plug or replace it Earth switching off cable Check the tightening Spark plug hood wrong installed Check it Carburetor has problems Clean and check it eventually replace the diaphragm No spark Check the ign...

Страница 22: ...hone number Fax number E Mail Address Product purchased on I enclose a copy of receipt invoice Purchaser s signature Pursuant to Art 13 of Legislative Decree No 196 2003 concerning the treatment of the personal data the undersigned authorize the treatment of the transmitted personal data Kindly send this certificate by e mail to news polini com at the moment of your purchase in order to activate t...

Страница 23: ...es tiers et les accidents pouvant provoquer des blessures ou décès dérivants de l utilisation de ce produit Nous vous invitons à lire attentivement les instructions de ce manuel car elles sont utiles pour améliorer la connaissance et l utilisation du produit et donc pour prévenir et mesurer chaque risque éventuel GARANTIE Tous les produits Polini sont construits avec du matériel de qualité on assu...

Страница 24: ...s pour longtemps car elle subit un abiment de la qualité Il faut utiliser des récipients métalliques certifiés pour le transport des carburants Mélanger l essence avec l huile seulement au moment de l usage AVERTISSEMENT les incrustations en carbone sur la culasse sur la bougie et sur la sortie du cylindre indiquent le type de mélange de votre moteur On rappelle qu une combustion trop riche en hui...

Страница 25: ...couleur de la porcelaine qui doit être de couleur noisette ou qui tire sur une couleur sombre Une couleur claire de l électrode de la bougie est symptôme d une carburation trop pauvre l usage du moteur dans ces conditions peut facilement porter à la rupture du moteur N utilisez pas le moteur dans ces conditions et adressez vous à un centre autorisé pour le réglage NOTA les carburateurs Walbro sont...

Страница 26: ...rous M7 en partant de l écrou de gauche avec serrage de 15Nm 1 5 Kgf m Maintenant enlever le poids et le levier et remonter l hélice 04 6 Kg ATTENTION IMPORTANTE Entretien et contrôle mise en tension courroie La mise en tension correcte de la courroie est effectuée à l usine Pendant les premiers usages la courroie subi un tassement pourtant il faut la mettre en tension après la première heure d us...

Страница 27: ...e façon à éviter quelconque dommage et blessures Enlever la vis centrale et le couvercle photo 10 09 10 ATTENTION Sous le couvercle il y deux doigts d embrayage démarreur en vérifier l usure et si nécessaire les remplacer et au dessous il y a deux ressorts de dimensions réduites Prêter attention pour éviter de perdre ces composants Préparer la nouvelle corde en faisant un nœud à une extrémité Enle...

Страница 28: ...les deux trous en même temps photo 15 et faire passer complètement la corde jusqu au nœud Faisant attention à ne pas laisser la corde laisser que le ressort tire de manière autonome la corde et la enroule sur la roue intérieure 15 Faire passer le coté libre de la corde à travers la poignée et faire un nœud simple bien serré photo 14 Remonter le démarreur sur le moteur en revissant les 4 vis m5 ave...

Страница 29: ...n collision avec l hélice et en causer la rupture 11 1 MOTEUR AVEC ALLUMAGE ELECTRIQUE Fixer bien la batterie en dotation livrée déjà chargée nous conseillons de toute façon un cycle de charge Connecter le relais au châssis Connecter les deux câbles rouges au pole positif de la batterie le câble noir au pole négatif et le câble jaune vert à un interrupteur NO Normalement Ouvert vers masse qui sert...

Страница 30: ...ôle de l usure de l embrayage et de la cloche Remplacement du piston des segments et de la cage à aiguilles Remplacement du matériel insonorisant du silencieux Remplacement de la boite à clapets Remplacement de la plaque de réglage de la tension 928 415 001 et de ses écrous Toutes les 300 heures Remplacement de tous les roulements et des joint spy Remplacement du piston des segments et de la cage ...

Страница 31: ... faire tourner le moteur en actionnant le lanceur monter la bougie en la séchant ou la remplacer Bougie défectueuse Remplacer la bougie Bougie noire ou humide Nettoyer et sécher la bougie ou la remplacer Cable de coupure moteur Vérifier le cablage et le bouton coupe circuit Antiparasite mal enclenché Vérifier Le carburateur a des problèmes Nettoyage et vérification du carburateur éventuellement re...

Страница 32: ... Numéro de téléphone Numéro de fax Addresse Mail Produit achété le joint copie du ticket de caisse ou de la facture Signature de l acheteur Aux sens de l art 13 du Décret Législatif 196 2003 relatif au traitement des informations personnelles le soussigné donne son propre consensus au traitement des données personnelles Nous vous prions d envoyer ce certificat par mail à l adresse news polini com ...

Страница 33: ......

Страница 34: ...Polini Motori S p A viale Piave 30 24022 Alzano Lombardo BG Italy Tel 39 035 2275111 news polini com www polinithor com PI 734 11A19 ...

Отзывы: