background image


13


3.12


Clock 

Tap the 


Clock

 application icon. Time / date, Alarm, Countdown and Stopwatch are displayed 

Alarm


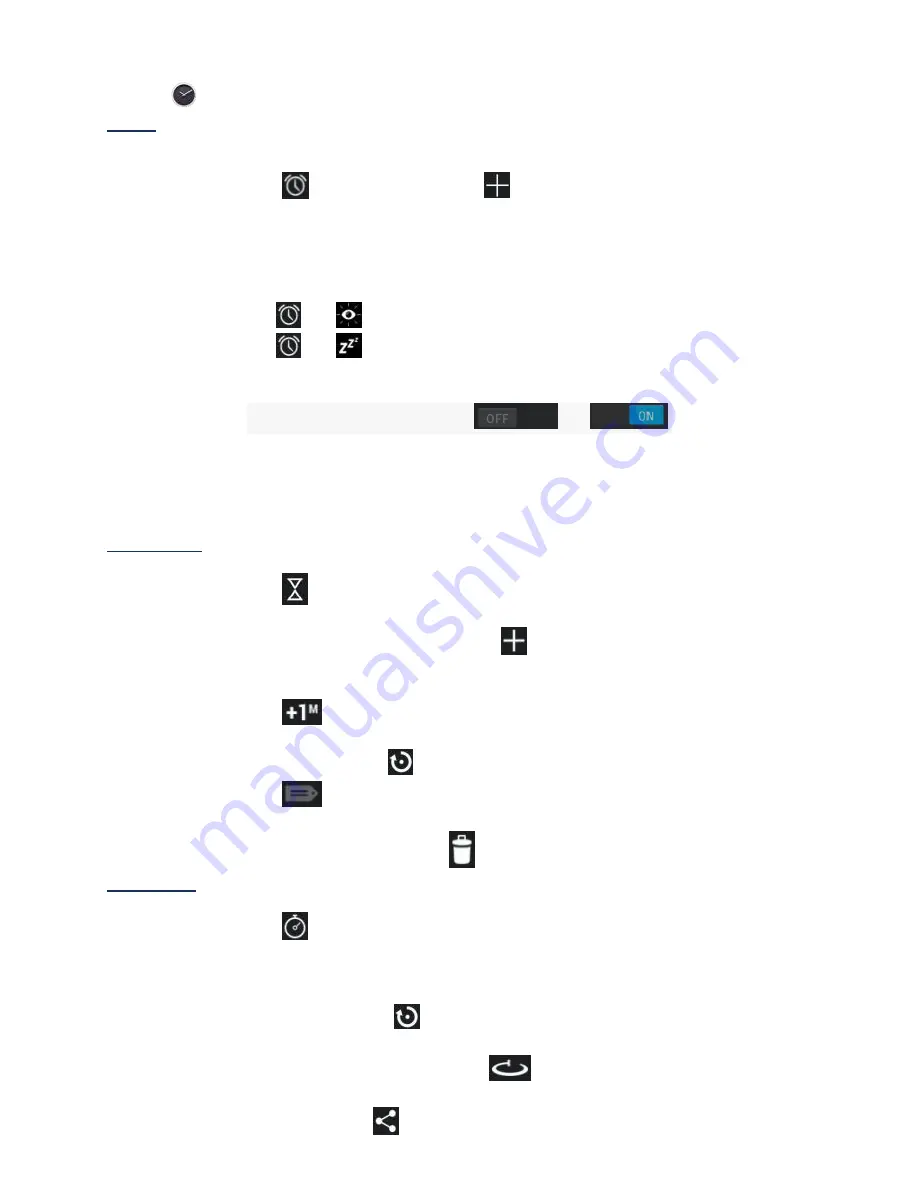
You can use your device as an alarm clock and to set multiple alarms. 

Add Alarm 

1.


Tap 

  to set alarm 

→ Press 

  to add an alarm. 

2.


Set up your alarm as desired. 

3.


Tap 

OK.


4.


Toggle on/off switch to enable. 


Shut Off Alarm Alert 


When a scheduled alarm is activated, a pop-up window with the alarm title appears. 

Drop 


to 

  cancel the alert. 

Drop 

  to 

  to snooze for 10 minutes.   


Turn Alarm on 

1.


In the Alarm list, find the desired alarm. 

2.


Toggle the switch button from 

  to 

Edit Alarm 

1.


Enter the alarm list, click the alarm time to edit. 

2.


After editing, tap 

OK.


Delete Alarm 

1.


Enter the alarm list, drag left or right to delete the alarm you want to delete 

Countdown


Add countdown 

1.


Tap 


Count down 

icon to enter the countdown interface. 

2.


Set a time, then tap

 Start.


If user has set a countdown

  tap 

  below the interface to continue to add a new 

countdown. 

Edit countdown 

1.


Tap 

  to add one minute countdown time. 

2.


Tap

 Stop 

to pause countdown. 

3.


After paused

tap 

  to reset countdown. 

4.


Tap 

  to add tags to the countdown. 

Delete countdown 

In countdown interface

tap 

  to delete the corresponding countdown 

Stopwatch


Start stopwatch 

1.


Tap 


Stopwatch 

icon to enter the stopwatch interface. 

2.


Tap 

Start 

to start the stopwatch. 

Pause / Restart stopwatch


1.


While the stopwatch is running

tap 

Stop

 to pause. 

2.


When paused

tap 

  to reset stopwatch 

Lap times 

While running the stopwatch

tap 

  to record the lap times. 

Share timing results 

After paused

tap 

  to share the results on Google or through Gmail.


Содержание SMTP01

Страница 1: ...ity may change from that which is presented here without prior notice This includes both hardware and software product specifications Products may also differ slightly by geographical locations and as...

Страница 2: ...Specification 5 3 1 Getting to Know Your Camera 5 3 2 Power Button Use 8 3 3 Touch Screen Navigation 8 3 4 U Disk USB Flash Drive 8 3 5 Using the MICRO SD card 8 3 6 Getting Started 9 3 7 Desktop 10...

Страница 3: ...19 EMAIL 16 3 20 File browser 17 3 21 Gallery 18 3 22 Screen Capture 19 3 23 Wi Fi 19 3 24 GPS 19 3 25 Settings 19 3 26 System Reset 21 3 27 SocialMatic Apk 21 Frequently asked questions 23 Battery m...

Страница 4: ...nting should be conducted between 5O C 45O C 20 75 RH Storage conditions The unit may be safely stored from 10 70 10 85 RH The unit should be allowed to return to normal operating conditions for one h...

Страница 5: ...ingle Point Gesture Memory RAM 1GB Y Memory ROM 4GB Y Storage Micro SD Y Support up to 32GB Network Wi Fi 802 11b g n Y Blue tooth V2 0 Y Internal GPS Interface USB Micro USB2 0 5Pin Y Support OTG Bat...

Страница 6: ...ification 3 1 Getting to Know Your Camera 1 Power Switch 2 Reset Button 3 LED 4 SUB LCD 5 Micro SD Card Slot 6 DC Power Adapter Jack 7 USB Jack 8 Speaker 9 Microphone 10 Front primary Camera 11 Flash...

Страница 7: ...6 13 Rear Camera 14 Media tray door open switch 15 Printed image exit slot 16 Primary LCD...

Страница 8: ...7 17 Media tray...

Страница 9: ...Drive into the device via USB host transfer cable When ready for use enter into the file browser and switch to the USB folder to view its contents Remove U Disk USB Flash Drive Close all applications...

Страница 10: ...m for developers ADB driver needs to be installed before using this mode Installation method as follows 1 First switch on the device to Install Driver mode And then find the CD driver such as F on you...

Страница 11: ...et to have the screen locked automatically or manually by quickly pressing the power button The system provides four lock screen styles for users Enter Settings Security Lock Screen to switch The defa...

Страница 12: ...alizing your Device GPS GPS MAP Map Wi Fi WI FI Bluetooth Bluetooth Voice search Voice search Socialmatic App allows full color printing of images immediately after capture Hangouts Multi user video c...

Страница 13: ...ion files were saved 5 Tap on an Apk file Install The application is installed and the application icon is added to the Applications screen 6 Tap Open to launch the application now or tap done to retu...

Страница 14: ...drag left or right to delete the alarm you want to delete Countdown Add countdown 1 Tap Count down icon to enter the countdown interface 2 Set a time then tap Start If user has set a countdown tap be...

Страница 15: ...ndar screen tap on the date to which you want to add an event 2 Tap on the event time tap 3 In each field enter the details of the related activities 4 Tap Done Click the date in the upper left to cho...

Страница 16: ...ll range of continuous imagery into a single panoramic photo You can press Viewfinder long or on the top right screen tap tap button to switch between the front and back cameras then tap enter camera...

Страница 17: ...erver enter or select the parameter and server type and then tap Next 7 Optional Enter a name for the account 8 Enter name for outgoing message tap Done After setup if you are unable to connect to a f...

Страница 18: ...ed is automatically set as the default 1 Tap the Email application icon 2 On the Inbox screen tap Settings 3 Click the account you want to delete 4 In the pop up Account options window tap Delete 5 Ta...

Страница 19: ...p Delete OK to confirm the deletion 3 21 Gallery Switch the storage area to be viewed In the root directory on the top left click the Local SD or U Disk to switch the view storage area Classification...

Страница 20: ...efault storage device Show screen capture icon in status bar About After the images are saved they can be viewed through Gallery application 3 23 Wi Fi Tap Settings Wi Fi to enter into Wi Fi settings...

Страница 21: ...lication access to your GPS position Wi Fi location info Allow Google services access for faster performance Security Screen lock Owner Info Password setting Require pin or password to access the devi...

Страница 22: ...plication display touch the cursor position display layout boundary the GPU view update update display hardware layer display GPU excessive drawing surface update transition animation window program l...

Страница 23: ...e sharing screen b Click next to upload the photo to SocialMatic Important notes store media paper in cool dry locations do not expose the paper to high temperature high humidity conditions e g car be...

Страница 24: ...from your computer onto a SD card or USB storage device and then use the File Browser application to copy the files into the device Video Q What type of video files can I play on my device A Video fil...

Страница 25: ...exceed 30 C When the external environment exceeds 45 C printing will be prohibited Protect the power cord Route power cords so that they are not likely to be walked on or pinched by items placed on o...

Страница 26: ...nt or relocate the receiving antenna b Increase the separation between the equipment and receiver c Connect the equipment into an outlet on a different circuit from that to which the receiver is conne...

Отзывы: