MAINTENANCE
AIR DRYER MAINTENANCE
The dryer is factory tested before shipping. All controls
are calibrated for automatic operation. If the dryer is
installed in clean surroundings, within the temperature
limits of the specified ambient, the dryer will run trouble-
free for a very long time. Routine maintenance
procedures recommended are the following:
1. Checking the fan motor(s) for proper operation to
maintain the cooling air to be drawn through the
condenser and blown over the refrigerant
compressor. If the dryer is equipped with condenser
ambient filters, check, clean or replace as needed to
maintain the proper air flow through the condenser.
Dirty ambient filters will reduce the air flow through
the condenser, and trip the compressor “off” at the
overload control.
2. For dryers without ambient filters, clean the
condenser periodically to maintain the proper heat
transfer on the condenser coil. Dirty condenser will
raise the head pressure of the refrigeration system
and trip the compressor “off” at the overload control.
Running the compressor on high head pressures
may cause premature failures. Check the ambient
temperature limits to be maintained at the
installation.
3. Check and clean water-cooled condensers for dirt,
scale and sludge buildup every year or as needed.
Cooling tower water condensers may need cleaning
more often if the water is not properly treated.
4. Check the suction pressure gauge. Reading should
be within the specified range after a few minutes of
start-up. Suction pressure below the range will
cause freeze-up inside the air system, increasing the
pressure drop across the air dryer. Suction pressure
above the range will reduce the refrigeration cooling
capacity.
5. Check the pressure drop across the air dryer at full
capacity flow. If it is higher than specified value
(normally 5 PSI or less), consult factory. If pressure
drop increases over years of operation, it may be
due to particulate buildup from air compressor
intake. In that event, back-flush the dryer with any
MILD DETERGENT
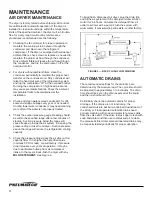
. See Figure 2.
To back-flush, disconnect air dryer, plug the drain line
and fill the air system with the detergent water solution.
Hold it for 4-6 hours. Circulate the detergent from air
outlet to air inlet with a pump. Flush the system with
warm water. If pressure-drop still exists, contact factory.
FIGURE 2 — BACK FLUSH FLOW DIAGRAM
AUTOMATIC DRAINS
The recommended settings for the drain time are
determined by the moisture load. The cycle time should
be adjusted to approximately 3 to 4 minutes. The drain
time should be set so the drain expels all of the liquid
and then a short burst of air.
Periodically check the automatic drains for proper
drainage. If the drains are not functioning, the
condensed moisture will be re-entrained downstream of
the air dryer. Float operated automatic drains need
periodic cleaning with soap and water to remove solids
from the valve seat. If the valve is stuck open, clean with
soap and water and then use compressed air to clean
the valve seat. Electronic solenoid operated drains may
be manually tested periodically for proper operation.
11
Содержание AD Series
Страница 1: ...Noncycling Refrigerated Air Dryers AD 750 to 4000 Series Owner s Manual 9829 2103 73 August 2009 ...
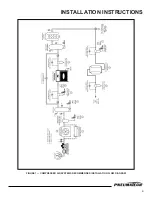
Страница 5: ...INSTALLATION INSTRUCTIONS 4 FIGURE 1 COMPRESSED AIR SYSTEMS RECOMMENDED INSTALLATION FLOW DIAGRAM ...
Страница 15: ...14 FIGURE 6 FLOW DIAGRAM AD 750 to 1000 ...
Страница 16: ...15 FIGURE 7 FLOW DIAGRAM AD 1200 to 2000 ...
Страница 17: ...FIGURE 8 FLOW DIAGRAM AD 2500 to 4000 16 ...
Страница 22: ...21 ...
Страница 23: ...22 ...
Страница 24: ...Pneumatech 4909 70th Avenue Kenosha WI 53144 Phone 262 658 4300 Fax 262 658 1945 www pneumatech com ...


