


Cardox Techical Manual
Page 10
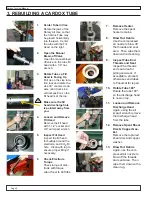
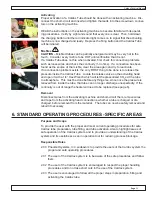
Charged Cardox Tubes are safe to be transported and handled with reasonable care
and safety.
Once a Cardox tube is filled with the proper amount of CO
2
it is ready
for activation. A filled Cardox tube should always be respected. Dropping a tube will
not cause it to activate, but it could break the copper washer seals on either end and
cause the tube to leak
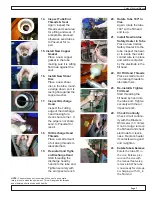
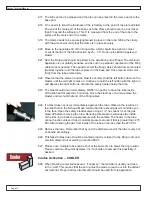
Tube Placement
Drill a 2-1/8” diameter hole into the effected material to a depth that will put the dis
-
charge ports of the Cardox Tube in a position 12” – 18” from a free face. Try to take
less material with initial shots, until you learn more about the solidity and cohesive-
ness of the material.
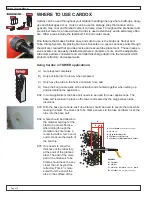
Tube Securing
In securing a Cardox tube hold the tube into the material before initiation to prevent
ejection of the tube and to allow for retreival of the tube after initiation. There are
three basic methods for Cardox Tube retention:
1. Quik-Lok Socket and Clamp (available from Pneumat)
A Quik-Lok Socket is welded or bolted permantly to the tower, hopper or bin
wall in the effected area and is sealed with a removable plug when not in use.
A Quik-Lok Clamp is affixed to the Cardox Tube at point that will yield the
desired tube insertion depth. The tube/clamp assembly is now inserted into
the hole through the socket on the vessel and secured with a half turn of the
bayonet-style coupling between the clamp and the socket.
2. Quik-Clamp (available from Pneumat)
A Quik-Clamp is fastened to the outside of a Cardox tube to provide an anchor
point for attaching a chain, wire rope or come-along to act as a retaining line.
Make sure the retaining line is secured to something substantial that can with-
stand the power of a Cardox tube.
3. Cardox Activating Head With Eyebolt
Cardox Activating Heads have a threaded hole that will accept an eyebolt
that can be used for tube retention and retrieval. Smaller heads have a 1/2”
threaded hole and larger heads have a 1” threaded hole. After securing an
eyebolt into the head, attach a chain, wire rope or come-along to the eyebolt
to act as a retaining line. Make sure the retaining line is secured to something
substantial that can withstand the power of a Cardox tube.
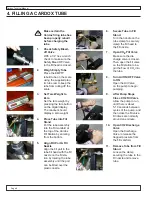
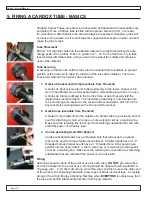
Wiring
All wiring should be done at the point of use for each tube.
DO NOT
pre-wire tubes
and then transport to the point of use. Wiring should be done with well-insulated 14–
18 gauge wire. . First short-circuit one end of the wires and then secure the other end
of the wires to the activating head with a few wraps of black electrical tape. Complete
wiring to the a High Energy Activating Machine when
EVERYONE
is safely away from
the area and behind substantial protection from flying material.
5. FIRING A CARDOX TUBE - BASICS
Содержание Cardox CO2
Страница 1: ...A B C D 8 7 6 TECHNICAL MANUAL 110 Mohr Drive Mankato MN 56001 1 800 458 9446 www pneumat com ...
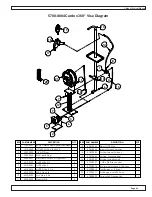
Страница 22: ...Cardox Techical Manual Page 22 5780 0005 Cardox Fill Stand Assembly Parts List ...
Страница 25: ...Cardox Techical Manual Page 25 5730 0003 Auto Fill Activating Head w Eyebolt Parts List ...
Страница 27: ...Cardox Techical Manual Page 27 Series 3700 Firing Head Tube Body Discharge Head Parts List ...
Страница 28: ...Cardox Techical Manual Page 28 Series 5700 Firing Head Tube Body Discharge Head Parts List ...


