L A U N C H I N G - S E L F L A U N C H
45
o
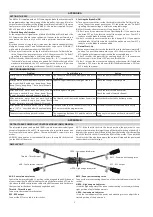
Make sure the kite is still secured
from blowing away by some sand or
other substance on the trailing edge.
Attach the safety leash to the round
ring on the end of the safety line.
Stand at a position so your flying lines
are at about 45 degrees to the wind
kite directly downwind, the more
power the kite will produce when
launching.
Check again if the area is clear of
people. Slowly take a few steps back
untill the kite launches. Steer the kite
towards the edge of the wind window
and slowly let it fly up to the zenith.
a kite with a harness, you can hook in
the depower loop.
45
o
As an alternative to the self-launch,
you may also ask someone to hold the
kite by the leading edge, so it is ready
to
Attach your safety leash and if you
with a harness, hook in your depower
loop.
Stand at a position so your flying lines
are at about 45 degrees to the wind
direction. First let the kite with air,
and check if you are ready to launch.
Signal your helper.
L A U N C H I N G - L a u n c h w i t h H e l p e r
upward.
Steer the kite towards the edge of the
wind window and slowly let it fly up
to the zenith.
LAUNCHING - Self launch
45
o
Make sure the kite is still secured
from blowing away by some sand or
other substance on the trailing edge.
Attach the safety leash to the round
ring on the end of the safety line.
Stand at a position so your flying lines
are at about 45 degrees to the wind
kite directly downwind, the more
power the kite will produce when
launching.
Check again if the area is clear of
people. Slowly take a few steps back
untill the kite launches. Steer the kite
towards the edge of the wind window
and slowly let it fly up to the zenith
a kite with a harness, you can hook in
the depower loop.
45
o
As an alternative to the self-launch,
you may also ask someone to hold the
kite by the leading edge, so it is ready
to
Attach your safety leash and if you
with a harness, hook in your depower
loop.
Stand at a position so your flying lines
are at about 45 degrees to the wind
direction. First let the kite with air,
and check if you are ready to launch.
Signal your helper.
LAUNCHING - Launch with Helper
upward.
Steer the kite towards the edge of the
wind window and slowly let it fly up
to the zenith.
Содержание DEPOWER FOIL KITE
Страница 1: ...PLKB PLKB PLKB FOR DEPOWER FOIL KITES U S E R M A N U A L...
Страница 20: ...PLKB PLKB PLKB...