background image

INSTALLATION:

1. Follow the instructions provided, do not 

alter its design in any way.

2. Place the playset on level ground, not 

less than 6' (1.8m) from any structure 
or obstruction such as a fence, garage, 
house, overhanging branches, laundry 
lines or electrical wires. If the area 
where you will be installing your play-
set is not level, you must make it level.

3. Playsets must be anchored to the 

ground. Follow the anchoring instruc-
tions provided with your building kit. If 
soil conditions permit anchors to be 
pulled out easily, such as in sandy soil 
conditions, cementing is required.

4. Tighten all bolts securely to the intended 

member then cut off all protruding 
threaded ends of bolts with a hack saw 

flush to the end of the nut 

and 

remove sharp edges with a metal file.

WARNING: 

Children must not use the

playset until properly installed and proper
shock-absorbing surfacing material is in place.

OPERATION:

Observing and 

following statements and  warnings
reduces the likelihood of serious or
fatal injury.

1. On-site adult supervision is recommended

for children of all ages.

2. Only one child, for each single planned

seat or single planned activity should 
be allowed on this set at one time, with 
a maximum weight of 

105 pounds

for 

each child

.

WARNING:

You must teach children the

following:
A.

Not

to walk close to, in front of, behind, 

or between moving items.

B.

Not

to twist swing chains or ropes or 

loop them over the top support bar since 
this may reduce the strength of the 
chain or rope.

C.

Avoid

swinging empty seats.

D.

To Sit

in the center of the swings with 

their full weight on the seats.

E.

Not

to use the equipment in a manner 

other than intended.

F.

Not

to get off equipment while it is in motion.

G.

Not

to climb when equipment is wet.

H.

Not

to attach items to the playground 

equipment that are not specifically 
designed for use with the equipment 
such as, but not limited to, jump 
ropes, clothesline, pet leashes, cables 
and chain as they may cause a 
strangulation hazard.

I.

Remove

bike or other sports helmet 

before playing on the play equipment 
as the helmet may become entrapped 
in an enclosed opening and cause a 
strangulation hazard.

3. Verify that suspended climbing ropes 

are secured at both ends and that they 
cannot be looped back on themselves.
(A rope that is not taut enough may 
cause a strangulation hazard.)

4. Dress children appropriately. Provide 

well fitting shoes. Avoid ponchos, 
scarves, and other loose-fitting clothing
which is potentially hazardous while 
using equipment.

5. Verify that all suspended swinging 

components have at least 8" clear-
ance between the lowest point of 
component and top of shock-absorbing 
surfacing material.

WARNING:

Lawn swings are designed for

use by children two years of age and older.
Use by children under the age of two can
result in entrapment between the seat and
backrest. 

NEVER

place children in a

rearward facing position or with legs
between the seat and backrest because
the child’s body may pass through the
opening causing entrapment of the child’s
head. 

DISPOSAL:

When the playset is to be retired from
service, disassemble and dispose of in
such a way that no unreasonable
hazards will exist. Follow your local
disposal requirements.

At the beginning of play season:

Date: ___________

n

Tighten all hardware.

n

Lubricate all metallic moving parts per 
manufacturer’s instructions.

n

Check all protective coverings on bolts, pipes, edges, 
and corners. Replace if they are loose, cracked, or missing.

n

Check all moving parts including swing seats, ropes, 
cables, and chains for wear, rust, or other 
deterioration. Replace as needed.

n

Check metal parts for rust. If found, sand and repaint 
using a nonlead-based paint meeting the 
requirements of 16 CRF 1303.

n

Check all wood members for deterioration and 
splinters. Sand down splinters and replace 
deteriorating wood members.

n

Reinstall any plastic parts, such as swing seats or 
any other items that were removed for the cold season.

n

Rake and check depth of loose fill protective 
surfacing materials to prevent compaction and to 
maintain appropriate depth. Replace as necessary.

Twice a month during play season:

Date: _________

n

Tighten all hardware.

n

Check all protective coverings on bolts, pipes, edges, 
and corners. Replace if they are loose, cracked, or missing.

n

Rake and check depth of loose fill protective 
surfacing materials to prevent compaction and to 
maintain appropriate depth. Replace as necessary.

Once a month during play season:

Date: _________

n

Lubricate all metallic moving parts per 
manufacturer’s instructions.

n

Check all moving parts including swing seats, ropes, 
cables, and chains for wear, rust, or other 
deterioration. Replace as needed.

At the end of each play season or when the 
temperature drops below 0º F:

Date: _________

n

Remove plastic swing seats and other items as specified
by the manufacturer and take indoors or do not use.

n

Rake and check depth of loose fill protective 
surfacing materials to prevent compaction and to 
maintain appropriate depth. Replace as necessary.

SAFETY

ANNUAL MAINTENANCE CHECKLIST

(Copy this section as needed and maintain for your records or visit www.playstarinc.com/maintenance)

If any of these conditions exist, call 1-888-752-9782 for ordering information.

Clean plastic components with warm water and a mild detergent such as dish soap.

3

LT 6456 Climbing Bar Instructions_AS Instructions '04 R1  2/24/10  3:04 PM  Page 3

Содержание Play Action Climbing Bar Kit

Страница 1: ...e re Here To Help Play Action Important Intended for residential use by children ages 2 to 10 only on properly installed PlayStar playsets Before use refer to complete safety guidelines in your original playset at www playstarinc com or at 1 888 752 9782 LT 6456 Climbing Bar Instructions_AS Instructions 04 R1 2 24 10 3 04 PM Page 1 ...

Страница 2: ...facing will also compact displace and settle and should be periodically refilled to maintain at least a 9 inch depth Use containment such as digging out around the perimeter and or lining the perimeter with landscape edging Don t forget to account for water drainage Check and maintain the depth of the loose fill surfacing material To maintain the right amount of loose fill materials mark the corre...

Страница 3: ...oint of component and top of shock absorbing surfacing material WARNING Lawn swings are designed for use by children two years of age and older Use by children under the age of two can result in entrapment between the seat and backrest NEVER place children in a rearward facing position or with legs between the seat and backrest because the child s body may pass through the opening causing entrapme...

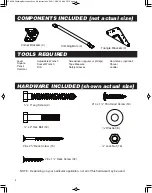
Страница 4: ...or phillips Tape Measure Safety Glasses NOTE Depending on your particular applicaton not all of this hardware may be used Climbing Bars 4 Corner Brackets 4 Triangle Brackets 4 1 000 1 000 1 000 1 000 1 000 1 000 x 3 Lag Screw 4 14 x 1 Pan Head Screw 16 x 2 Hex Bolt 16 Washer 8 Lock Nut 16 8 x 2 Deck Screw 15 8 x 1 Deck Screw 32 LT 6456 Climbing Bar Instructions_AS Instructions 04 R1 2 24 10 3 04 P...

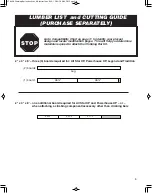
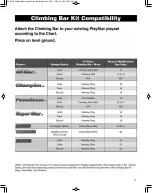
Страница 5: ...required to attach the Climbing Bar Kit STOP 2 x 4 x 8 three 3 boards required for All Star XP Powerhouse XP Legend and Tradition 2 x 4 x 8 one additional board required for All Star XP and Powerhouse XP or when attaching a climbing component accessory other than climbing bars 46 46 24 24 21 2 boards 1 board Leg LT 6456 Climbing Bar Instructions_AS Instructions 04 R1 2 24 10 3 04 PM Page 5 ...

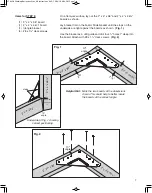
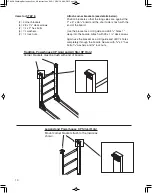
Страница 6: ...he underside are tight against the boards as shown Fig 1 Use the bracket as a drill guide and drill four holes 1 deep into the board Attach with 8 x 1 deck screws Fig 2 2 x 4 x 46 2 x 4 x 96 10º angle stops gap must be about Underside of Fig 1 showing correct positioning Fig 1 Fig 2 CLIMBING BAR ASSEMBLY Helpful Hint Mark the two boards at the dimensions shown This could help to better locate the ...

Страница 7: ...wn Lay bracket flat on the board Slide bracket until the stops on the underside are tight against the boards as shown Fig 1 Use the bracket as a drill guide and drill four holes 1 deep into the board Attach with 8 x 1 deck screws Fig 2 Fig 1 Fig 2 Underside of Fig 1 showing correct positioning Helpful Hint Mark the two boards at the dimensions shown This could help to better locate the boards at t...

Страница 8: ...oards as in previous step Use the bracket as a drill guide and drill four holes 1 deep into the boards Attach with 8 x 1 deck screws Fig 1 Use the bracket as a drill guide and drill five holes completely through the board Attach with x 2 hex bolts and lock nuts Fig 2 Repeat for second Climbing Bar Assembly Figs 3 4 Right Assembly Left Assembly Fig 1 Fig 2 Fig 3 Fig 4 LT 6456 Climbing Bar Instructi...

Страница 9: ...semblies 21 apart Use the Climbing Bar as a drill guide and drill holes 1 deep in the boards Attach with 14 x 1 pan head screws 21 21 10 21 32 43 IMPORTANT The climbing bars must be positioned as specified otherwise a head entrapment could exist LT 6456 Climbing Bar Instructions_AS Instructions 04 R1 2 24 10 3 04 PM Page 9 ...

Страница 10: ...e bracket as a drill guide and drill holes 1 deep into the boards Attach with 8 x 1 deck screws Again use the bracket as a drill guide and drill holes completely through the boards Secure with x 2 hex bolts washers and lock nuts Tradition Powerhouse XP Gold and All Star XP Only Corner brackets must be flush with end of boards Legend and Powerhouse XP Silver Only Mount corner brackets flush to the ...

Страница 11: ...11 LT 6456 Climbing Bar Instructions_AS Instructions 04 R1 2 24 10 3 04 PM Page 11 ...

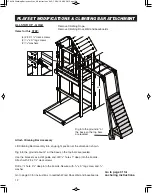
Страница 12: ...into the boards Attach with 8 x 1 deck screws Drill a hole 2 deep into the boards Secure with x 3 lag screw and washer Go to page 30 for instructions to reattach Wood Rock Wall and baseboards PLAYSET MODIFICATIONS CLIMBING BAR ATTACHMENT ALL STAR XP GOLD Remove Climbing Rope Remove Climbing Rock Wall and baseboards 92 Go to page 31 for anchoring instructions Dig into the ground 6 at the base so th...

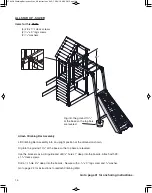
Страница 13: ...deck screws 2 x 3 lag screws 2 x 2 hex bolts 2 lock nuts 4 washers Attach Corner Brackets Position brackets so that the short sides are against the 2 x 4 x 48 board Use the brackets as a drill guide and drill holes 1 deep into the boards Attach with 8 x 1 deck screws Use the brackets as a drill guide and drill holes 2 deep through the long side and a hole completely through the short side of the b...

Страница 14: ...se the brackets as a drill guide and drill holes 1 deep into the boards Attach with 8 x 1 deck screws Drill a hole 2 deep into the boards Secure with a x 3 lag screw and washer Go to page 24 for instructions to reattach Climbing Wall ALL STAR XP SILVER 88 Go to page 31 for anchoring instructions Dig into the ground 10 at the base so the top bars are leveled LT 6456 Climbing Bar Instructions_AS Ins...

Страница 15: ...to the boards Attach with 8 x 1 deck screws Drill a hole 2 deep into the boards Secure with x 3 lag screw and washer Go to page 25 for instructions to reattach Arch Climber POWERHOUSE XP GOLD Remove Arch Climber Remove 1 2 x 4 x 21 and 2 2 x 4 x 28 boards used to attach Arch Climber to playset not shown 92 15 Go to page 31 for anchoring instructions Dig into the ground 6 at the base so the top bar...

Страница 16: ...eep into the boards Attach with 8 x 1 deck screws Use the brackets as a drill guide and drill holes 2 deep through the long side and a hole completely through the short side of the bracket Secure the long side with a x 3 lag screw and washer Secure the short side with a x 2 hext bolt washer and lock nut Items for this STEP 2 Corner Brackets 8 8 x 1 deck screws 2 x 2 hex bolts 2 x 3 lag screws 2 lo...

Страница 17: ...crews 4 8 x 1 deck screws 2 x 2 hex bolts 2 washers 2 lock nuts Reattach Wood Rock Wall Cut ten 10 x 6 x 28 boards removed from Wood Rock Wall down to 24 Position first x 6 x 24 board tight against the ground as shown Secure with 8 x 2 deck screws reused from Wood Rock Wall Position next x 6 x 24 board tight against the first board Secure with 8 x 2 deck screws reused from Wood Rock Wall Repeat fo...

Страница 18: ...ing Gym Rings and attachment hardware NO swinging elements including Gym Rings should be attached to overhead Climbing Bars since they pose a conflicting fall hazard 13 12 12 12 Items for this STEP 4 Climbing Bars 16 14 x pan head screws IMPORTANT The Climbing Bars must be positioned as specified otherwise a head entrapment could exist 18 LT 6456 Climbing Bar Instructions_AS Instructions 04 R1 2 2...

Страница 19: ...head screws SUPER STAR XP BRONZE Remove existing Gym Rings and attachment hardware NO swinging elements including Gym Rings should be attached to overhead Climbing Bars since they pose a conflicting fall hazard 15 12 12 12 Items for this STEP 4 Climbing Bars 16 14 x pan head screws IMPORTANT The Climbing Bars must be positioned as specified otherwise a head entrapment could exist 19 LT 6456 Climbi...

Страница 20: ... at the base so the top bars are leveled Attach Climbing Bar Assembly Lift Climbing Bar Assembly into an upright position at the dimension shown making sure it is centered in the opening Dig into the ground 10 at the base so the top bars are leveled Use the brackets as a drill guide and drill holes 1 deep into the boards Attach with 8 x 1 deck screws Drill a hole completely through the boards Secu...

Страница 21: ...h with 8 x 1 deck screws Use the brackets as a drill guide and drill holes 2 deep through the long side and a hole completely through the short side of the bracket Secure the long side with x 3 lag screw and washer Secure the short side with x 2 hext bolt washer and lock nut 21 Items for this STEP 2 Corner Brackets 8 8 x 1 deck screws 2 x 2 hex bolts 2 x 3 lag screws 2 lock nuts 4 washers LT 6456 ...

Страница 22: ...ground 10 at the base so the top bars are leveled Use the brackets as a drill guide and drill holes 1 deep into the boards Attach with 8 x 1 deck screws Drill a hole completely through the board Secure with x 2 hex bolt washer and lock nut Attach Corner Brackets Position brackets so that the short sides are against the 2 x 4 x 46 board as shown Use the brackets as a drill guide and drill holes 1 d...

Страница 23: ...D SILVER BRONZE Remove existing Gym Rings and attachment hardware NO swinging elements including Gym Rings should be attached to overhead Climbing Bars since they pose a conflicting fall hazard Items for this STEP 4 Climbing Bars 16 14 x pan head screws IMPORTANT The Climbing Bars must be positioned as specified otherwise a head entrapment could exist 23 11 3 11 11 Go to page 31 for anchoring inst...

Страница 24: ...mensions shown Follow directions provided with your Climbing Wall to attach to end of frame 24 Dig into the ground so top bars are leveled 2 x 4 x 21 2 x 4 x 24 2 x 4 x 24 42 Detail for board placement Flush Go to page 31 for anchoring instructions Bottom board should be tight against the ground LT 6456 Climbing Bar Instructions_AS Instructions 04 R1 2 24 10 3 04 PM Page 24 ...

Страница 25: ...own Follow directions provided with your Arch Climber to attach to end of frame 25 Dig into the ground so top bars are leveled 2 x 4 x 24 2 x 4 x 24 2 x 4 x 21 43 1 Back detail for board placement Go to page 31 for anchoring instructions Bottom board should be tight against the ground LT 6456 Climbing Bar Instructions_AS Instructions 04 R1 2 24 10 3 04 PM Page 25 ...

Страница 26: ...shown Follow directions provided with your Rock Wall to attach to end of frame 26 Dig into the ground so top bars are leveled 2 x 4 x 24 2 x 4 x 24 2 x 4 x 21 42 1 Detail for board placement Go to page 31 for anchoring instructions Bottom board should be tight against the ground LT 6456 Climbing Bar Instructions_AS Instructions 04 R1 2 24 10 3 04 PM Page 26 ...

Страница 27: ...n Follow directions provided with your Vertical Climber to attach to end of frame 27 Dig into the ground so top bars are leveled 45 2 x 4 x 24 2 x 4 x 24 2 x 4 x 21 Flush Back detail for board placement Go to page 31 for anchoring instructions Bottom board should be tight against the ground LT 6456 Climbing Bar Instructions_AS Instructions 04 R1 2 24 10 3 04 PM Page 27 ...

Страница 28: ...attach to end of frame 28 Dig into the ground so top bars are leveled 2 x 4 x 24 2 x 4 x 24 48 Top Step flush with top of board Step mounting lip is flush to this edge on both sides 2 x 4 x 24 2 x 4 x 24 Back detail for board placement Go to page 31 for anchoring instructions Bottom board should be tight against the ground LT 6456 Climbing Bar Instructions_AS Instructions 04 R1 2 24 10 3 04 PM Pag...

Страница 29: ...pment could exist These Climbing Bars may or may not be from existing playset Attach Climbing Bars at dimensions from ground as shown 12 24 36 48 Go to page 31 for anchoring instructions CLIMBING BARS Ground LT 6456 Climbing Bar Instructions_AS Instructions 04 R1 2 24 10 3 04 PM Page 29 ...

Страница 30: ...boards at the dimensions shown Cut baseboards as shown Attach baseboards as shown reusing hardware Use scrap 2 x 4 boards as temporary spacers for proper alignment as shown Attach Wood Rock Wall as shown reusing hardware Go to page 31 for anchoring instructions Baseboards Baseboards Spacers 21 10º Baseboards Cut Guide LT 6456 Climbing Bar Instructions_AS Instructions 04 R1 2 24 10 3 04 PM Page 30 ...

Страница 31: ...rs to be pulled out easily such as in sandy soil conditions cementing is required If your ground is too hard to screw in the anchors you can remove the earth with a shovel Install the anchors and compact the earth as you replace it Anchors must be placed below the level of the shock absorbing surfacing material to prevent tripping or injury resulting from a fall Reminder Be sure to install proper ...

Страница 32: ... 034 US 7 253 951 US D548 760 US 7 304 810 CA D109 227 CA D109 226 CA D112 355 CA D113 437 CA D113 442 CA D114 067 CA D114 068 CA 2 304 896 CA D119 674 US D573 222 US 7 419 437 CA 2 304 068 CA 2 488 576 US D580 507 US D585 570 CA 2 490 923 CA 2 304 341 US 7 594 875 CA 2 304 043 CA 2 529 276 CA 2 633 628 CA 633 056 Please call us Toll Free at 1 888 PLAYSTAR 752 9782 Monday through Friday 8 00 A M t...

Отзывы: