background image

DocuPen Color Calibration procedure

Before starting the calibration procedure please make sure that you have downloaded

our latest DocuPen PenTwain drivers. You can download the drivers from the installa-

tion CD or from the following link: http://www.planon.com/drivers.php

The DocuPen is factory calibrated and there should be no need to re-calibrate. We

advise you to recalibrate only if you experience poor scan quality, e.g. scanned image

appear in white or black.

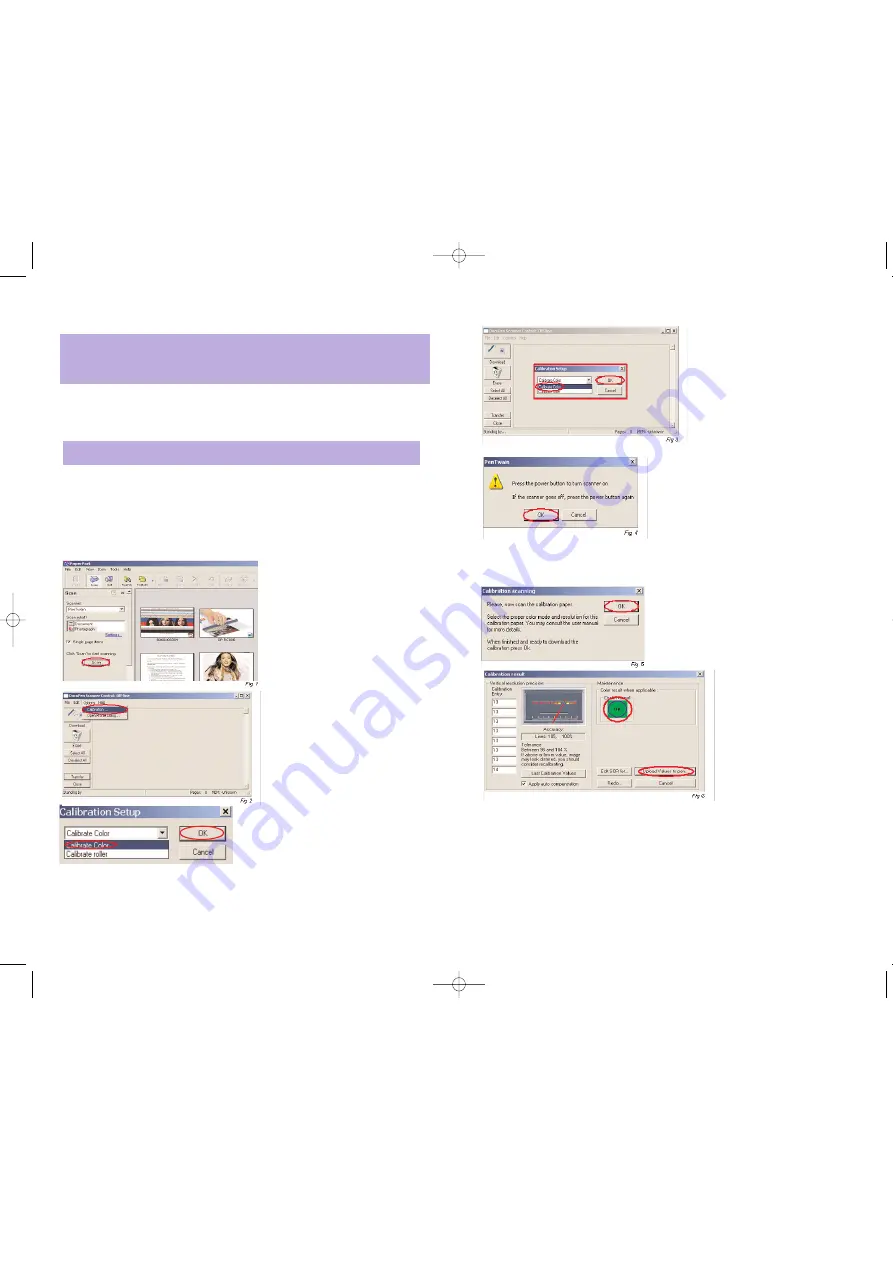
1. Connect the DocuPen to your computer using the USB cable.

2. Start the Paperport software.

3. Press and hold the left Shift and Ctrl

keys on your keyboard and then click

the Scan button within the Paperport

window.

The DocuPen Scanner Control window

will appear with the Calibration function

enabled.

4. In the DocuPen Scanner Control

Window, click on Options and select the

Calibration function. If you don't see the

Calibration function please repeat step 3.

3. In the

Calibration Setup

window that

appears please

Calibrate Color

and click

OK

.

4. You will be prompted to turn the DocuPen ON. Press the

Power On

button on your

DocuPen and Click

OK

in the Dialog window.

DocuPen Operation Manual 24

Note:

In order to perform Color Calibration you need to print out the Color

Calibration sheet. You can download the file from the installation CD or from the link:

http://www.planon.com/drivers.php. Please print the color calibration sheet on photo

paper in landscape mode.

Note:

Your DocuPen must be

CONNECTED

to your PC before starting the

Calibration procedure

DocuPen Color Calibration procedure (continued)

5. In the Calibration Setup dialog win-

dow - Select Calibrate Color and con-

firm by clicking the OK button

6. You will be prompted to turn the DocuPen

ON. Press the Power On button on your

DocuPen and Click OK in the PenTwain Dialog

window

7. After the memory has been formatted the Calibration scanning dialog window will

appear. Please disconnect the DocuPen from the USB cable and position it on top of

the Color Calibration sheet. Please scan the sheet in photo mode and high resolution.

8. The DocuPen will now save the Calibration

image into memory. After the image is saved,

please re-attach the DocuPen to the USB

cable. Now press the Power ON button on

the DocuPen and click the OK button within

the Calibration scanning dialog window

9. The Calibration result dialog

window will appear. You should

see the calibration values to the

left and a Green OK sign to the

right

10. Finally, click Upload Values to pen button in the Calibration result dialog window to

send the calibration result to the DocuPen. You will be prompted to turn the

DocuPen ON. Press the Power ON button on the DocuPen and click OK in the dialog

window - this will store the new values.

You have successfully recalibrated your DocuPen!

DocuPen Operation Manual 25

RC810 850 Operating Manual:opman_eng_rc800_022006_eng.qxd  05/06/2008  9:30 AM  Page 15

All manuals and user guides at all-guides.com

Содержание DocuPen RC810

Страница 1: ...g Manual DocuPen RC810 850 PLANON SYSTEM SOLUTIONS INC RC810 850 Operating Manual opman_eng_rc800_022006_eng qxd 05 06 2008 9 30 AM Page 1 All manuals and user guides at all guides com a l l g u i d e...

Страница 2: ...of the FCC Rules Operation is subject to the follow ing two conditions 1 this device may not cause harmful interference and 2 this device must accept any interference received including interference...

Страница 3: ...nce any kind of difficulties during installation or operation don t hesitate to contact our Customer Support at support planon com 1 877 DOCUPEN or 1 905 507 3926 For International callers 1 888 507 3...

Страница 4: ...le select the desired color mode and scan resolution The LEDs on the left hand side of the scanner will indicate the mode that you have select ed Power On Rez Resolution Button Press the Power On Rez...

Страница 5: ...allation Continued We recommend that you close all Windows programs and disable all virus protection software temporarily during the Pentwain driver PaperPort installation 1 Insert the DocuPen CD ROM...

Страница 6: ...ing the USB driver Continued 2 In the Start Installation window click the Next button to begin installation 3 In the Set Up window select Install and click the Next button to begin installation DocuPe...

Страница 7: ...r assistance don t hesitate to contact our Customer care support planon com TOLL FREE 1 877 DOCUPEN or 1888 507 3926 DocuPen Operation Manual 9 Installing the USB driver Continued 4 In some Windows OS...

Страница 8: ...ding on your Operation System a Restart might be required We recommend that you restart your computer after installation is completed Note The DocuPen is completely independent from the computer i e i...

Страница 9: ...erPort and simply follow the on screen instructions 2 In the welcome window select your 3 In the next window please Click on the language and click this button Start Installation button 4 In the next...

Страница 10: ...rPort window Simultaneously the Available scan ners prompt window will open Select PenTwain and click Ok You may have more than one scan ner so PenTwain must be selected when using the DocuPen DocuPen...

Страница 11: ...click the SetUP exe to install Please follow the onscreen instructions to complete installation Convert scanned images to text using Abbyy Sprint In the File menu choose Select Scanner In the dialog...

Страница 12: ...erased DocuPen Operation Manual 19 Note Make sure that your DocuPen is CONNECTED to your PC Convert scanned images to text using Abbyy Sprint Continued A prompt window will ask you to press the DocuP...

Страница 13: ...h quality images Photocolor Hi rez Mode Best suited for printing of high quality images NOTE The images scanned in this mode are very large in size Scan Settings The DocuPen RC800 has two control butt...

Страница 14: ...layed in the corresponding cell By clicking the Default button the values will be automatically set to When desired color and resolution values are set and uploaded to DocuPen you can close the Profil...

Страница 15: ...t the color calibration sheet on photo paper in landscape mode Note Your DocuPen must be CONNECTED to your PC before starting the Calibration procedure DocuPen Color Calibration procedure continued 5...

Страница 16: ...and Click OK in the PenTwain Dialog window 7 After the memory has been format ted the Calibration scanning dialog window will appear Please disconnect the DocuPen from the USB cable and position it o...

Страница 17: ...hen you stop moving the scan light at the bottom of the pen shuts off and the DocuPen saves the data You must wait momentarily till the data is stored in memory The DocuPen will then automatically shu...

Страница 18: ...anty is effective for 12 months from the original date of purchase 2 Service Agreement Customer must call Planon Customer support for a Return Merchandise Authorization RMA number Upon prepaid return...

Страница 19: ...riods of time it is recommended to plug the unit in to a USB source to recharge the battery for optimum performance If the unit becomes dirty it can be wiped with a soft damp cloth or alcohol swab If...

Отзывы: