255
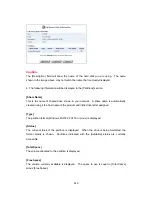
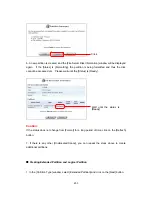
4. A new partition will be created, and the [File Server Disk Information] window will be
displayed again. Click on the
button of the [Unallocated Space] field.
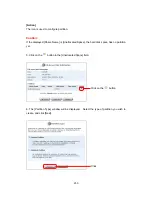
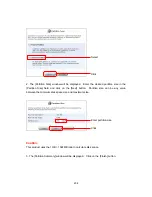
5. The [Partition Type] window will be displayed. Click on the [Next] button.
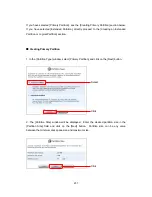
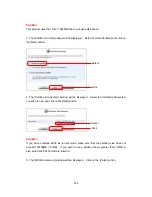
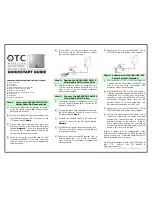
6. The [Partition Size] window will be displayed. Enter the desired partition size in the
[Partition Size] field and click on the [Next] button. Partition size can be any value
Click
Click on the
button
Click
Содержание BRC-14VG
Страница 1: ...4 Port VPN Virtual Private Network Broadband Router BRC 14VG ...
Страница 27: ...27 5 Connection Summary screen will be displayed Verify the information displayed and click Finish Click ...
Страница 47: ...47 2 Click IP Address Distribution 3 Click on the Connection List button Click Click Advanced window ...
Страница 50: ...50 2 Click on the DNS Server icon 3 Click on the button in the New DNS Entry field Click Click Advanced window ...
Страница 55: ...55 4 The deletion of host name or IP address is now complete DNS Server window Click on the button Click ...
Страница 61: ...61 2 Click on the Routing icon 3 Click on the button in the New Route field Click Click Advanced window ...
Страница 71: ...71 3 Select Communications in the Components list and click on the Details button Click ...
Страница 75: ...75 4 Click on the OK button 5 UPnP has been disabled on the product Uncheck Universal Plug and Play window ...
Страница 80: ...80 2 Click on the Advanced Filtering tab 3 The following tables will be displayed Click Security window Click ...
Страница 113: ...113 4 Click on the OK button 5 The deletion of URL filter is now complete Click on the button ...
Страница 119: ...119 2 Click on the Security Log tab 3 Click on the Settings button Security window Click Click ...
Страница 131: ...131 2 Click on the Local Servers tab 3 Click on the button in the New Entry field Click Security window Click ...
Страница 203: ...203 5 When Video is selected the video clip window will be displayed The still image window Click The video clip window ...
Страница 237: ...237 3 Click on the OK button 4 When the system has restarted the login window will be displayed Click Restart window ...
Страница 240: ...240 5 SNMP has been enabled on the product ...
Страница 244: ...244 3 The firmware version of the product will be displayed Technical Information window ...
Страница 282: ...282 3 In the Workgroup field enter the same work group name as the NetBIOS Work Group of the product Click ...
Страница 294: ...294 3 Select the Using the Well Known HTTP Port 80 option and click on the OK button Click Select Click ...


