


197
Chapter 9 Option configuration
This chapter describes how to use the product to configure its option functions.
9.1 Configuring a USB Camera
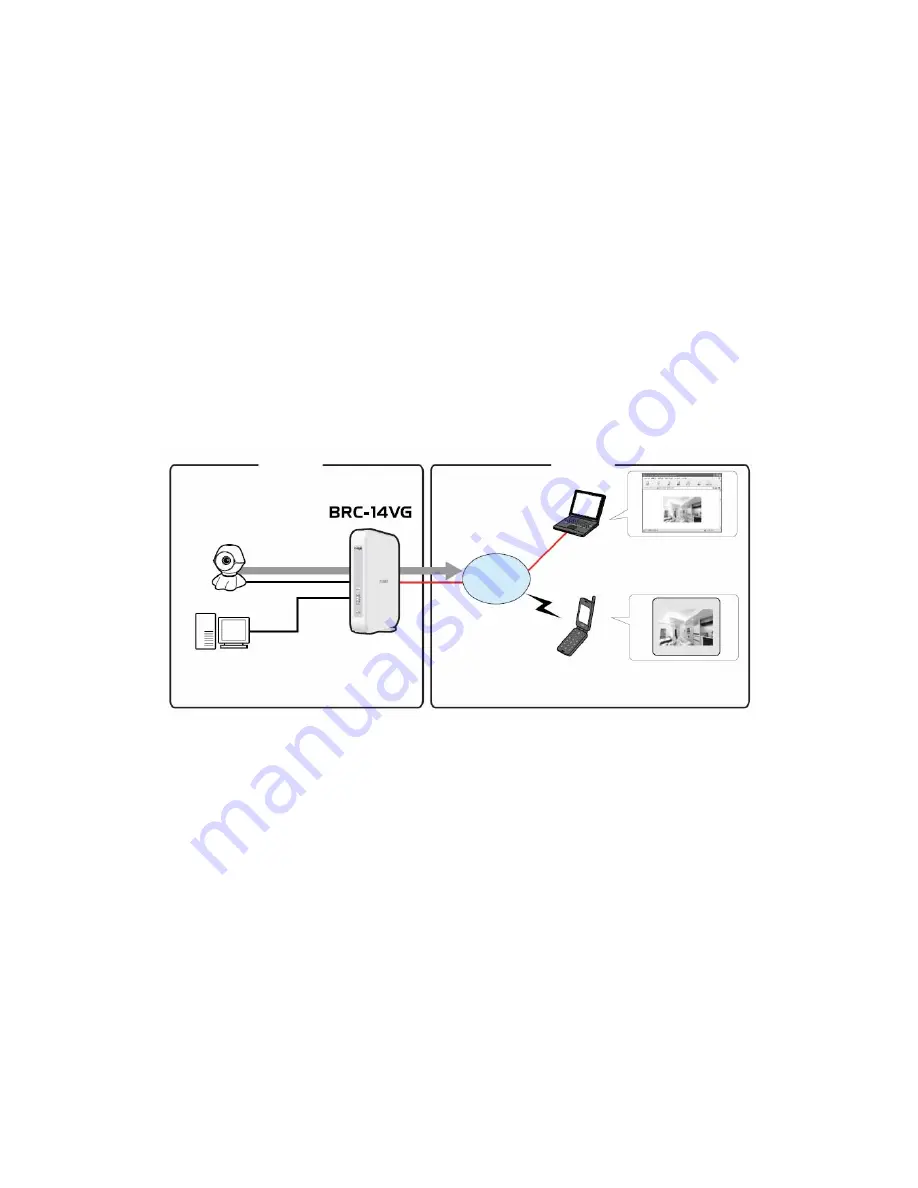
You can take still image shots or capture video clips via a USB camera attached to the USB
interface of the product. The image shots or video clips can be viewed from a PC or
cellular phone that accesses the product remotely. This section describes i) how to enable
an USB camera as well as ii)how to view the captured image/video clips. Only one USB
camera may be attached to the product.
*Refer to the user’s manual of the option USB camera BRC-EE260 to learn how to connect
the camera to the product.
9.1.1 Configuring USB Camera
1. Click on the [Option Settings] icon on the side bar.
LAN
Internet
Displays images
captured via camera
USB Camera
WAN
PC
USB cable
LAN cable
Remote PC
Cellular phone
(JPEG compliant browser
required)
Displays images
captured via camera
Содержание BRC-14VG
Страница 1: ...4 Port VPN Virtual Private Network Broadband Router BRC 14VG ...
Страница 27: ...27 5 Connection Summary screen will be displayed Verify the information displayed and click Finish Click ...
Страница 47: ...47 2 Click IP Address Distribution 3 Click on the Connection List button Click Click Advanced window ...
Страница 50: ...50 2 Click on the DNS Server icon 3 Click on the button in the New DNS Entry field Click Click Advanced window ...
Страница 55: ...55 4 The deletion of host name or IP address is now complete DNS Server window Click on the button Click ...
Страница 61: ...61 2 Click on the Routing icon 3 Click on the button in the New Route field Click Click Advanced window ...
Страница 71: ...71 3 Select Communications in the Components list and click on the Details button Click ...
Страница 75: ...75 4 Click on the OK button 5 UPnP has been disabled on the product Uncheck Universal Plug and Play window ...
Страница 80: ...80 2 Click on the Advanced Filtering tab 3 The following tables will be displayed Click Security window Click ...
Страница 113: ...113 4 Click on the OK button 5 The deletion of URL filter is now complete Click on the button ...
Страница 119: ...119 2 Click on the Security Log tab 3 Click on the Settings button Security window Click Click ...
Страница 131: ...131 2 Click on the Local Servers tab 3 Click on the button in the New Entry field Click Security window Click ...
Страница 203: ...203 5 When Video is selected the video clip window will be displayed The still image window Click The video clip window ...
Страница 237: ...237 3 Click on the OK button 4 When the system has restarted the login window will be displayed Click Restart window ...
Страница 240: ...240 5 SNMP has been enabled on the product ...
Страница 244: ...244 3 The firmware version of the product will be displayed Technical Information window ...
Страница 282: ...282 3 In the Workgroup field enter the same work group name as the NetBIOS Work Group of the product Click ...
Страница 294: ...294 3 Select the Using the Well Known HTTP Port 80 option and click on the OK button Click Select Click ...


