background image


TC160 / TC320 


NETWORKING GUIDE


(v.1.8)


www.planckvisionsystems.com 


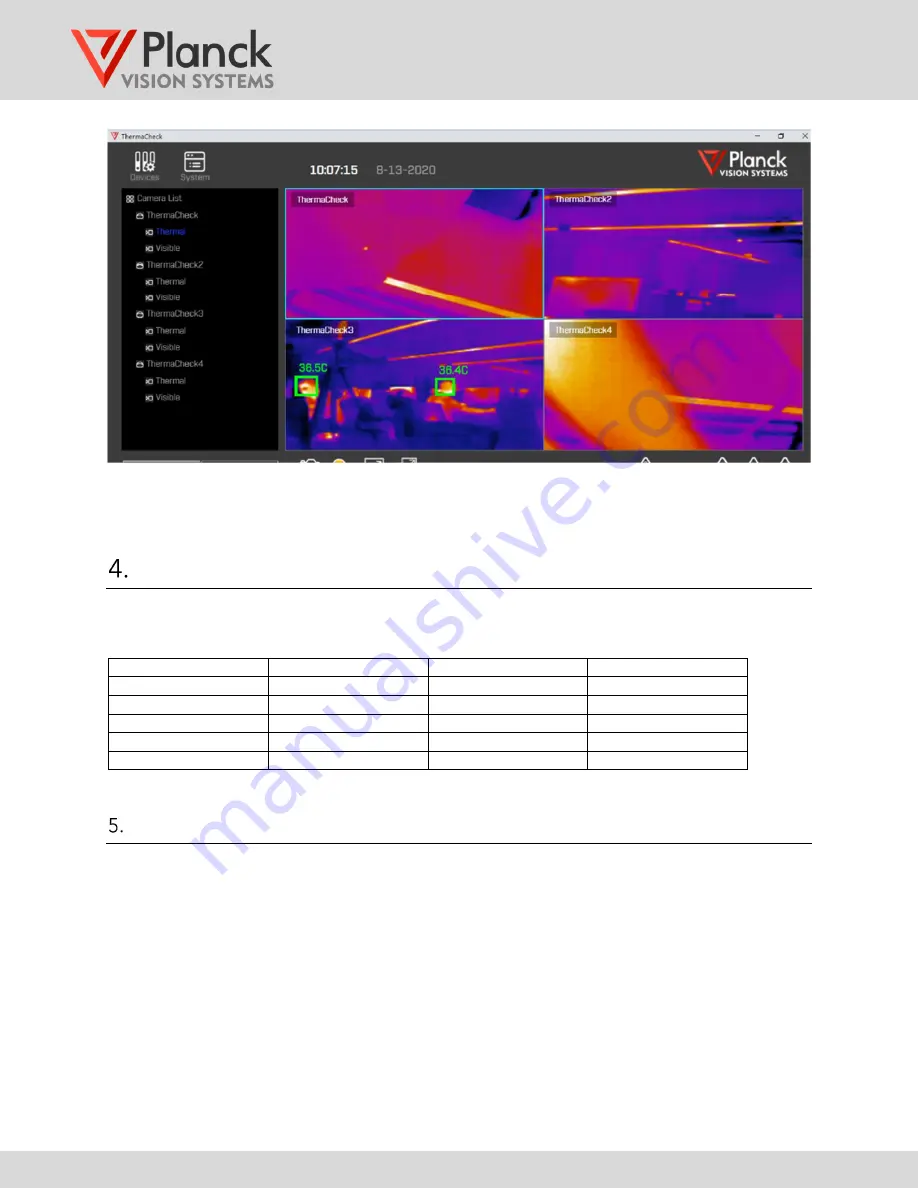
Figure 7: Main user interface after completing the multi-camera configuration


Recommended network configuration parameters:  

The recommended network configuration is shown in Table 1.


Table 1: Recommended network configuration 

number 

name 

IP 

subnet mask 

Computer 

169.254.1.99 

255.255.255.0 

Camera 1 

169.254.1.20 

255.255.255.0 

Camera 2 

169.254.1.21 

255.255.255.0 

Camera 3 

169.254.1.22 

255.255.255.0 

Camera 4 

169.254.1.19 

255.255.255.0 


User interface functions with multi-cameras


For general software features and functionality, please refer to the TC160/TC320 User Manual 
(ThermaCheck and ThermaCheck Pro).  Guidelines for temperature screening discussed in the 
TC160/TC320 User Manual are applicable to multi-camera operation.  


In multi-camera mode,  

1)


The display contains video from each camera in the Camera List.   

2)


Only one “Selected Camera” is designated with a light blue bounding box around the 
video. 

3)


The Selected Camera can be changed by selecting the desired video window or camera 
from the Camera List using the left mouse button. 

Содержание ThermaCheck TC160

Страница 1: ... ThermaCheck TM Contents 1 Introduction 2 2 Multi camera network 2 3 Steps for adding each new camera to the network 2 Step 1 2 Step 2 2 Step 3 4 Step 4 5 4 Recommended network configuration parameters 6 5 User interface functions with multi cameras 6 6 Thank you 7 ...

Страница 2: ...maCheck camera 3 One to four ThermaCheck cameras Figure 1 Multi camera network Steps for adding each new camera to the network Multiple cameras must be added sequentially to the network with each camera being reassigned a unique IP address The steps required to do this are as follows Step 1 Connect the computer and one ThermaCheck camera to the ethernet ports on the switch panel as shown in Figure...

Страница 3: ...g IP address Figure1 e and set the IP address to 169 254 1 99 Figure1 f and set the Subnet mask to 255 255 255 0 Figure1 g 4 To save the computer IP address settings close out all the network pop up windows by clicking OK Figure 2 Network dialog box settings 5 Start the ThermaCheck program Once the program is running a single video stream corresponding to the first camera should automatically star...

Страница 4: ...er in the ThermaCheck software Confirm that the status of the last camera added is Online and has the default IP address of 169 254 1 19 2 Click the settings button for the device with the default IP address and select the Network Param page 3 In the IP Address Box change the last two digits of IP to match the value in Table 1 Click Set to change the IP address The camera will automatically restar...

Страница 5: ...ra has the default IP address 169 254 1 19 the new camera should come online automatically Figure 5 Manually add device interface Step 4 1 To add additional cameras Repeat Step 3 for each camera A total of four cameras can be monitored with the ThermaCheck software 2 Note that camera names can be modified in the Device Manager interface Select the pencil icon to modify the text of the camera name ...

Страница 6: ...22 255 255 255 0 5 Camera 4 169 254 1 19 255 255 255 0 User interface functions with multi cameras For general software features and functionality please refer to the TC160 TC320 User Manual ThermaCheck and ThermaCheck Pro Guidelines for temperature screening discussed in the TC160 TC320 User Manual are applicable to multi camera operation In multi camera mode 1 The display contains video from eac...

Страница 7: ...ly return to the 4 screen mode Two important notes 1 The Threshold Temperature setting is common to all cameras 2 The calibration of cameras must be performed individually In multi camera mode the calibration function applies only to the Selected Camera designated by the light blue bounding box Thank you Thank you for your purchase of a ThermaCheck camera We develop our products to deliver reliabl...

Отзывы: