88
6.2 Changing the Air Filter
Clean, cool air is essential for proper Margay operation.
When should I change the air filter?
When it gets dirty, change it.
Unfortunately, there is no absolute rule about
when to change an air filter. For some installations
the environment has clean, dust-free air, such as a
corporate lobby. The air filter may be good for a year
or more.
In other environments—airports, subway termi-
nals—the air full of dust and dirt all the time. The air
filter might have to be changed every month.
Of course, it also depends on how many hours per
day or per week the lamp is on.
How to determine a changing schedule.
Remove and inspect the air filter after three
months of operation. Make a note of the air filter’s
condition. Then check it again after six months of
operation.
These two inspections will give you some idea of
how often the filter needs changing. If it doesn’t need
changing after six months, inspect again in a year. As
long as the environment doesn’t change, you can
build an appropriate schedule in this way.
If new construction occurs in the vicinty of the
Planar
displays, watch out. New construction usually
means
DUST
.
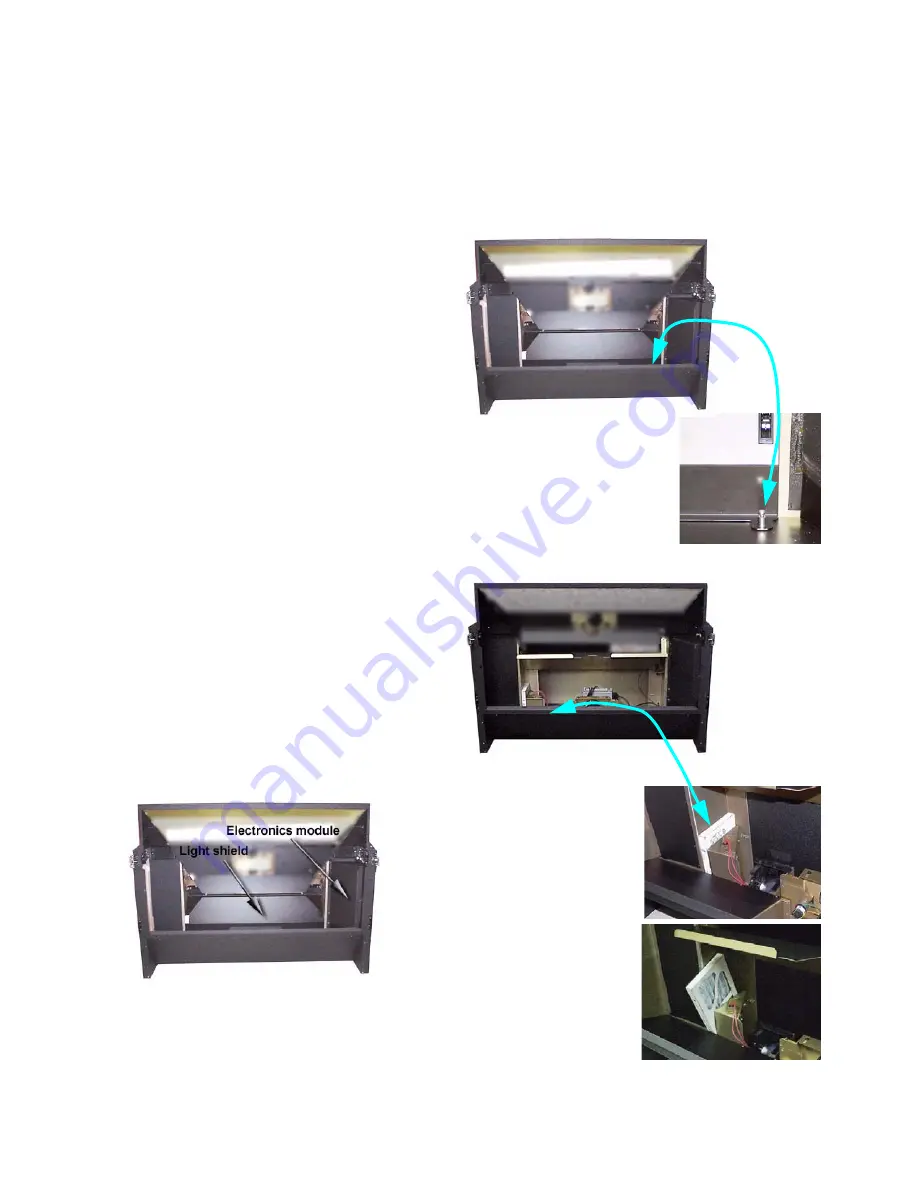
Removing the air filter from the front
1. From the front, open the screen. (See
2.6.2 “Opening or Removing a Screen” on
page 34.)
2. Open the electronics module door. Turn off the
AC power switch and remove the power cord.
3. Loosen the light shield screw. Lift and latch the
light shield in its up position.
4. Lift out the air filter, tilting it forward as you lift.
Содержание WN-5040-720
Страница 1: ...WN 5040 720 User Guide...
Страница 2: ......
Страница 3: ...i WN 5040 720 Margay 50 Display Wall Unit User Guide 020 0548 00B 29 March 2007...
Страница 6: ...iv...
Страница 7: ......
Страница 10: ...1 1 Basic Information About Margay 1 1 Accessories For Margay 2 1 2 Your Safety and Margay s Safety 4...
Страница 14: ...5...
Страница 17: ...6...
Страница 20: ...9...
Страница 24: ...13...
Страница 30: ...19...
Страница 32: ...21 Electronics module as seen from the front The electronics module door is open...
Страница 34: ...23 In Out...
Страница 36: ...25...
Страница 38: ...27 AC power in and out 1 4 5 3 2 6 No more than 4 115 VAC...
Страница 40: ...29...
Страница 51: ...40...
Страница 54: ...43...
Страница 56: ...45...
Страница 58: ...47...
Страница 66: ...55...
Страница 70: ...59...
Страница 72: ...61...
Страница 74: ...63 ENTER ENTER...
Страница 77: ...66...
Страница 80: ...69...
Страница 82: ...71...
Страница 84: ...73...
Страница 86: ...75...
Страница 88: ...77 5 Troubleshooting 5 1 Troubleshooting Tips 78 5 2 Reading the On Screen Code 80 5 3 Reading the LEDs 82...
Страница 95: ...84...
Страница 115: ...104 Diagnostics RS232 RS485 Status...
Страница 116: ...105 Diagnostics Test Patterns...
Страница 117: ...106 Diagnostics Setup Summary...
Страница 128: ...117 Starts scanning the input con nectors for the next available source...
Страница 131: ...120 7 3 Drawings All dimensions are in inches...
Страница 132: ...121...
Страница 133: ...122...
Страница 134: ...123...
Страница 140: ...129...
Страница 144: ...133...
Страница 151: ...140 A B C D E F G H I J K L M N O P Q R S T U W V X Y Z A B C D E F G H I J K L M N O P Q R S T U W V X Y Z...


