


102
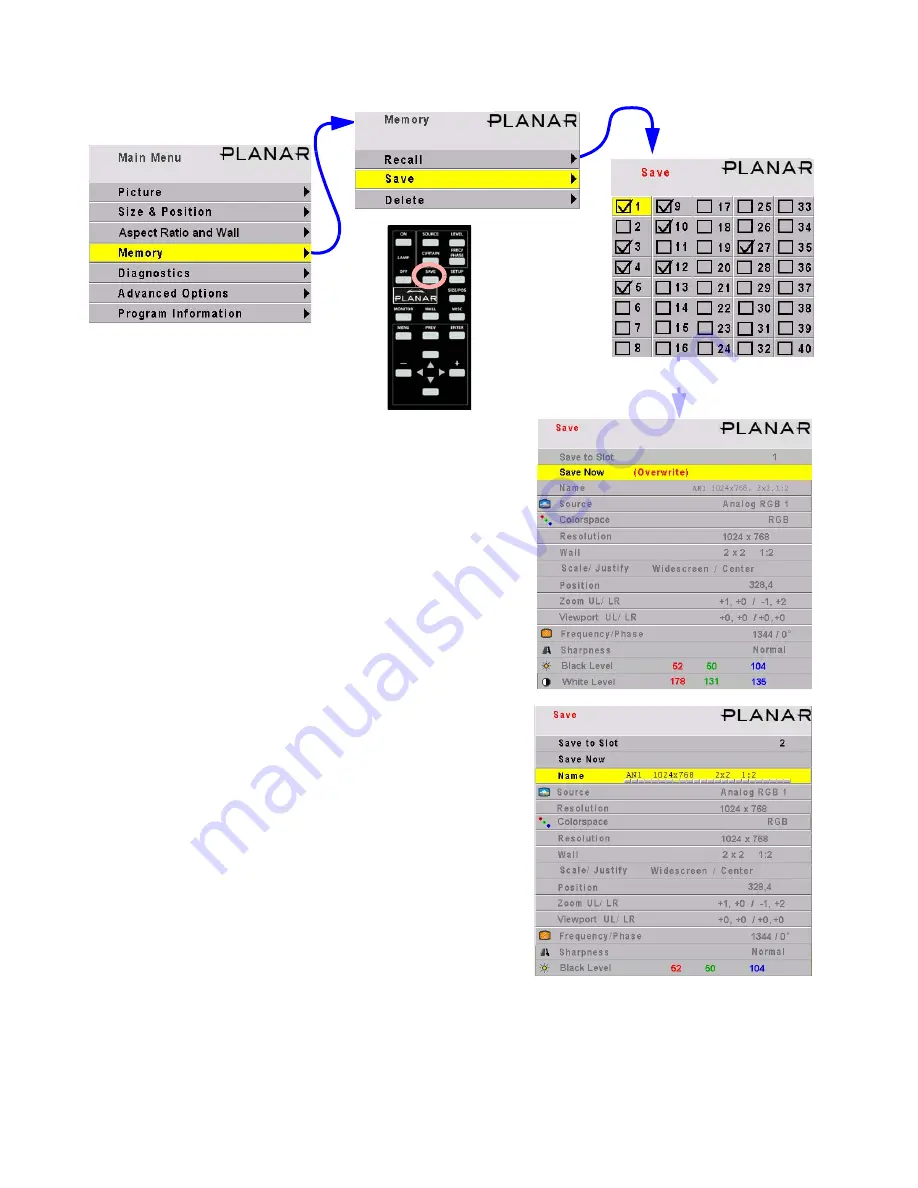
Memory: Save
In the Save grid, use the arrow keys to cycle through the
available memories. As you navigate through all 40
memories, Save Now will show (Overwrite), as shown
here, if the slot already has something in it.
For each empty memory, the Name of the memory is the
default name for this slot. You can change this name as
described below. Many lines are grayed out because
you can’t change anything here except the name of the
memory. The lines in this menu are different for saving
different modes: video or digital.
(Overwrite) appears if the Save to Slot number currently
has something saved in it.
To save, highlight Save Now and press
ENTER
.
A (Current) notice will appear in Save to Slot to indicate
that the save was successful and that the slot now con-
tains exactly what the
Margay
is doing now.
To change the
Name
of a memory slot, highlight Name
and press
ENTER
. A bar appears below the name which
indicates character position. Use the +/– arrows to
move the yellow highlight in this bar. Use the up-down
arrows to change the character at that position. There
are 24 character spaces available.
The default name is an abbreviation of the memory con-
tents: connector used, resolution, wall configuration and
wall position (if wall mode is on).
ENTER
Press
SAVE
twice
to open this menu
directly.
Содержание WN-5040-720
Страница 1: ...WN 5040 720 User Guide...
Страница 2: ......
Страница 3: ...i WN 5040 720 Margay 50 Display Wall Unit User Guide 020 0548 00B 29 March 2007...
Страница 6: ...iv...
Страница 7: ......
Страница 10: ...1 1 Basic Information About Margay 1 1 Accessories For Margay 2 1 2 Your Safety and Margay s Safety 4...
Страница 14: ...5...
Страница 17: ...6...
Страница 20: ...9...
Страница 24: ...13...
Страница 30: ...19...
Страница 32: ...21 Electronics module as seen from the front The electronics module door is open...
Страница 34: ...23 In Out...
Страница 36: ...25...
Страница 38: ...27 AC power in and out 1 4 5 3 2 6 No more than 4 115 VAC...
Страница 40: ...29...
Страница 51: ...40...
Страница 54: ...43...
Страница 56: ...45...
Страница 58: ...47...
Страница 66: ...55...
Страница 70: ...59...
Страница 72: ...61...
Страница 74: ...63 ENTER ENTER...
Страница 77: ...66...
Страница 80: ...69...
Страница 82: ...71...
Страница 84: ...73...
Страница 86: ...75...
Страница 88: ...77 5 Troubleshooting 5 1 Troubleshooting Tips 78 5 2 Reading the On Screen Code 80 5 3 Reading the LEDs 82...
Страница 95: ...84...
Страница 115: ...104 Diagnostics RS232 RS485 Status...
Страница 116: ...105 Diagnostics Test Patterns...
Страница 117: ...106 Diagnostics Setup Summary...
Страница 128: ...117 Starts scanning the input con nectors for the next available source...
Страница 131: ...120 7 3 Drawings All dimensions are in inches...
Страница 132: ...121...
Страница 133: ...122...
Страница 134: ...123...
Страница 140: ...129...
Страница 144: ...133...
Страница 151: ...140 A B C D E F G H I J K L M N O P Q R S T U W V X Y Z A B C D E F G H I J K L M N O P Q R S T U W V X Y Z...